

You don’t need a steam wand to make a decent latte at home.
With a jar, a French press, or a whisk you can get warm, frothy milk that mixes cleanly with espresso.
This guide shows three quick methods, how to heat milk safely to 60–65°C, and simple fixes when foam goes flat or big bubbles appear.
No fancy gear, just repeatable steps and the checks that prove each change helped.
Read on and you’ll be steaming milk confidently with tools already in your kitchen.
Quick At‑Home Methods for Frothing Milk Without a Wand
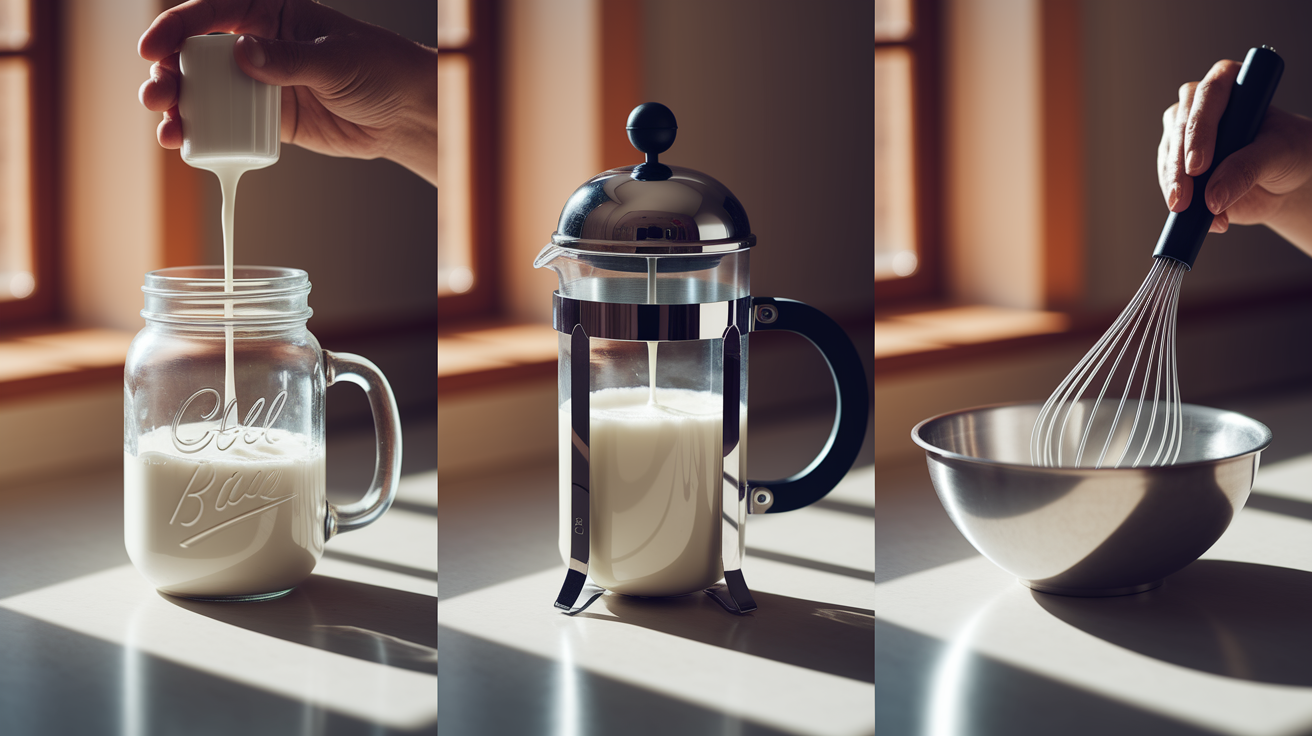
You can froth milk to a texture that works in a home latte using stuff already in your kitchen and milk warmed to 60–65°C. You won’t get the high-pressure microfoam a steam wand delivers, but you will get something drinkable and repeatable.
Jar + Microwave – Fill a jar about halfway with cold milk, seal it, shake hard for 30–60 seconds, then microwave it uncovered for 30–45 seconds. The heat stabilizes the foam.
French Press – Warm your milk first (don’t let it boil), pour it into a clean French press, and pump the plunger fast until you see foam.
Hand Whisk or Electric Mixer – Heat the milk, then whisk just under the surface in circles until it froths. Lift and lower the whisk to pull in air and break up the bigger bubbles.
Heating Milk Safely and Effectively
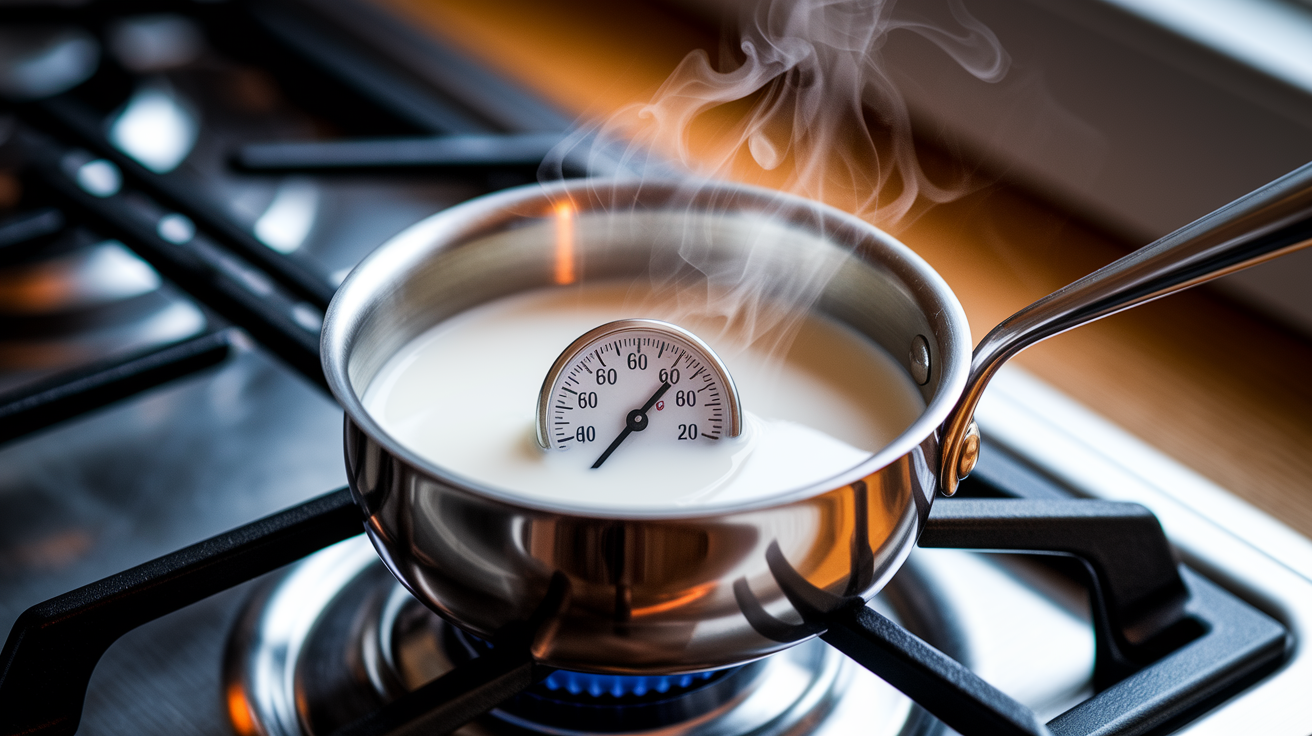
You’re aiming for 60–65°C. At that temperature, milk tastes sweet, blends cleanly with espresso, and holds foam long enough to pour. Go hotter and you’ll scald it, which kills the natural sugars and breaks down the proteins that keep foam stable. You’ll end up with flat, burnt-tasting liquid.
Stovetop works fine. Use a small pot, medium heat, and stir every few seconds. Microwave works too. Heat in 15-second bursts in a heatproof cup and stir between each one. Either way, pull it off heat before it boils or grows a thick skin on top. Pour a little more than you need because some will evaporate or stick to the container.
Small bubbles at the edges mean you’re close. The container should feel too hot to hold for more than a second, but not burning. Always use something heatproof that can handle direct heat or microwave energy without cracking.
Jar-Shaking Techniques for Frothing Milk
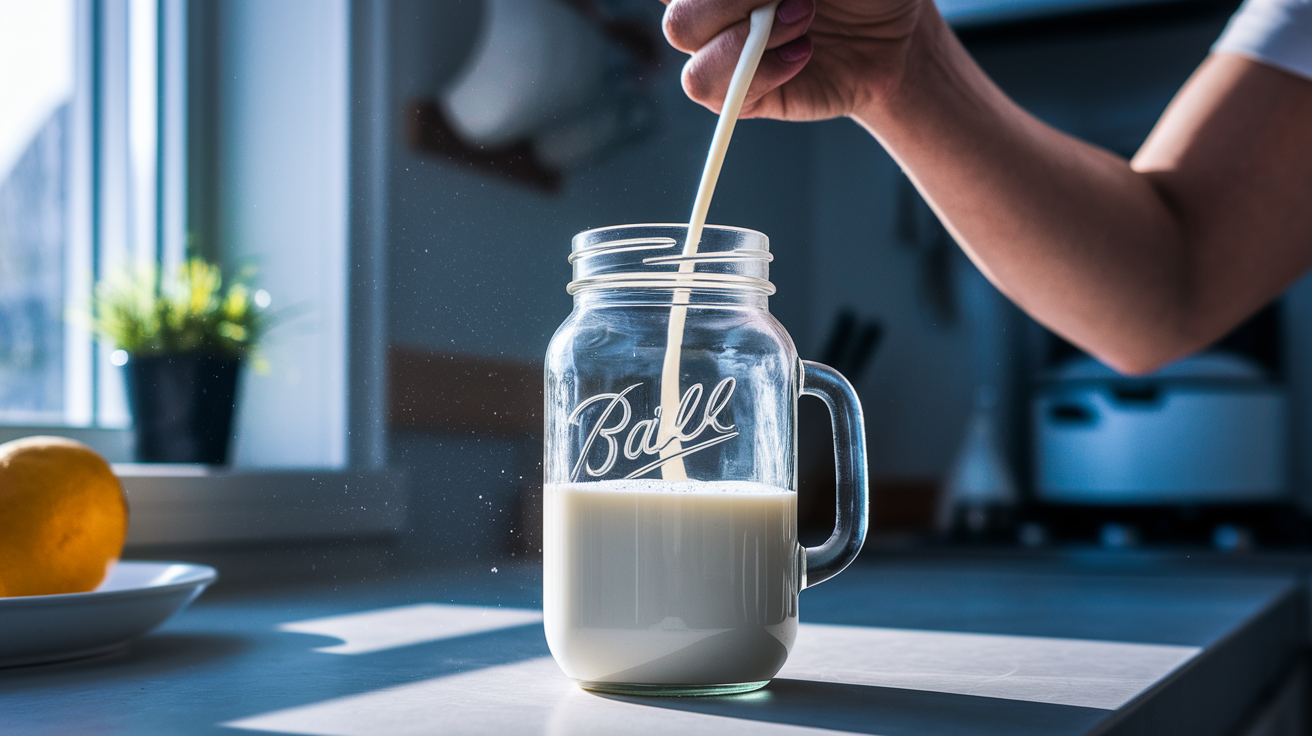
Grab a mason jar with a screw lid or an insulated bottle with a tight seal. Fill it no more than halfway so the milk has room to expand. Pour in cold milk straight from the fridge, seal the lid tight, and shake hard in sharp up-and-down motions for 30–60 seconds. The milk will turn cloudy and double in volume.
After shaking, take the lid off and microwave the jar for 30–45 seconds. Heat firms up the foam so it doesn’t collapse right away and warms the milk to drinking temperature. The foam you get is airy and bubbly, not silky. It’s fine for a home latte or cappuccino but won’t give you the tight microfoam a steam wand does. Let the foam settle a few seconds before pouring so the biggest bubbles pop and what’s left tightens up slightly.
| Method | Result | Notes |
|---|---|---|
| Shake cold milk in sealed jar | Large, airy bubbles, high volume | Fast and requires zero extra tools; works off-grid or camping |
| Shake then microwave | Stabilized foam, warm milk | Heating firms up bubbles and prevents immediate collapse |
| Add blender-bottle spring | Smaller, denser bubbles | Metal whisk ball or cocktail-strainer spring breaks up large air pockets during shaking |
Using a French Press to Froth Milk

Heat your milk first. Stovetop or microwave, doesn’t matter. Get it to 60–65°C, stirring occasionally so it doesn’t scorch. Don’t let it boil. Pour the warm milk into a clean French press, filling it no more than halfway so there’s room to expand. Put the lid on and start pumping the plunger up and down in a firm, steady rhythm. Pump hard for about 10–15 seconds, pulling the plunger all the way up and pressing it almost all the way down each time without bottoming out on the carafe floor.
Step-by-Step Frothing
-
Heat milk to 60–65°C on the stove or in the microwave, stirring every few seconds so a skin doesn’t form.
-
Pour warm milk into the French press carafe until it’s about one-third full.
-
Place the lid and plunger assembly on top, with the mesh screen just touching the milk surface.
-
Pump the plunger up and down rapidly and evenly, creating a churning motion that pulls air into the milk and breaks it into small bubbles.
-
Stop when you see thick foam rising to the top and the milk has nearly doubled in volume, then pour immediately into your cup.
The foam you get from a French press has smaller, more even bubbles than jar shaking and pours more smoothly. It’s closer to what you’d get at a café but still not as silky as a steam wand produces. Cleanup is the downside. Rinse the plunger and mesh screen right away or milk residue will dry and clog the fine filter.
Whisking and Handheld Frother Methods

A handheld battery frother is a tiny wand with a whisk coil on the end. Heat your milk first, then stick the frother head just below the surface and turn it on. Move the wand in slow circles, keeping it near the top to pull air in, then gradually lower it to break up the large bubbles and smooth out the texture. Run the frother for 15–30 seconds total. Go longer and you’ll over-froth, ending up with stiff, dry foam that won’t pour smoothly.
A manual whisk or electric hand mixer works the same way but takes more effort. Heat the milk, hold the whisk at an angle just under the surface, and whisk in fast, tight circles. You’re creating air pockets at the top, then working them down into the body of the milk to make smaller, denser bubbles. With an electric mixer, use the lowest speed and move the beaters up and down gently. High speed whips the milk too hard and creates big, unstable bubbles that pop before you finish pouring.
Handheld frothers and whisks give you the most control over bubble size. With practice you can get closer to café microfoam than any other at-home method. The texture won’t be identical to a steam wand, but it’s smooth enough for basic latte art if you pour carefully.
Start the frother or whisk near the surface to introduce air, then move it deeper to mix and refine the bubbles. Keep the tool tilted at a slight angle rather than straight up and down so you create a rolling motion in the milk. Stop frothing as soon as the milk looks thick and glossy. Over-frothing creates dry, separated foam that won’t blend with espresso. If you see large bubbles forming, move the whisk downward through the milk to break them into smaller ones. Use a narrow, tall container (like a small pitcher or measuring cup) so the whisk stays submerged and doesn’t spray milk everywhere.
Choosing the Best Milk for Frothing Without a Wand
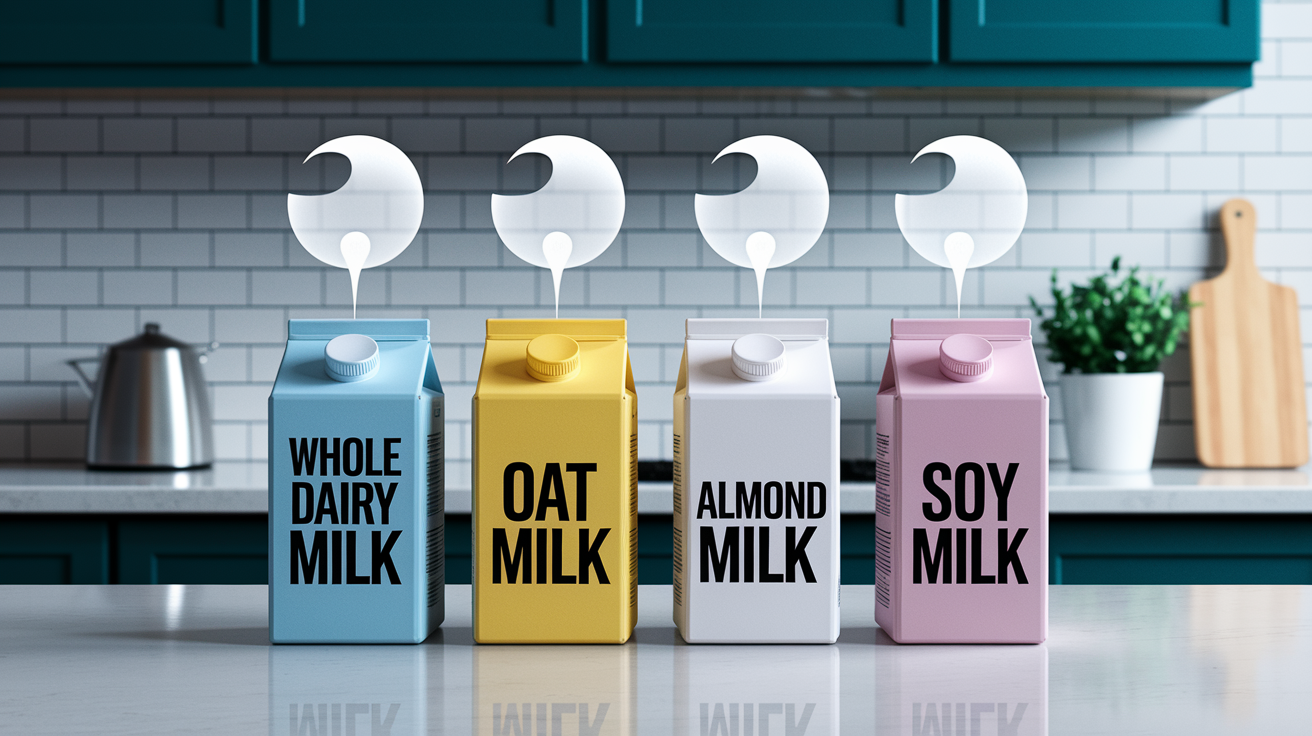
Whole dairy milk froths best because it has the right balance of fat (around 3.5%) and protein to stabilize foam and create smooth texture. The fat coats the air bubbles and keeps them from popping too quickly. The proteins form a flexible network that holds the structure together. Skim milk can froth to high volume because it has more protein and less fat, but the foam is drier and collapses faster. Two-percent milk sits in the middle. Decent foam, less richness than whole.
Cold milk straight from the fridge creates better foam than milk that’s been sitting at room temperature. The colder the milk, the longer you have to work air into it before the heat destabilizes the bubbles. Always start with chilled milk, then heat it right before frothing or froth first and heat second, depending on your method.
Whole dairy milk – best all-around choice. Creamy, stable foam with natural sweetness.
Oat milk – froths well when chilled, especially barista-blend versions with added fat and stabilizers. Produces smooth, pourable foam similar to dairy.
Almond milk – thinner foam that separates quickly. Works better in a handheld frother than in a jar or French press.
Soy milk – good protein content so it holds bubbles, but can taste slightly grainy if overheated. Barista blends perform better than standard cartons.
Texture Expectations Compared to a Steam Wand

A steam wand on an espresso machine injects high-pressure steam directly into cold milk, heating and aerating it simultaneously in a controlled vortex. The result is tight, velvety microfoam with bubbles so small they’re almost invisible, a glossy surface, and a texture that pours in smooth, even layers for latte art. None of the at-home methods in this guide can fully replicate that texture because they lack the pressure and the precise temperature control a steam wand provides.
Jar shaking gives you the largest bubbles and the least silky texture. It’s fast, it works, and it makes your drink taste good, but the foam is airy and bubbly rather than creamy. French press frothing produces smaller, more even bubbles and a noticeably smoother pour. It’s a step closer to microfoam but still not quite there. Handheld frothers and whisks come the closest. With steady technique, you can create fine, dense foam that looks and feels similar to café steamed milk, though the bubbles are still slightly larger and the texture a bit less stable.
Here’s the practical takeaway: if you want café-identical microfoam, you need a steam wand. If you want milk that’s warm, frothy, creamy, and good enough to make a satisfying latte at home, any of these methods will get you there with a little practice.
Troubleshooting Common Problems When Frothing Without a Wand

If your milk tastes burnt or smells scorched, you overheated it. Pull it off the heat as soon as small bubbles form at the edges and the container feels too hot to hold comfortably. Once milk scorches, the sweetness is gone and no amount of frothing will fix the flavor. Start over with fresh milk and lower heat.
Large, unstable bubbles that pop immediately mean you didn’t incorporate enough air into the body of the milk. With a whisk or frother, move the tool deeper after you create surface foam so the air mixes all the way through. With a jar or French press, shake or pump harder and for a few seconds longer. Let the foam settle for 5–10 seconds before pouring, and gently tap the container on the counter to pop the biggest bubbles on top.
If the milk and foam separate into two layers instead of blending, the milk wasn’t warm enough when you frothed it, or you frothed it too gently. Warm milk to at least 60°C before frothing, and use firm, rapid motions whether you’re shaking, pumping, or whisking. Swirl the container gently right before pouring to reintegrate the layers.
Overheated milk – smells burnt, tastes flat, foam won’t hold. Fix by heating to only 60–65°C and stirring frequently.
Big bubbles that pop fast – shake or pump harder, froth closer to the surface, let settle briefly before pouring.
Separated foam and milk – warm milk fully before frothing, use faster motions, swirl container before pouring.
Foam collapses in the cup – milk wasn’t cold enough at the start, or you over-frothed. Start with fridge-cold milk and stop as soon as foam thickens.
Thin, watery texture – not enough air incorporated. Increase shaking time, pumping speed, or whisk depth and duration.
Final Words
Grab a jar, French press, or handheld whisk and heat milk to 60–65°C. Start frothing: shake, plunge, or whisk.
You covered quick 30‑second methods, safe heating cues, deeper jar and French press technique, whisk and frother tips, milk choices, texture expectations versus a steam wand, and common fixes.
Pick one method, try it, and tweak only temperature or technique. You’ll get comfortable with how to steam milk without a steam wand — and it gets better fast.
FAQ
Q: Can you steam milk without a steam wand?
A: You can steam milk without a steam wand by using household tools like a jar + microwave, French press, or whisk, and heating milk to about 60–65°C (140–149°F) for best texture.
Q: What can I use if I don’t have a frother?
A: If you don’t have a frother, use a mason jar (shake 30–60 seconds, microwave 30–45 seconds), a French press (plunge rapidly), or a hand whisk/immersion blender for 15–30 seconds.
Q: How to steam milk with no equipment?
A: To steam milk with no equipment, warm milk on the stove to 60–65°C, pour into a sturdy jar, seal and shake 30–60 seconds, then microwave 30–45 seconds to stabilize foam.
Q: How to steam milk manually?
A: To steam milk manually, heat milk to 60–65°C, aerate with a whisk or handheld frother just under the surface for 15–30 seconds, then swirl to refine texture and pour.