

Think steam wand angle is just a personal quirk that doesn’t matter?
This guide gives exact tilt and tip depth targets for 1oz through 12oz so you stop guessing.
You’ll get one starting angle per volume, one tweak to try next, and clear cues to listen and watch while steaming so you can judge results by time, rise, and sound.
Follow these rules and you’ll pull smoother texture, fewer splatters, and repeatable shots.
Definitive Angle Recommendations for Steaming 1oz–12oz Milk Volumes

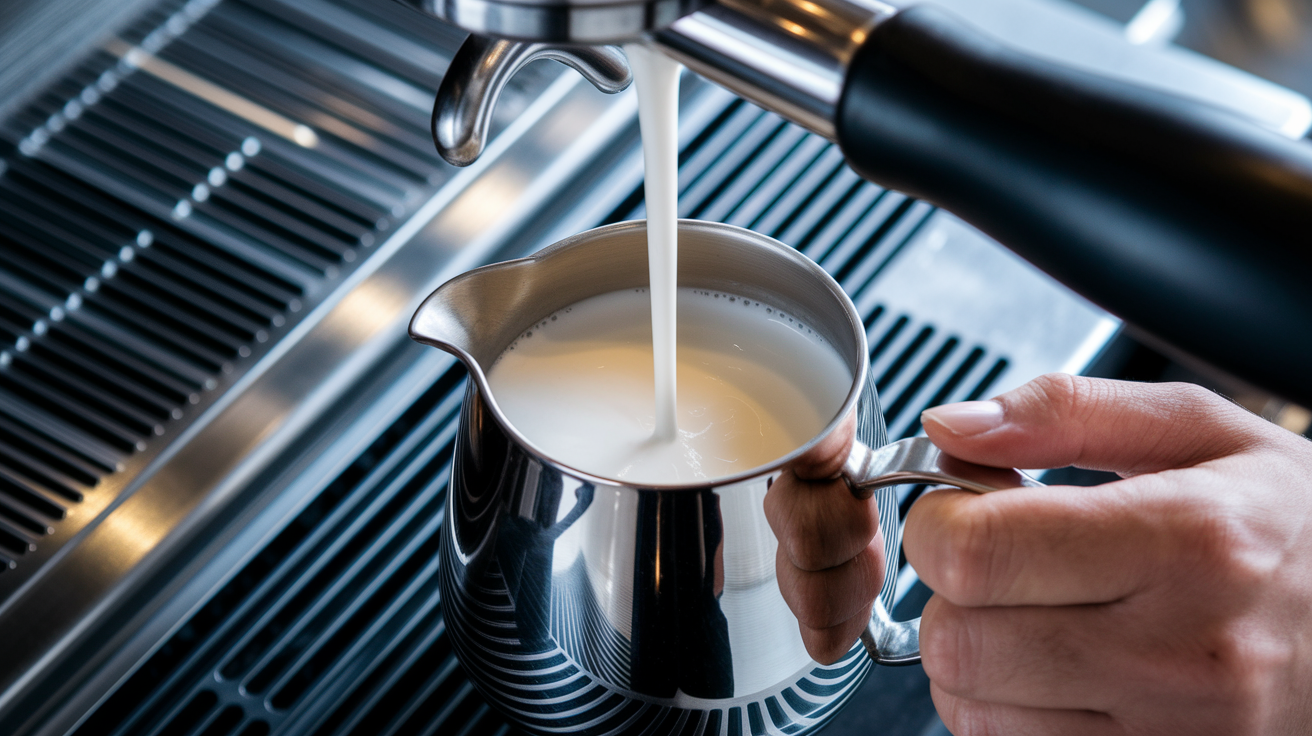
When baristas mention “steam wand angle,” they’re talking about how you tilt the pitcher and where the tip ends up inside the milk. A “slight angle” means you’re not holding the pitcher straight up. You’re tipping it somewhere between 15 and 45 degrees from vertical. That tilt moves the steam wand tip off center, closer to the pitcher wall, which gets the milk spinning in a whirlpool. The vortex you’re chasing depends on this combo: tilt, depth, and where the wand sits. Get the angle wrong and milk either splatters everywhere or just sits there heating without any texture forming.
Angle changes with milk volume because surface area, depth, and basic physics don’t scale in a straight line. In a tiny 2oz pour, the tip sits near the surface and a sharp 20 degree tilt can spin a tight vortex. With 10oz, that same angle leaves too much milk sitting dead at the bottom, so you tilt less and position deeper to move the larger mass. More milk also heats slower and stretches longer, which shifts how aggressively you angle the pitcher to keep airflow steady and avoid dead spots.
| Volume Range | Wand Tilt (°) | Tip Depth |
|---|---|---|
| 1–3 oz | 15–25° | 0.5–0.7 cm below surface |
| 4–6 oz | 20–35° | 0.7–1.0 cm below surface |
| 7–12 oz | 25–45° | 0.8–1.2 cm below surface (stretching), 2–3 cm from bottom (heating) |
Real time adjustment is what separates repeatable microfoam from guesswork. Listen for the paper tearing sound in the first few seconds. If you hear violent bubbling or see big craters forming on the surface, tilt the pitcher a few degrees steeper to pull the tip slightly deeper and calm things down. If the milk goes silent and the surface stays flat, reduce the tilt to bring the tip closer to the surface and start aerating again. You’re looking for a 20 to 30% volume increase during stretching. Once you see that rise and feel the pitcher warming past body temperature (around 100°F or 38°C), angle the pitcher back toward vertical and plunge the wand deeper to finish heating without pumping in more air.
Deeper Mechanical Theory Behind Volume-Dependent Angle Changes

Steam injected into milk creates turbulent jets that pull in air, heat the liquid, and drive circulation. In small volumes, the milk’s low thermal mass heats fast. The short distance from tip to pitcher wall means even gentle steam pressure creates strong shear forces that fold microfoam quickly. Larger volumes have more thermal inertia, so the same steam input heats more slowly. The longer flow path from wand to wall needs a wider circulation radius to stop stratification. Surface dynamics shift too. In a shallow 2oz pour, the free surface sits close to the tip, making it easy to over aerate. In a deep 10oz batch, the surface is farther away, and you need a steeper tilt or deeper initial placement to couple steam energy into the upper layer without losing control.
Five mechanical principles help you see problems before they ruin the batch:
Steam injection force versus circulation radius: Higher steam pressure or a narrower tip angle concentrates force in a smaller zone, so you tilt more steeply to spread that energy across the volume. Lower pressure or a multi hole tip disperses force, so less tilt gets you the same vortex strength.
Turbulence scaling with volume: Small batches turn turbulent right away because steam velocity is high relative to milk mass. Large batches need sustained vortex motion to break up still zones, so you hold tilt longer and adjust depth as milk expands.
Vortex shear and bubble refinement: The spinning motion from off center wand placement shears large bubbles into microfoam. If the vortex weakens (common when tilt is too shallow or the wand drifts toward center), bubbles stay coarse and float instead of integrating.
Depth-tilt tradeoff during heating: As milk heats and proteins denature, viscosity rises slightly and circulation slows. Moving the wand deeper compensates by driving flow from the bottom up, but you have to reduce tilt at the same time or the tip will push milk sideways instead of lifting it.
Density driven flow resistance: Cold milk is denser and resists circulation. As it warms and stretches, density drops and the same wand angle suddenly drives faster, more chaotic motion. Adjusting tilt in response to this shift keeps texture smooth.
Recognizing these dynamics means you can feel when circulation is about to stall, hear when aeration is about to turn into splutter, and see when foam is integrating poorly, all before the batch is wrecked. Angle becomes something you control live, not a number you memorize once.
Practical Application Examples for Small Volumes (1–3oz)

Steaming 1 to 3 ounces is precision timing and micro control. At this scale, milk barely covers the wand tip, and even half a second of excess aeration turns microfoam into stiff meringue. The vortex in a tiny volume spins fast but also wanders easily because there’s not enough mass to hold the flow pattern steady. If the tip drifts a few millimeters toward the center, circulation collapses and you’re left with a hot, flat puddle. Recovery without restarting means catching the stall right away. Rotate your wrist a few degrees to nudge the tip back toward the pitcher wall and get the spin going again.
Splutter is the most common failure mode in small pours. It happens when the wand sits too close to the surface and injects air faster than the vortex can fold it in. The fix isn’t to pull the pitcher away or turn off the steam, both of which reset your progress. Instead, tilt the pitcher one or two degrees steeper so the tip drops a fraction deeper, cutting the air intake while keeping the whirlpool alive. You’ll hear the violent bubbling settle into a smooth hiss within a second. Temperature climbs fast in small volumes, so you stop stretching early, often within three seconds, and transition right away to heating. Miss that window and the milk hits 150°F before the foam integrates, leaving you with a layer of dry froth on top of scalded liquid.
Four micro adjustments make small volume steaming repeatable:
Rotate wrist slightly counterclockwise (if right handed) when the vortex drifts center, nudging the tip back to the wall without lifting the pitcher.
Tilt pitcher an extra 2 to 3 degrees if milk starts to splutter, reducing air intake instantly.
Cut aeration at the first sign of volume expansion (even 15 to 20% is enough in small batches) to prevent over stretching.
Monitor milk rise visually in the narrow space. When foam reaches two thirds up the pitcher wall, plunge deeper and finish heating without adding air.
Technique Adaptations for Medium Volumes (4–6oz)
Medium volumes sit in a sweet spot where vortex momentum is easier to build than in small pours but still light enough to control without fighting thermal lag. The challenge shifts from preventing splutter to keeping circulation steady through the stretching to heating transition. As milk expands from 4oz to roughly 5.5oz, the free surface rises and changes the effective depth of the wand tip even if you don’t move the pitcher. This rise can weaken the vortex if your initial tilt was borderline, so a lot of baristas start with a slightly steeper angle (25 to 30 degrees) and ease back toward vertical as the milk climbs.
Pitcher geometry matters more at this scale. A narrow, tall 12oz pitcher filled to 5oz behaves differently than a wide, shallow 20oz pitcher at the same volume. The tall pitcher concentrates circulation into a tight column, so less tilt is needed to form a strong vortex. The wide pitcher spreads flow horizontally, needing more tilt to prevent milk from sitting still near the edges. Wall anchoring (resting the pitcher spout lightly against the steam wand shaft) helps lock tilt angle and prevents wrist fatigue, but only if you’ve dialed in the right starting position. If the anchor point forces the wand too far off center, you’ll hear erratic hissing as steam skips across the surface instead of driving a clean whirlpool.
Five cues help you fine tune medium volume technique:
Listen for a shift from airy hissing to a deeper, rolling hum as you move from stretching to heating. That hum confirms the vortex is integrating foam instead of just spinning liquid.
Adjust tilt with milk rise. Start at 30 degrees, reduce to 20 degrees as foam lifts the surface closer to the tip.
Use the pitcher spout as a tilt reference. When the spout edge aligns with a fixed point on the machine (like the drip tray corner), you know you’re holding the same angle shot to shot.
Compensate for steam pressure variability by testing vortex strength in the first two seconds. If circulation is weak, increase tilt by 5 degrees before stretching ends.
Manage the transition to deeper heating by plunging smoothly, not abruptly, so the vortex doesn’t collapse. Aim for a gradual descent over two seconds as milk passes 100°F.
| Volume | Tilt Angle (°) |
|---|---|
| 4 oz | 20–28° |
| 5 oz | 25–32° |
| 6 oz | 28–35° |
Advanced Handling for Large Volumes (7–12oz)

Large volumes introduce circulation challenges that don’t show up at smaller scales. With 10 or 12 ounces in the pitcher, the bottom third of the milk can sit nearly motionless while the top spins, creating a temperature gradient where foam integrates beautifully near the surface but the base stays cold and flat. Stopping this stratification means building a vortex strong enough to lift milk from the bottom all the way to the top in a continuous loop. That means starting with a tilt between 30 and 45 degrees, positioning the wand tip close to the pitcher wall, and holding that angle steady through the entire stretching phase. Any wobble or drift toward center weakens the upward pull and leaves dead zones.
As milk expands from 8oz to 10oz or more, the rising surface can push the steam tip out of the sweet spot unless you compensate. Some baristas lower the pitcher slightly during stretching to keep the tip engagement consistent. Others start with the wand deeper (closer to 1cm instead of 0.5cm) and accept a slightly louder initial hiss. Either approach works as long as you’re watching surface motion and adjusting in real time. The biggest risk in large batches is losing vortex structure halfway through heating. It often happens when you plunge the wand deeper but forget to ease the tilt back toward vertical. The wand ends up angled steeply while submerged, which pushes milk sideways into the wall instead of lifting it, and the whirlpool stalls. Recovery means tilting back to near vertical and giving the milk a moment to restart circulation before continuing to heat.
Six scenario based techniques keep large volume steaming consistent:
Stop dead zones by confirming that milk near the pitcher spout is moving at the same speed as milk near the handle. Uneven flow means the wand is too centered or tilt is too shallow.
Recover a stalled vortex by briefly reducing steam pressure (if your machine allows) or lifting the pitcher slightly to shallow the wand depth, then re building tilt once flow restarts.
Control expansion speed by moderating how long you hold the tip near the surface. In large batches, three seconds of stretching is often enough to hit 20% expansion without over aerating.
Moderate steam force in tall pitchers by angling slightly less steeply than you would in a short, wide pitcher of the same volume. Tall geometry amplifies circulation naturally.
Use spout geometry by positioning the wand on the side opposite the spout, so the spout acts as a visual reference for tilt consistency and the curved wall guides flow smoothly.
Make sure full microfoam integration happens by holding the heating phase until the entire batch reaches 140°F. Temperature variance between top and bottom is common in large volumes, and pulling early leaves the base under frothed.
Pitcher Size, Shape, and Steam Wand Design Effects on Angle

A 12oz pitcher filled with 6oz of milk needs a different tilt than a 20oz pitcher with the same 6oz, because the taller, narrower vessel concentrates circulation and the wider one spreads it. Pitcher curvature also changes how steam deflects off the wall. A sharply curved interior funnels flow into a tight vortex with less tilt needed, while a gently sloped wall needs more angle to prevent the steam jet from dissipating. Spout height affects where you can safely position your hand and how much visual clearance you have to check surface behavior, which indirectly shapes the angles you can hold comfortably without blocking your view or straining your wrist.
Wand tip design is just as important as pitcher shape. Single hole tips concentrate steam into a narrow, high velocity jet that needs a steeper tilt to spread force across the milk and avoid drilling a tunnel straight to the bottom. Multi hole tips (common on commercial machines) disperse steam into several smaller jets, creating turbulence more gently and letting you tilt less while still forming a strong vortex. Wand length and shaft diameter also matter. A long wand gives you more leverage to anchor the pitcher but can make small adjustments harder because tiny wrist movements translate into larger tip displacement. A short, thin wand is nimble but harder to stabilize, especially in large volumes where you need steady, sustained tilt.
Four design factors shape your angle choices:
Hole count: Single hole tips typically need 5 to 10 degrees more tilt than multi hole tips at the same volume to distribute steam energy evenly.
Wand length: Longer wands allow shallower tilts because the tip reaches farther into the pitcher. Shorter wands need steeper angles to achieve the same off center positioning.
Pitcher curvature: Sharply curved pitchers (common in 12oz and 20oz sizes) form vortices with 15 to 20 degrees of tilt. Gently curved or straight walled pitchers need 25 to 35 degrees.
Spout height and handle geometry: High spouts and wide handles limit how steeply you can tilt without your hand hitting the drip tray or machine body, capping practical tilt at around 40 to 45 degrees regardless of volume.
Sensory Cues for Verifying the Correct Wand Angle

The fastest way to know your angle is dialed in is to listen for a steady, tearing paper hiss during stretching that shifts into a low, rolling hum once you move deeper. Violent bubbling or a loud, percussive splutter means the tip is too shallow or the angle is forcing too much air in at once. Silence, or a faint whistle with no surface motion, means the wand is buried too deep or angled so steeply that steam is jetting straight down instead of across the milk.
Watch the milk surface. A correct angle produces a smooth, dimpled whirlpool that spins clockwise (in most right handed setups) without large craters or erupting foam. If you see a single large bubble forming and collapsing repeatedly in the same spot, the vortex is weak and your tilt needs adjustment. The surface should stay mostly level, rising gradually and evenly as foam integrates, not heaving up and down. Bubble behavior is another checkpoint. Microfoam should look like wet paint with no visible individual bubbles larger than a pinhead. Large bubbles clustered at the top mean you stretched too long or held the tip too shallow. Flat, shiny milk with no body means you never aerated properly, likely because the wand was angled too steeply from the start. Vortex strength is easy to gauge by watching how fast milk completes one full rotation. In a 6oz batch, a healthy vortex spins the entire volume once every two to three seconds. Slower than that and your angle isn’t driving enough circulation. Temperature feel is a backup cue. The pitcher bottom should warm steadily and evenly in your palm, not stay cold in one spot while the sides heat up, which signals poor mixing and an angle problem.
Five sensory indicators confirm your angle in real time:
Sound: Paper tearing hiss equals correct stretching. Rolling hum equals correct heating. Violent bubbling equals too shallow. Silence equals too deep. High pitched whistle equals wand touching pitcher wall.
Surface motion: Smooth, spinning dimple equals good vortex. Flat, still surface equals wand too deep or vertical. Erupting craters equals wand too shallow or tilted excessively.
Bubble size: Microfoam (no visible bubbles) equals correct technique. Scattered large bubbles equals over aeration. Thick dry foam on top equals held stretching too long at wrong angle.
Vortex speed: Full rotation every 2 to 3 seconds equals strong circulation. Slow or stalled spin equals insufficient tilt or wand drifted center.
Temperature distribution: Even warming across pitcher bottom equals good mixing. Cold spot equals dead zone, adjust tilt or depth.
Troubleshooting Angle Problems Across All Volumes

Over aeration happens when the wand sits too close to the surface or the pitcher is tilted so steeply that air floods in faster than the vortex can integrate it. The fix is to reduce tilt by 5 to 10 degrees or plunge the wand a few millimeters deeper, both of which cut air intake right away. If you’ve already over aerated and see a pile of stiff foam on top, you can sometimes rescue the batch by holding a strong vortex during heating to shear the large bubbles down, but it rarely produces latte art quality microfoam. Better to catch it early by listening for the shift from smooth hissing to chaotic spluttering and adjusting before foam sets.
Under aeration is the opposite problem. Milk heats to 140°F with little or no foam because the wand was angled too steeply or positioned too deep from the start, preventing any air from reaching the surface. If you notice flat milk and you’re still below 100°F, you can raise the pitcher or reduce tilt to bring the tip closer to the surface and stretch for another two to three seconds, but timing is tight. Past 120°F, the window for stretching closes and adding air just creates large, unstable bubbles that won’t integrate. Losing the vortex mid stream is common when baristas plunge the wand deeper for heating but don’t ease the tilt back toward vertical at the same time. The angled wand pushes milk sideways, circulation stops, and you’re left heating a still bath that stratifies. The moment you notice the swirling slow or stop, tilt back toward vertical and give the milk a second to restart flow before continuing.
Inconsistent tilt from shot to shot is often an ergonomic issue. If you’re holding the pitcher in mid air without anchoring any part of your hand or the pitcher against the machine, wrist fatigue and micro movements will change your angle by 5 to 10 degrees between drinks, which is enough to produce noticeably different foam. Resting the pitcher spout lightly against the steam wand shaft or bracing your pinky against the drip tray creates a reference point that locks tilt angle and makes the technique repeatable. Heating errors, where milk goes past 150°F and starts to taste scorched, usually trace back to leaving the wand too deep for too long. Once you’ve finished stretching and moved into heating, the wand should sit about 2 to 3cm from the pitcher bottom, angled nearly vertical to maintain circulation without adding air. If it’s angled steeply and buried, steam heats the bottom layer too fast and you lose temperature control.
Quick-Reference Angle Chart and Practical Workflow Tips

Dialing in a repeatable steaming routine means following the same steps every time and adjusting only one variable when something goes wrong. Start by purging the wand for one to two seconds to clear condensation. Fill the pitcher using the volume cues: two fingers of milk for 1 to 3oz, one finger below the spout for 4 to 6oz, same level for 7 to 12oz. Set your tilt angle based on volume, insert the wand to the target depth, anchor the pitcher against the steam wand or your hand against the machine, and turn steam fully on. Listen and watch for the first three to five seconds while stretching, stop adding air when the milk rises 20 to 30% and reaches body temperature (around 100°F), then ease the pitcher back toward vertical and plunge deeper to finish heating to 140 to 150°F. Turn steam off before removing the pitcher, wipe the wand, and purge again.
| Volume (oz) | Tilt Angle (°) | Depth Cue |
|---|---|---|
| 1–3 | 15–25 | 0.5–0.7 cm below surface; tip near wall |
| 4–6 | 20–35 | 0.7–1.0 cm below surface; off-center placement |
| 7–9 | 25–40 | 0.8–1.0 cm stretching; 2–3 cm from bottom heating |
| 10–12 | 30–45 | 1.0–1.2 cm stretching; 2–3 cm from bottom heating |
| Universal cues | Adjust by sound and surface motion | Stop stretching at ~100°F; finish at 140–150°F |
Training angle accuracy is about isolating one variable and drilling it until muscle memory takes over. Spend a session steaming the same 5oz volume ten times in a row, changing only your tilt angle by five degree increments and noting how sound, surface behavior, and final texture shift. Then hold angle constant and vary tip depth. Then hold both and vary milk type. Each focused drill builds the tactile and auditory recognition you need to self correct in real time without thinking.
Key Things to Keep in Mind When Adjusting Steam Wand Angle

First, wand angle directly affects microfoam density and the perceived sweetness of the final drink. A well angled vortex integrates air smoothly and denatures milk proteins gently, which releases natural sugars and produces a creamy, sweet taste even in non fat milk. Poor angle yields under aerated or over aerated foam that tastes thin or chalky.
Second, wrist anchoring isn’t optional if you want shot to shot consistency. Bracing any part of your hand, the pitcher, or your forearm against a stable point on the machine gets rid of the small wobbles and drifts that change your angle by 10 degrees without you noticing.
Third, depth and angle aren’t independent. If you increase tilt, you effectively make the tip shallower relative to the milk surface. If you decrease tilt, the tip goes deeper. Adjusting one always changes the other, so think in terms of the combined position, not two separate settings.
Fourth, temperature control depends as much on angle as it does on timing. A steep angle during heating drives circulation and slows the rate of temperature climb in the bottom of the pitcher, giving you a wider margin before hitting 150°F. A vertical wand heats the base fast and can push milk past safe temperatures before the top layer is even warm.
Fifth, microfoam quality peaks in a narrow angle range for each volume. Going five degrees too shallow or too steep is often the difference between silky microfoam and something that pours badly or tastes off, which is why sensory feedback and real time adjustment matter more than memorizing a single number.
Final Words
Start steaming with a slight tilt, off‑center, and the tip 0.5–1 cm under the surface to build a steady vortex. The post laid out why angle changes with milk volume and gave exact tilt ranges for 1–3oz, 4–6oz, and 7–12oz.
You also got the mechanical why, real‑world fixes, sensory cues (paper‑tearing, quiet whirlpool), and quick charts to use at the machine. Practice the simple routine: stretch 3–5 seconds, transition near 100°F, finish 140–150°F.
Use the recommended steam wand angle by milk volume 1oz-12oz as your baseline, then tweak by sound, swirl, and milk rise. Change one thing at a time and you’ll get repeatable, sweeter microfoam—soon it’ll feel second nature.
FAQ
Q: How much milk to steam for a 12oz latte?
A: The amount of milk to steam for a 12oz latte is about 10 fluid ounces (≈300 ml). Steam cold milk; it will expand 20–30% during stretching and finish near the cup volume with two shots of espresso.
Q: What angle for steaming milk?
A: The angle for steaming milk is typically 15–45°. Use 15–25° for 1–3 oz, 20–35° for 4–6 oz, and 25–45° for 7–12 oz, keeping the wand slightly off‑center to form a vortex.
Q: What are some common steamed milk mistakes?
A: Common steamed milk mistakes are using a too‑shallow tip that makes big bubbles, plunging the tip too deep so no microfoam forms, overheating over 160°F, skipping wand purges, and inconsistent tilt or timing.
Q: What temperature should 4 ounces of milk be frothed to?
A: The temperature for 4 ounces of milk frothed to is 140–150°F (60–65°C) final. Start stretching until about 100°F (38°C), then heat to the final range—avoid exceeding 160°F to prevent scalding.