

What if the angle of your steam wand matters more than pressure or time?
A small tilt, 15-20° off vertical, creates sideways steam that hugs the pitcher wall and makes a steady whirlpool.
That whirlpool folds tiny bubbles into the milk, giving glossy, silky microfoam and fewer big, foamy pockets.
This post shows why angle beats random fiddling, how to set the wand for different pitcher sizes, and the one tweak most people skip.
First check your wand: tilt it 15-20° off-center and listen for a gentle paper-tearing sound.
Practical Guide to Wand Angle, Placement, and Whirlpool Formation
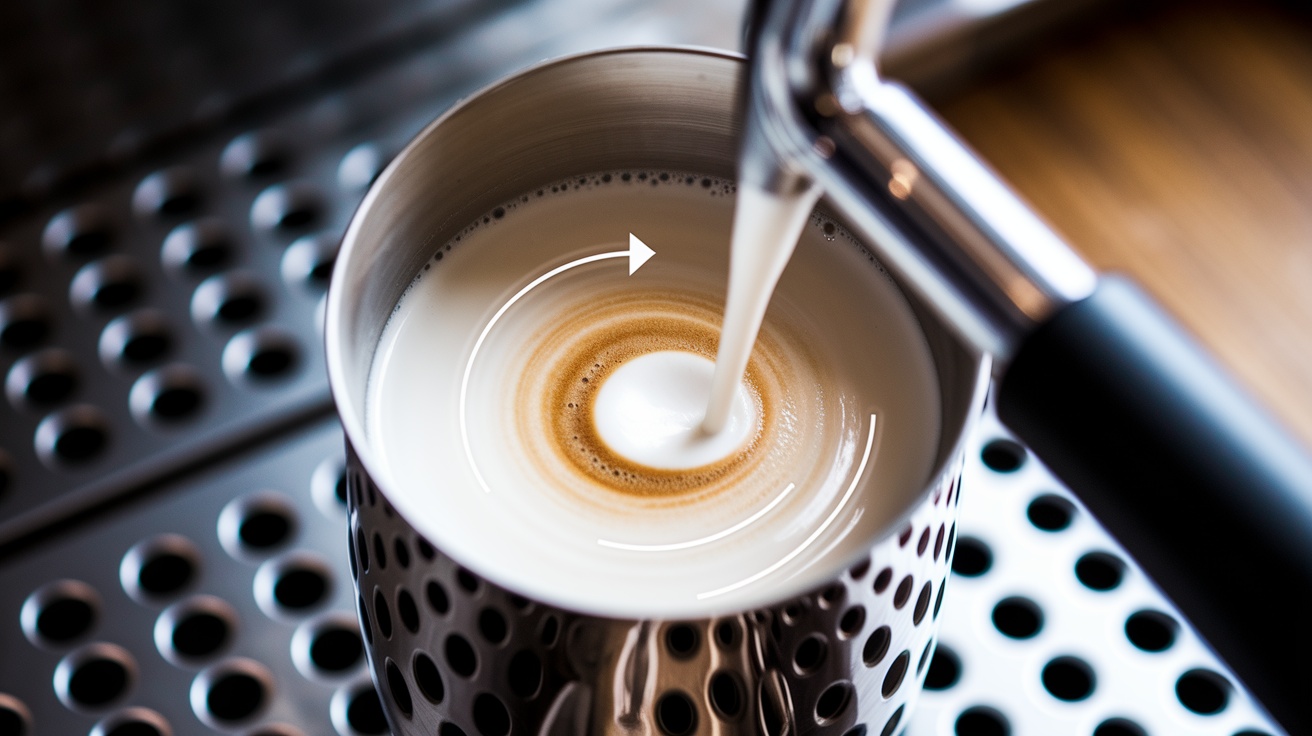
Hold the steam wand at a slight tilt, somewhere around 15–20° off vertical, and position the tip just below the milk surface and off-center. You’re looking for roughly 5–15 mm from the pitcher wall. This angled, off-center placement sends steam flow tangentially along the wall, creating rotational velocity that spins the milk into a stable vortex. The whirlpool forms because steam pushes milk sideways instead of straight down, building centripetal acceleration that keeps the swirl going. That rolling motion folds tiny air bubbles into the liquid, breaking them down into microfoam. Center the wand or point it straight down and you’ll heat the milk but skip the vortex entirely.
Start with the tip 0.5–1 cm below the surface during the first 3–5 seconds of stretching. You should hear a gentle paper-tearing sound as air gets pulled in. Once the milk’s grown by about 20–30% in volume, lower the wand to roughly halfway down the pitcher and keep it angled at 15–20°. The vortex should continue rolling smoothly, blending foam and heating the milk toward 140–150°F. If the whirlpool slows or stops, nudge the wand closer to the wall or check that the tip’s still angled and off-center.
| Condition | What Happens |
|---|---|
| Angle Too Shallow (wand nearly horizontal) | Splashing, violent rotation, milk ejects from surface; unstable vortex. |
| Optimal Angle (15–20°) | Steady vortex, gentle paper-tearing during stretch, smooth roll during texturing; glossy microfoam. |
| Angle Too Steep (wand nearly vertical or centered) | No whirlpool, milk heats but doesn’t rotate; flat or frothy foam with large bubbles. |
Common causes and effects by angle:
Angle too shallow: steam hits the surface at a glancing angle, causing spatter and excessive surface agitation that entrains large bubbles instead of fine microfoam.
Optimal 15–20° angle: steam exits tangentially, generating rotational flow that sustains a vortex and folds microfoam evenly throughout the milk.
Angle too steep: steam drives straight down, heating milk quickly but producing no sideways momentum, so the vortex never forms and bubbles stay large or separate.
Centered placement: even at 15–20°, a centered wand cancels rotational flow because steam spreads evenly in all directions instead of pushing the milk around the wall.
Advanced Flow Physics: Diagnosing Stability, Pitcher Dynamics, and Flow-State Signals

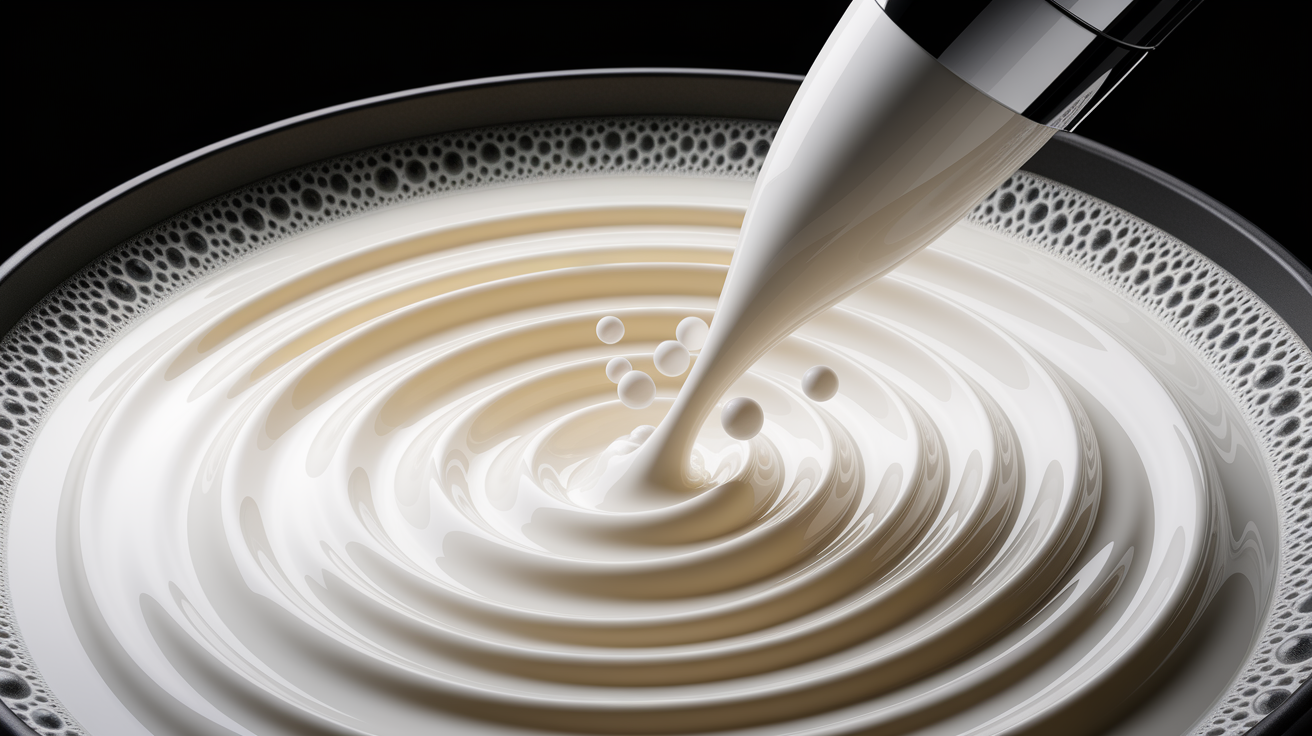
Watch the milk surface for visual cues. A stable vortex shows a smooth, shallow depression in the center with milk rotating steadily around the wall. That’s laminar flow, where layers of milk slide past each other in orderly paths. If you see choppy waves, random splashing, or hear loud chaotic hissing, the flow’s turned turbulent. Turbulent flow happens when the wand angle’s too shallow or steam pressure’s too high, creating chaotic eddies that break the vortex and trap large air pockets. Laminar flow keeps bubbles small and evenly distributed. Turbulent flow scatters them unevenly and makes microfoam impossible.
Pitcher radius directly affects vortex stability because centripetal acceleration scales as a = v²/r. A smaller radius means you need less tangential speed to maintain the same centripetal force, so small pitchers (350 ml) form a vortex more easily with gentle wand positioning. Larger pitchers (600–1000 ml) have a bigger radius, so you need stronger tangential velocity to keep the milk rotating. If the vortex in a large pitcher feels sluggish, increase the wand angle slightly within the 15–20° range or move the tip a few millimeters closer to the wall to boost rotational speed. Too much speed in a small pitcher will send milk climbing the walls or splattering out.
Flow stability breaks down when steam pressure, wand angle, or tip depth crosses a threshold where rotational energy can’t overcome friction and turbulence. Listen for the sound signature. Steady low hiss means laminar vortex. Loud screech or gurgling means turbulent breakdown. If the vortex suddenly collapses mid-steam, check that the wand hasn’t drifted toward the center or that you haven’t raised the pitcher too high, exposing the tip and disrupting the tangential flow.
| Flow Parameter | Effect on Vortex |
|---|---|
| Tangential Velocity | Higher velocity increases rotation speed; too high causes splashing and turbulence. |
| Centripetal Acceleration (a = v²/r) | Keeps milk rotating inward; smaller r needs less v for same stability. |
| Flow Stability | Laminar = smooth vortex, small bubbles; turbulent = chaos, large bubbles, uneven heating. |
Laminar vs turbulent flow in steaming:
Laminar: milk rotates in parallel layers, vortex is smooth, bubbles stay micro-sized, audible hiss is steady and quiet.
Turbulent: random eddies and chaotic mixing, vortex breaks apart, large bubbles form, loud screeching or sputtering noise.
Speed threshold: increasing tangential velocity boosts vortex strength until flow turns turbulent. Stay within 0.5–2 rotations per second for stability.
Depth influence: tip too shallow encourages turbulence at the surface; tip too deep dampens rotation and can shift flow to turbulent mixing without a vortex.
Pressure interaction: high steam pressure can push flow turbulent even at correct angle; lower pressure favors laminar vortex but requires longer texturing time.
Aeration vs Texturing: How Angle Controls Air Incorporation
Aeration, or stretching, happens when the wand tip sits 1–2 mm below the milk surface and the 15–20° angle directs steam flow to pull air down into the liquid. You’ll hear a gentle paper-tearing sound as tiny bubbles get incorporated. This phase lasts 3–5 seconds for most single-drink volumes and should increase milk volume by about 20–30%. The wand angle matters here because too shallow creates a violent surface churn that grabs huge air pockets, while too steep pushes the tip below the air-drawing zone and skips aeration entirely.
Texturing begins when you lower the wand to 5–15 mm below the surface and maintain the same 15–20° angle. Now the vortex does the work. Rotational flow cycles milk through high-shear zones near the steam jet, breaking large bubbles into microfoam and folding them evenly throughout the pitcher. The angle keeps the vortex stable, so every layer of milk passes through the shear zone multiple times. If the angle drifts too steep or the wand centers, the vortex weakens, milk stops circulating, and bubbles stay large or separate into froth on top.
Over-aeration signs include a loud screech during stretching, rapid volume growth beyond 30%, and big bubbles surfacing after you finish. Under-aeration looks like flat, barely-expanded milk with no shine and thin body. Both problems trace back to incorrect wand angle or depth during the 3–5 second stretch window. Hold the angle steady, listen for that paper-tearing sound, and watch the surface. You want gentle ripples, not violent splashing or dead calm.
| Depth & Angle | Aeration Outcome |
|---|---|
| Shallow (0–1 mm) + steep angle | Little to no air incorporation; quiet, minimal volume growth; under-aerated milk. |
| Optimal (1–2 mm) + 15–20° angle | Gentle paper-tearing sound; 20–30% volume increase in 3–5 s; fine microfoam. |
| Too shallow (tip exposed) + shallow angle | Loud screech, excessive air, large bubbles, rapid volume spike; over-aerated. |
| Too deep (3+ mm) + any angle | No surface agitation, no air drawn in, only heating; flat milk, no foam. |
Angle-related aeration mistakes:
Wand too horizontal during stretch: creates splashing and grabs fist-sized air pockets instead of microbubbles.
Wand too vertical during stretch: tip sinks below the air-drawing zone, producing no aeration even if surface positioning is correct.
Centered wand during stretch: no tangential flow to pull air downward, so bubbles stay on the surface and don’t integrate.
Moving wand angle mid-stretch: inconsistent air incorporation, leading to uneven bubble distribution and patchy foam.
Stretching too long at correct angle: extends air intake beyond 5 seconds, over-expanding volume and creating dry, frothy foam.
Skipping angle check before texturing: if you lower the wand without confirming the 15–20° tilt, the vortex may collapse and leave bubbles un-mixed.
Steam Wand Angle Variations for Different Pitcher Sizes and Milk Volumes
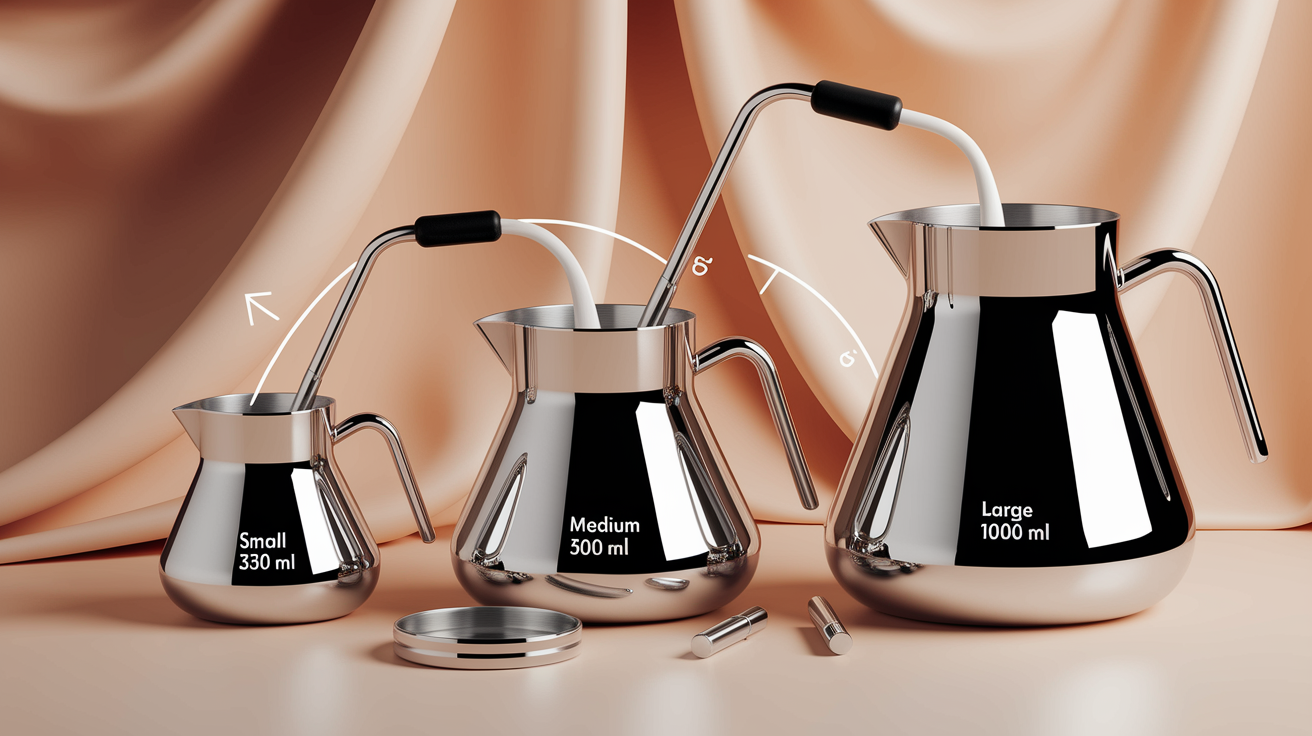
Smaller pitchers (350 ml) filled to about one-third (120–150 ml milk) need gentler positioning because the smaller radius forms a vortex more easily. Keep the wand at 15° and the tip 5–8 mm from the wall during texturing. Aerate for 3 seconds, then lower to half-depth and maintain the angle until the milk hits 140–150°F. Total steaming time will be around 12–18 seconds. Use the same aggressive angle you’d use in a large pitcher and the vortex will spin too fast, sending milk up the walls or splattering.
Larger pitchers (600–1000 ml) filled with 350–800 ml of milk need stronger rotational momentum, so you can safely push toward the higher end of the 15–20° range and position the tip 10–15 mm from the wall. The bigger radius means centripetal acceleration is lower for the same tangential speed, so you need more speed to keep the vortex rolling. Aerate for 4–5 seconds, then texture for 20–35 seconds. Watch for the vortex to form a visible depression in the center. If it’s weak or flat, angle the wand slightly more toward the wall.
| Pitcher Size | Milk Volume | Wand Angle | Tip Depth (Texturing) | Aeration Time | Total Time |
|---|---|---|---|---|---|
| 350 ml (12 oz) | 120–200 ml | 15° | 5–8 mm | 3 s | 12–18 s |
| 500 ml (17 oz) | 200–350 ml | 15–18° | 8–12 mm | 3–4 s | 15–25 s |
| 600–1000 ml (20–32 oz) | 350–800 ml | 18–20° | 10–15 mm | 4–5 s | 20–35 s |
Adapting wand angle to pitcher size:
Match angle to radius: smaller pitchers need gentler 15° angles; larger pitchers tolerate 18–20° to generate enough tangential velocity.
Adjust tip-to-wall distance: keep 5–15 mm gap; too close risks sticking the wand to the wall, too far reduces vortex strength.
Scale aeration time: small volumes reach 20–30% expansion in 3 seconds; large volumes may need 5 seconds at the same angle.
Monitor rotation speed: aim for 0.5–2 full rotations per second; faster in small pitchers, steadier and slower in large pitchers.
Fill pitcher to one-third: leaves room for expansion and makes sure the initial tip depth of 0.5–1 cm sits correctly below the surface regardless of pitcher size.
Steam Wand Angle Adjustments for Whole, Skim, and Plant Milks
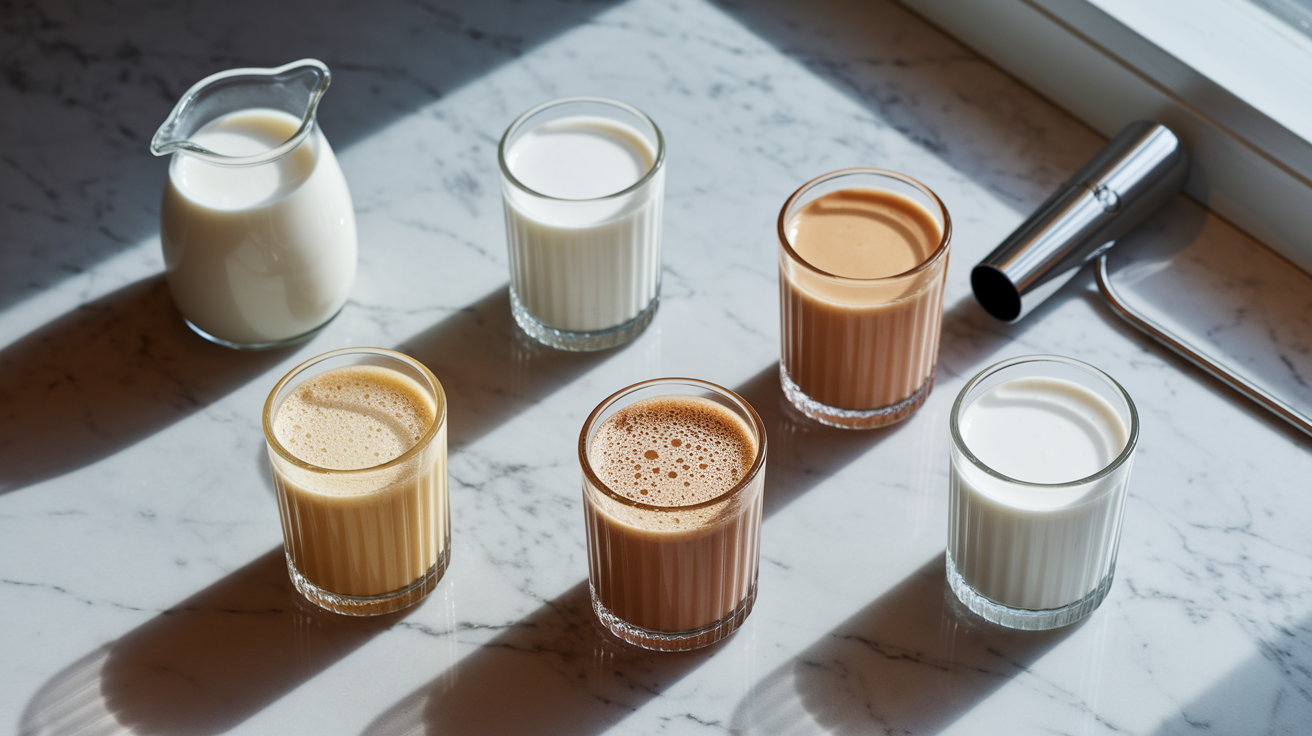
Whole milk responds predictably to the standard 15–20° angle because its fat and protein content stabilize bubbles and emulsify easily. The vortex forms quickly, microfoam integrates smoothly, and you can finish in the typical 15–25 second window. Skim milk has less fat, so bubbles are larger and less stable. Keep the same 15–20° angle but shorten aeration to 2–3 seconds and rely on a strong, sustained vortex to break bubbles down through shear. The finished texture will be lighter and less creamy, but the angle and vortex technique stay the same.
Plant milks vary more. Oat milk usually foams well because of added stabilizers and moderate protein. Use the standard 15–20° angle but extend stretching by 1–2 seconds to build enough volume, then texture with a steady vortex. Soy milk can be temperamental. Hold the angle precisely at 15° and avoid aggressive aeration, because soy proteins coagulate if overheated or over-sheared. Almond milk has low protein and fat, so it needs a more assertive 18–20° angle and slightly longer aeration (4–5 seconds), but keep the vortex gentle during texturing or the foam will collapse. Coconut and other low-protein plant milks often require barista-formulated versions and similar aggressive stretching with careful angle control.
Angle adjustments by milk type:
Whole milk: standard 15–20° angle, 3–5 second stretch, strong stable vortex, finish at 140–150°F.
Skim milk: same 15–20° angle, shorter 2–3 second stretch, longer texturing to break larger bubbles through vortex shear.
Oat milk: 15–20° angle, extend stretch to 4–5 seconds, maintain steady vortex to integrate stabilizers evenly.
Almond milk: push toward 18–20° angle, longer 4–5 second stretch, gentle vortex during texturing to prevent collapse.
Troubleshooting Wand Angle Problems: Fixing Bubbles, Sputtering, and Weak Whirlpools
Large bubbles surfacing after steaming usually mean the wand was too shallow or too horizontal during aeration, pulling in fist-sized air pockets instead of microbubbles. Fix it by lowering the pitcher slightly so the tip sits 1–2 mm below the surface, not at or above it, and reduce the angle if it’s past 20°. During texturing, confirm the vortex is rolling steadily. If not, move the wand tip 5–10 mm closer to the pitcher wall and check that the angle’s still 15–20°. A strong vortex will break down existing large bubbles through shear and folding.
Loud sputtering or screaming during stretching signals that the tip’s exposed or the angle’s too shallow, causing violent surface agitation. Raise the pitcher a few millimeters or tilt the wand slightly more vertical to bring the angle back into the 15–20° range. If the whirlpool’s weak or non-existent, the wand’s likely centered or angled too steeply. Shift the tip off-center by 5–15 mm from the pitcher wall and tilt it so steam exits tangentially along the wall, not straight down the middle.
Flat, under-textured milk with no shine happens when the wand stays centered or vertical, skipping the vortex entirely. Reposition the wand off-center and confirm the 15–20° angle before starting the next pitcher. If milk overheats past 160°F but still looks flat, you’re heating without texturing. Lower the target temperature to 140–150°F and focus on sustaining the vortex during the texturing phase instead of blasting steam at full power.
| Symptom | Cause | Adjustment |
|---|---|---|
| Large bubbles on surface | Wand too shallow or angle too horizontal during stretch | Lower pitcher so tip is 1–2 mm below surface; reduce angle to 15–18° |
| Loud screech or sputtering | Tip exposed or angle under 10° | Raise pitcher slightly; tilt wand to 15–20° |
| No whirlpool, flat milk | Wand centered or angled too vertically | Move tip off-center 5–15 mm from wall; confirm 15–20° tilt |
Corrective checklist for angle problems:
Check tip depth: should be 1–2 mm below surface during stretch, 5–15 mm during texturing.
Confirm off-center placement: tip should sit 5–15 mm from pitcher wall, not in the middle.
Verify 15–20° tilt: use a mental or visual reference; wand should not be vertical or near-horizontal.
Listen for paper-tearing sound: gentle hiss during stretch; loud screech means too shallow, silence means too deep.
Watch for vortex formation: milk should start rotating within 2–3 seconds; if not, adjust angle or move tip toward wall.
Adjust one variable at a time: change depth, then angle, then tip placement. Don’t tweak everything at once or you won’t know what fixed it.
Advanced Angle Techniques for Consistent Microfoam
Experienced baristas control wand angle with wrist micro-adjustments instead of moving the whole arm. Rest the pitcher handle in your palm and use your wrist to tilt the pitcher slightly forward or back, which changes the effective wand angle by a degree or two. This lets you fine-tune the vortex speed mid-steam without moving the wand tip away from its off-center sweet spot. Two-handed steaming, one hand on the pitcher handle and the other stabilizing the wand, gives even tighter control, especially useful during the transition from stretching to texturing when you need to lower the pitcher smoothly without losing the angle.
Some baristas experiment with angle extremes to understand the physics. A 15° tilt produces a moderate, stable vortex with predictable microfoam. Pushing to 30° increases tangential velocity and speeds up the whirlpool, which can help in large pitchers or with low steam pressure, but also raises the risk of splashing and turbulence. At 45°, the wand’s nearly horizontal. The vortex becomes violent, milk climbs the walls, and control is difficult. A 60° angle or steeper is impractical. Steam exits almost sideways, causing chaotic surface eruptions and zero useful microfoam. Most workflows stay between 15° and 20° because that range balances vortex strength with stability and repeatability.
| Angle Experiment | Vortex Speed | Stability | Practical Use |
|---|---|---|---|
| 15° | Moderate | High; smooth, predictable vortex | Standard for most pitchers and volumes |
| 30° | Fast | Medium; increased splashing risk | Large pitchers or low steam pressure; requires careful control |
| 45° | Very fast | Low; milk climbs walls, turbulent | Impractical for microfoam; useful only for understanding limits |
| 60° or more | Chaotic | Very low; violent surface eruption | Avoid; no usable microfoam |
Advanced angle techniques:
Wrist-controlled angle: small wrist tilts adjust wand angle by 1–3° without moving the tip; useful for mid-steam corrections.
Pitcher tilt compensation: tilting the pitcher changes milk surface angle relative to the wand; practice holding pitcher level for consistent effective angle.
Two-handed steaming: stabilize wand with non-dominant hand to prevent angle drift during pitcher lowering or raising.
Pre-steam angle check: position wand and pitcher, then visually confirm 15–20° tilt before opening steam valve.
Rotation-speed feedback: if vortex is too slow, increase angle by 2–3°; if too fast or splashing, reduce angle.
Transition smoothness: maintain angle constant while lowering pitcher from stretch to texture depth; avoid sudden wand movements.
Pressure adaptation: on machines with variable steam pressure, reduce angle slightly on high-pressure days to prevent turbulence.
Visual reference training: place a protractor or angle guide next to the machine during practice to build muscle memory for 15–20° tilt.
Practical Application: Using Wand Angle to Improve Latte Art and Daily Workflow

Glossy, paint-like microfoam that pours smoothly for rosettas and tulips depends on a stable 15–20° wand angle throughout steaming. When the vortex integrates foam evenly, there’s no separation between liquid milk and froth, so your pour stream stays coherent and contrast is sharp. Inconsistent angles produce patchy foam, some areas silky and others bubbly, which breaks up the pour and blurs latte art details. Before every pour, swirl the pitcher and check that the surface looks like wet paint with no visible bubbles. If it does, your wand angle and vortex were dialed in.
In a busy café workflow, repeatable wand angle saves time and reduces waste. Set up each pitcher the same way: fill to one-third, position the wand off-center at 15–20°, stretch for 3–5 seconds, texture until 140–150°F. That process becomes automatic, so you can steam one pitcher while pulling a shot, then pour immediately without guessing whether the foam will cooperate. Maintaining angle consistency across multiple pitchers also keeps texture uniform, which matters when you’re making several drinks in a row and customers expect the same quality in every cup.
Practical application for latte art and workflow:
Consistent angle = consistent pourability: repeatable 15–20° tilt produces the same microfoam texture every time, so you know how the milk will behave when you pour.
Glossy surface check: swirl pitcher after steaming; if surface looks like wet paint with no bubbles, the angle and vortex worked.
Sharp contrast: even microfoam integration means liquid milk and foam pour together, creating clean white patterns against dark espresso.
Reduced separation: stable vortex prevents foam from floating to the top, so there’s no need to stir or tap excessively before pouring.
Workflow efficiency: standardizing wand angle, depth, and timing across all pitchers eliminates guesswork and speeds up multi-drink sets.
Final Words
In the action, you practiced a 15–20° wand angle, off‑center placement, and a shallow depth to form a steady vortex that folds microbubbles into milk. You saw how that angle balances stretching and texturing.
Troubleshooting covered loud screeching from too‑shallow angles and dead whirlpools from centered or too‑steep angles. Quick fixes: 5–15 mm tip distance, small tilt changes, and test one variable at a time.
Now try one focused change and listen for the paper‑tearing sound — this is how steam wand angle affects whirlpool and milk texture. Keep practicing; glossy microfoam is close.
FAQ
Q: What angle for steaming milk?
A: The angle for steaming milk is 15–20 degrees, tilted slightly off‑center with the tip 0.5–1 cm below the surface to form a stable vortex. Start at 15° and adjust to tighten the whirlpool.
Q: Why is it important to purge the steam wand before texturing milk?
A: Purging the steam wand before texturing milk clears condensed water and old milk, preventing sputter, weak steam, and off‑flavors. Purge 1–2 seconds until dry, then wipe the tip before steaming.
Q: How should you position the milk jug when setting up to the steam wand?
A: You should position the milk jug slightly off‑center, tilted to match a 15–20° wand angle, with the tip 0.5–1 cm under the surface and the pitcher filled to about one‑third.
Q: Why is milk sticking to my steam wand?
A: Milk is sticking to your steam wand because residue has dried on the tip or the wand wasn’t wiped and purged; proteins cling. Wipe immediately after steaming, purge, then soak and clean daily.