

Want better latte art or fluffier cappuccinos?
It all comes down to one dial: steam wand angle.
Use a shallow 10 to 20 degree angle for latte microfoam and a steeper 25 to 35 degree angle for cappuccino foam.
Angle controls how much air enters: shallow gives silky, paint-like microfoam; steep creates bigger, loftier bubbles.
Try 10 to 20 degrees, tip 0.5 to 1 cm under the surface, 2 to 3 second stretch for latte; 25 to 35 degrees, tip nearer the surface, 4 to 6 second stretch for cappuccino.
Your pours become more predictable and repeatable.
Optimal Steam‑Wand Angles for Latte Art vs Cappuccino
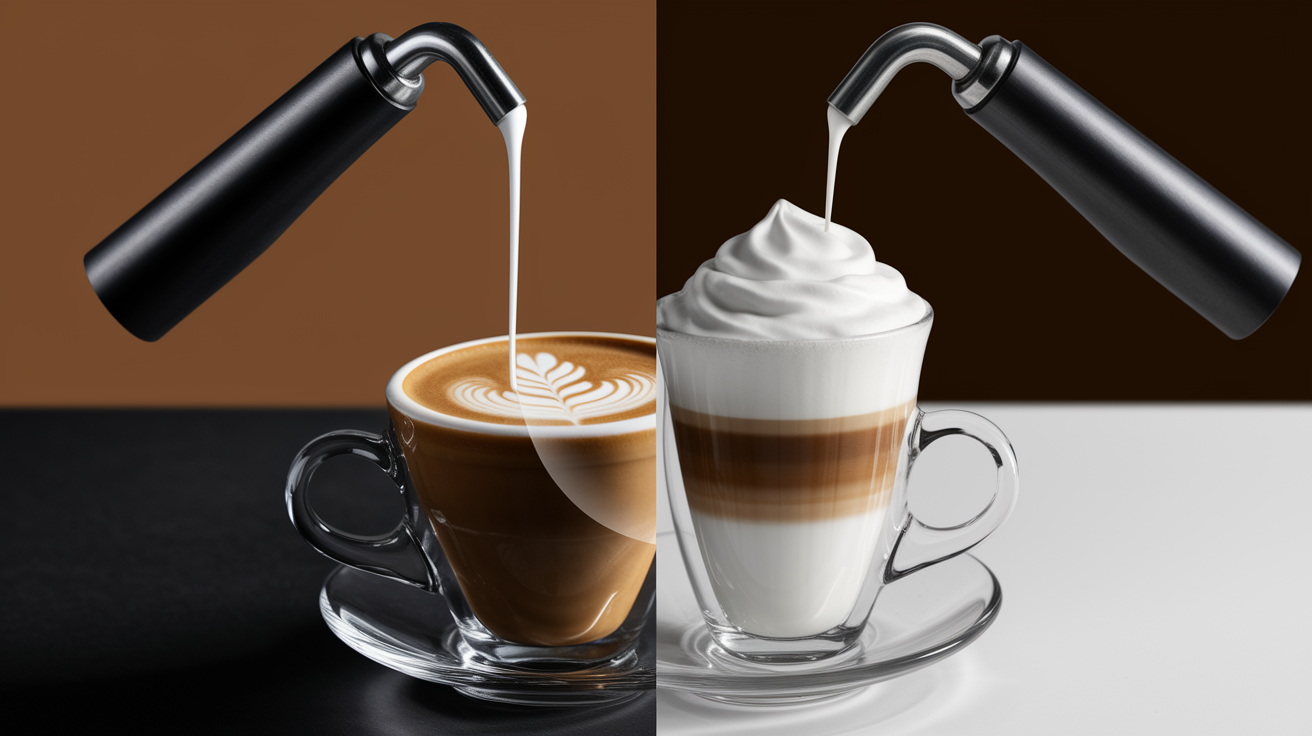
Latte art needs microfoam, which you get by holding the steam wand at a shallow angle. Somewhere between 10 and 20 degrees relative to the milk surface. Keep the tip about half a centimeter to one centimeter under the surface and you’ll introduce just the right amount of air during that quick 2 to 5 second stretch at the beginning. What you’re after is silky, paint-like microfoam with tiny bubbles distributed evenly. That’s what lets you pour smooth rosettas, hearts, and tulips.
Cappuccinos are different. You want drier, fluffier foam that sits on top instead of blending in. So you steepen the wand angle to around 25 to 35 degrees and stretch for a few extra seconds. The steeper angle and shallower tip position pull in more air, creating bigger, airier bubbles. That’s the dense, frothy cap people expect when they order a cappuccino.
Latte art angle: 10 to 20 degrees, minimal aeration, quick 2 to 3 second stretch, glossy microfoam.
Cappuccino angle: 25 to 35 degrees, longer stretching at 4 to 6 seconds, drier and loftier foam.
Tip depth for latte: just under the surface, about 0.5 to 1 cm, whisper the air in gently.
Tip depth for cappuccino: keep the tip closer to the surface during stretching to invite more air.
Transition cue: for both drinks, once milk reaches room temperature or expands by roughly 20 to 30 percent, plunge the wand deeper and tilt the pitcher to create a whirlpool that refines texture.
The angle controls how much air enters and how quickly that air gets folded into microfoam or stays as visible bubbles. It’s the single most adjustable variable after grind size when you’re dialing in your steaming.
Mechanics of Steam‑Wand Angle, Depth, and Tip Position

Steam wand angle decides where the steam goes and whether the milk spins in a circular vortex or shoots straight down. A shallow 10 to 20 degree angle sends steam diagonally across the surface, encouraging horizontal circulation and pulling milk from the bottom up through the aeration zone. Steeper angles, 25 to 35 degrees, drive steam more vertically. This forces milk downward and brings the surface closer to the tip over and over during each rotation, meaning more frequent air intake and larger bubbles.
Wand depth controls the boundary between stretching and texturing. When the tip sits within 0.5 to 1.0 centimeter of the surface, steam breaks through and pulls air down into the milk. That’s stretching. Once you drop the tip about 2 to 3 centimeters from the pitcher bottom, steam stops reaching the surface and instead creates turbulence that folds existing bubbles into smaller and smaller pieces until you get microfoam. Keeping consistent depth during each phase stops you from accidentally re-aerating during texturing or under-aerating during the stretch.
Tip placement relative to the pitcher’s center line affects vortex stability. Put the wand roughly halfway between the pitcher’s center and the side wall, angled slightly toward the spout. This creates an off-center flow that spins the milk in one direction. Dead-center and the milk might stall or swirl chaotically. Too close to the wall and the vortex weakens or stops. The combination of correct angle and off-center placement is what gives you that strong, steady whirlpool that integrates air and kills large bubbles.
Place the steam tip 0.5 to 1.0 cm under the milk surface to start stretching. Listen for a consistent hiss, sort of a “tss-tss” sound.
Tilt the pitcher and angle the wand at 10 to 20 degrees for latte microfoam. Bump it up to 25 to 35 degrees for cappuccino foam.
Position the wand halfway between the pitcher center and side wall to get a stable vortex going.
After the milk expands by 20 to 30 percent and hits roughly 100°F, plunge the wand deeper, about 2 to 3 cm from the bottom, to stop aeration and start texturing.
Keep the whirlpool spinning throughout the heating phase. It should look like a smooth, rolling wave with no large bubbles breaking the surface.
Stop steaming when the pitcher bottom is too hot to hold comfortably, around 140 to 150°F, then immediately purge and wipe the wand.
Creating Microfoam for Latte Art

Microfoam is that glossy, emulsified texture that lets you pour detailed latte art without big bubbles messing up the design. You get it by gently stretching at a shallow 10 to 20 degree angle for only 2 to 3 seconds, then quickly switching to the texturing phase where a strong vortex folds the tiny air pockets into an even, paint-like consistency. During stretching, the wand tip should hover just under the surface. Think of it as “kissing” the milk rather than diving in. You want to hear a steady, soft hiss, not violent bubbling or silence.
After the initial stretch, plunge the wand to about halfway down the pitcher and tilt the jug so milk rolls in one continuous whirlpool. This vortex breaks any larger bubbles into micro-sized pieces and spreads them evenly throughout the liquid. Skip the vortex or cut it short and the foam will separate into a layer of bubbles on top and liquid underneath. Impossible to pour clean hearts or rosettas that way.
Listen for a consistent hiss during the 2 to 3 second stretch. Violent splashing means the wand is too close to the surface.
Aim for roughly 20 to 30 percent volume expansion. The milk should rise noticeably but not double in size.
Switch to texturing as soon as the pitcher feels warm to the touch or the milk reaches approximately 100°F.
Keep a strong, rolling vortex with the wand positioned off-center and the pitcher tilted slightly forward.
Stop steaming at 140 to 150°F. Immediately tap the pitcher on the counter once or twice and swirl to kill any remaining large bubbles and polish the surface into a glossy sheen.
Properly executed microfoam looks like wet white paint and pours in a steady, controlled stream. When you tilt the pitcher, the surface should stay smooth and reflective, with no visible bubbles or separation between foam and liquid. If you can skim a spoon across the top and scoop off distinct foam, the texture is too dry for latte art. Back off the stretching time by one second and tighten the vortex during the texturing phase.
Producing Dry Foam for Cappuccinos

Cappuccino foam sits on top of the espresso as a dense, airy layer rather than blending into the drink. Creating it means deliberately introducing more air and letting larger bubbles survive the texturing phase. Start by angling the steam wand at approximately 25 to 35 degrees and keeping the tip very close to the milk surface. Closer than you would for a latte. Stretch the milk for 4 to 6 seconds instead of 2 to 3, listening for a louder, more aggressive hiss as the wand pulls in additional air.
You’re trying to increase milk volume by roughly 30 to 50 percent during the stretching phase, compared to the 20 to 30 percent expansion you target for latte microfoam. After stretching, plunge the wand and create a vortex to break up the largest bubbles, but accept that the final texture will stay loftier and less emulsified than microfoam. The foam should still feel creamy and stable, not dry and stiff like dish soap, but it’ll pour thicker and sit visibly on the espresso’s surface.
Angle the steam wand at 25 to 35 degrees, steeper than the 10 to 20 degree latte angle, to direct more steam toward the surface.
Stretch the milk for 4 to 6 seconds, roughly double the latte stretching time, to incorporate enough air for a visible foam layer.
Keep the wand tip shallow during stretching, about 0.5 cm under the surface or even closer, to maximize air intake.
Accept larger bubbles during the stretch. The vortex will refine them, but they won’t disappear entirely like they do in microfoam.
Stop steaming at the same 140 to 150°F target, then tap and swirl gently. The foam should still look creamy, not soupy or separated.
The steeper angle increases how often the milk surface passes near the wand tip during each rotation of the vortex, which naturally pulls in more air with each cycle. If you use a shallow 10 to 20 degree latte angle but extend the stretching time, you’ll get inconsistent aeration. Some milk will be over-stretched while the rest stays liquid. Matching the steeper angle with the longer stretching window creates even, voluminous foam that supports classic cappuccino pours and holds a dusting of cocoa or cinnamon on top without immediately sinking.
Pitcher Positioning and Vortex Control

Pitcher tilt and the angle at which you hold the jug relative to the steam wand decide whether milk circulates in a stable whirlpool or churns chaotically without integrating air. Hold the pitcher straight during the initial stretch to keep the wand tip at a consistent depth, then tilt the jug slightly forward, about 10 to 15 degrees, once you plunge the wand deeper for the texturing phase. This tilt redirects steam flow diagonally across the pitcher’s interior, pushing milk down one side and up the other in a smooth, rolling motion that folds foam continuously.
Position the steam wand roughly halfway between the pitcher’s center and the side wall, angled toward the spout. If your machine’s wand articulates, rest the wand lightly in the spout channel to keep consistent placement without gripping the pitcher awkwardly. Off-center positioning means the steam jet hits milk at an angle rather than straight-on, which is what starts and keeps the vortex going. Dead-center placement stalls circulation. Too close to the wall creates a weak, uneven spin that leaves large bubbles untouched.
Hold the pitcher straight and level during the 2 to 6 second stretching phase to maintain steady wand depth at the surface.
Tilt the pitcher forward approximately 10 to 15 degrees once you plunge the wand deeper for texturing, creating a diagonal steam path.
Position the wand halfway between the pitcher center and side wall, not dead-center or pressed against the wall.
Angle the wand tip toward the spout to encourage milk to roll in one consistent direction rather than bouncing randomly.
Watch the milk’s surface during texturing. It should look like a smooth, rolling wave with a visible downward current on one side and an upward current on the other. If you see large bubbles breaking the surface or milk sloshing side-to-side without rotating, adjust the pitcher tilt or shift the wand position slightly toward the spout until the whirlpool stabilizes. A strong vortex pulls foam from the top of the pitcher down to the bottom and back up again dozens of times during the heating phase. That’s how microfoam becomes uniform and glossy instead of layered and bubbly.
Troubleshooting Common Steaming Problems

Large bubbles that survive tapping and swirling mean the steam wand was too close to the milk surface during stretching or the vortex was too weak to break them apart. Lower the pitcher by a few millimeters during the stretch so the wand tip sits about 0.5 to 1.0 centimeter under the surface instead of right at it, and make sure you’re tilting the pitcher and positioning the wand off-center during texturing. If bubbles keep showing up, shorten the stretching phase by one second and focus on creating a stronger whirlpool earlier in the heating cycle.
No aeration or stretching sound, just hot milk with zero foam, means the wand was submerged too deeply from the start. Raise the wand relative to the milk by lowering the pitcher, or start with the tip closer to the surface before turning on the steam. You should hear a consistent hiss within the first two seconds. If you don’t, stop, turn off the steam, reposition the wand shallower, and try again. Practicing on cold water with a drop of dish soap lets you dial in the correct depth without wasting milk.
Screeching or high-pitched squealing during steaming usually comes from the wand tip vibrating against the pitcher wall or from partially opened steam flow. Always turn the steam valve fully open in one quick motion, never halfway, and make sure the wand sits off-center so it doesn’t rattle against metal. If screeching continues, check that the steam tip isn’t clogged with dried milk. Remove the tip, soak it, and clear the holes with a pin if necessary.
Symptom: large bubbles after tapping and swirling — Wand too shallow during stretch. Lower pitcher to submerge tip 0.5 to 1 cm, strengthen vortex, or cut stretching time by 1 second.
Symptom: no foam, just warm milk — Wand too deep. Raise wand by lowering pitcher, start with tip closer to surface, listen for hiss within 2 seconds.
Symptom: screeching or squealing — Steam valve partially open or wand vibrating against pitcher. Turn steam fully on in one motion, position wand off-center.
Symptom: foam separating into liquid and bubbles — Weak or absent vortex. Tilt pitcher more, reposition wand halfway between center and wall, extend texturing phase.
Symptom: burnt or scalded milk flavor — Overheated past 150°F. Stop steaming earlier, use thermometer or hand-feel cue, reduce total heating time.
Symptom: thin, watery pour with no body — Under-aerated. Extend stretching by 1 to 2 seconds, confirm wand is close enough to surface, increase target volume expansion to 25 to 30 percent.
Which Technique to Use and When

Use the shallow 10 to 20 degree angle and short 2 to 3 second stretch for any drink where you plan to pour latte art. Lattes, flat whites, cortados, and macchiatos all rely on glossy microfoam that integrates into espresso and lets you control contrast and detail. Flat whites require even less stretching than lattes, sometimes as brief as 1 to 2 seconds, to produce an ultra-thin layer of microfoam and a velvety, almost liquid texture. If the menu or customer expects a visible design on top, default to the latte technique and adjust stretching time down for flat whites or up slightly for larger lattes.
Switch to the steeper 25 to 35 degree angle and extended 4 to 6 second stretch whenever the drink’s identity depends on a structured foam cap. Traditional cappuccinos, dry cappuccinos, bone-dry cappuccinos, and any drink finished with a dusting or sprinkle on top. The drier foam holds toppings without immediately absorbing them and creates the tactile contrast between airy foam and dense espresso that defines a well-made cappuccino. If a customer asks for extra foam or specifies “dry,” add another second of stretching and accept that the texture will be loftier and less suited for pouring patterns.
Latte art drinks (latte, flat white, cortado): 10 to 20 degree angle, 2 to 3 second stretch, target glossy microfoam.
Cappuccino and foam-topped drinks: 25 to 35 degree angle, 4 to 6 second stretch, accept drier, airier texture.
Flat white: reduce stretch to 1 to 2 seconds, prioritize velvety liquid texture over visible foam layer.
Customer requests “extra foam” or “dry”: extend stretching by 1 to 2 additional seconds, use steeper angle, confirm foam layer is visible and stable before pouring.
Final Words
Start steaming with a shallow 10-20° wand angle for latte microfoam; switch to a steeper 25-35° angle when you want cappuccino’s drier foam. Keep the tip near the surface to add air, or deeper to texture.
Control tip depth, pitcher tilt, and vortex. Tweak one thing at a time: angle first, then depth, then heat.
Practice these steps and note time and sound. For the best steam wand angle for latte art vs cappuccino, the shallow-for-latte, steep-for-cappuccino rule will get you repeatable, confident pours.
FAQ
Q: How to steam milk for cappuccino vs latte?
A: The difference in steaming milk for cappuccino versus latte is: cappuccino uses a steeper wand angle (25–35°), more surface air for dry, airy foam; latte uses a shallow angle (10–20°), minimal aeration for glossy microfoam.
Q: When making a cappuccino, the steam wand should?
A: When making a cappuccino, the steam wand should be angled steeper (25–35°) with the tip near the milk surface to draw in air, producing larger, drier bubbles and a firm, structured foam.
Q: Can you put latte art on a cappuccino?
A: You can put latte art on a cappuccino, but its drier foam makes fine patterns harder; reduce aeration or skim the top to reveal smoother microfoam for simpler designs.
Q: How to get perfect steamed milk for latte art?
A: To get perfect steamed milk for latte art, use a shallow wand angle (10–20°), tip just below the surface, build a strong vortex, stretch briefly, and heat to 60–65°C for glossy microfoam.