

What if the tiny tilt of your steam wand is the reason your microfoam keeps failing?
Most baristas focus on heat and volume and skip a simple measurement that makes shots repeatable.
Read on for a clear set of tools and a single technique to measure and set a 15 to 20 degree steam wand angle and the half-centimeter depth that starts good aeration.
Do this, and you’ll get smoother milk, fewer splashes, and a repeatable routine you can test with a ruler or the pitcher spout.
Correct Steam Wand Position (Angle and Depth)
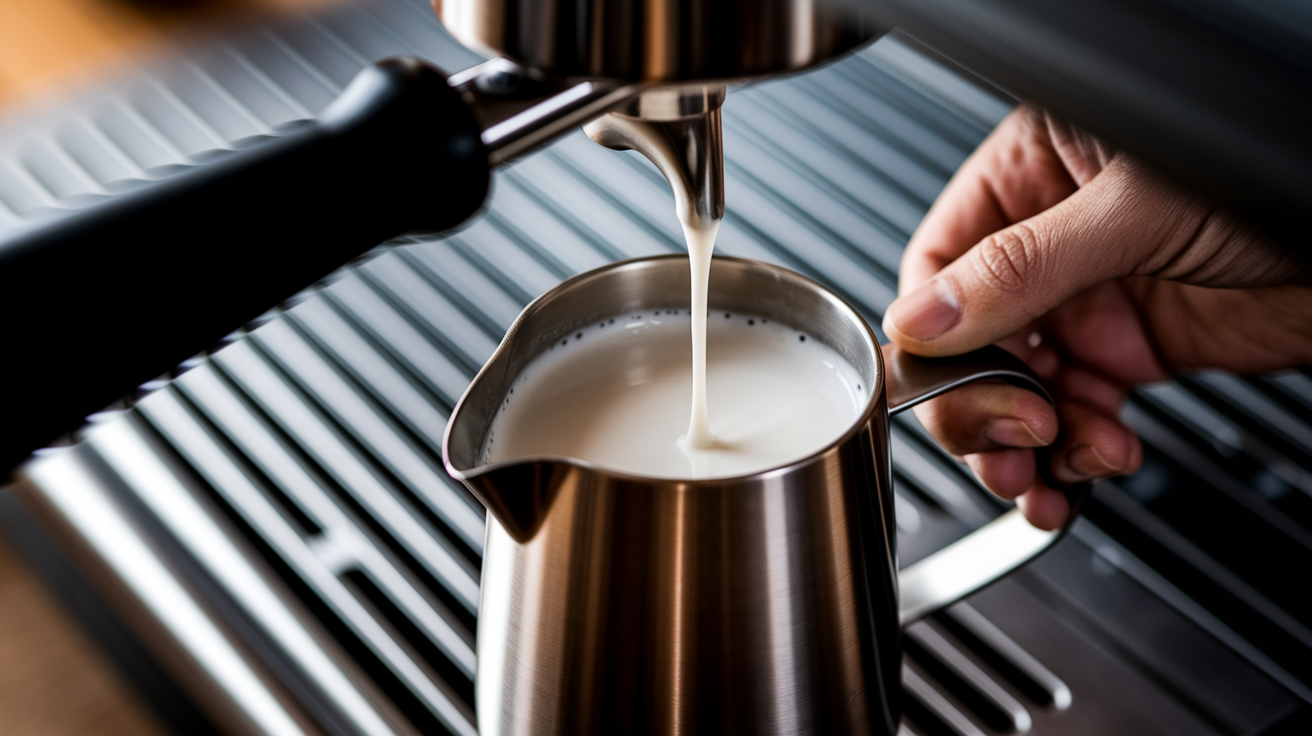
You want the steam wand sitting at about 15 to 20 degrees off vertical. Not straight down, just tilted enough to push steam into the milk at an angle that gets it spinning. Too vertical and the steam buries itself before any air can stretch the milk. Too flat and you’re spraying across the surface, making a mess of big bubbles instead of folding in tiny ones.
Depth is just as important. Rest the tip maybe half a centimeter to one centimeter below the surface. That shallow spot is where air sneaks in during the first few seconds while you hear that steady hiss or soft tearing sound. Drop the tip too deep right away and no air gets through, so the milk stays flat. Float it at or above the surface and you’ll hear loud sputtering while soapy bubbles pile up.
- Purge the wand for a second to clear out condensation before you stick it in.
- Fill the pitcher about a third of the way so the milk has space to grow.
- Insert the tip so it’s sitting half a centimeter to one centimeter under the surface.
- Angle the wand somewhere around 15 to 20 degrees off vertical, leaning a bit to one side.
- Open the valve all the way and listen for that gentle hiss. Nudge the depth up or down by a millimeter or two until you hit that sound without wild splashing.
Pros and Cons of Different Wand Positioning Approaches
Different placements change how fast air comes in and how evenly heat spreads. Here’s what shifts when you move things around.
Shallow depth (tip barely under the surface)
Gets you fast aeration and lots of volume for cappuccino foam. But keep it there too long and you’ll end up with huge bubbles and a noisy mess.
Deeper depth (one to two centimeters down)
Quieter, focuses on heating and rolling instead of stretching. Downside? Almost no foam if you’re trying to aerate.
Steeper angle (nearly vertical)
Easier to hold steady, especially if you’re new. But circulation stays weak, the vortex barely forms, and texture comes out uneven.
Flatter angle (25 to 30 degrees off vertical)
Strong tangential flow, aggressive whirlpool, fast integration. Can over-aerate or splash off-center if you’re not careful.
Stationary steaming (wand stays fixed)
Repeatable, simple to measure and practice. You’re counting on pitcher tilt and steam pressure to do all the work, though.
Slight tilting (small pitcher rock while steaming)
Helps guide the vortex when machine pressure is low or the pitcher’s big. Adds another thing to control and makes it harder to repeat the next time.
What Is Steam-Wand Angle Control?

Angle control is just how you tilt the wand when it goes into the milk. That tilt decides where the steam shoots once it leaves the tip, which shapes how air mixes in and how the surface moves. Angle the wand off-center and steam travels along the pitcher wall, creating a rolling motion. Keep it vertical and centered, and steam dumps straight down, heating fast but churning milk in random bursts that scatter big bubbles everywhere.
Rolling motion is what turns milk into microfoam instead of froth. Steam entering at an angle sweeps milk in a circle, folding tiny air pockets through the liquid over and over. A straight-down wand heats quickly but moves milk up and down chaotically, leaving bubbles unintegrated.
Airflow direction: Angling sends steam along the wall, guiding milk into a stable spin instead of random turbulence.
Bubble size: A controlled angle limits how much surface the steam jet hits, keeping new bubbles small and even.
Surface turbulence: Slight angles make gentle waves. Extreme angles cause violent splashing or dead zones with no movement.
Microfoam stability: Consistent angle means consistent circulation, which integrates air evenly and keeps foam holding its structure after you stop steaming.
What Is Steam-Wand Depth Control?

Depth control is how far under the surface you hold the tip during each phase. Shallow means the tip sits just under the surface, so the steam jet pulls in air from above. Deeper means the tip drops one to two centimeters down, stops pulling new air, and focuses steam on heating and rolling what’s already aerated.
Stretching needs shallow depth. For the first three to five seconds, keeping the tip near the surface lets you hear that paper-tearing hiss while air comes in. Once the milk grows by 20 to 30 percent, you drop the wand deeper to switch from stretching to texturing. At that deeper spot, the whirlpool integrates the small bubbles you just made, folding them into the liquid until everything looks uniform and glossy. Keep the wand shallow too long and the milk over-aerates into stiff, dry foam. Start deep and never raise the tip, and you get hot flat milk with no air.
What Is Pitcher Positioning?

Pitcher positioning is how you hold, tilt, and orient the jug relative to the wand and the machine. Wand angle and depth control how steam enters. Pitcher positioning controls how milk responds and sets up the conditions for a stable vortex.
Slight tilt: Tip the pitcher 10 to 20 degrees so one side of the surface sits lower, making it easier to keep the tip at the right shallow depth while aerating.
Centered wand placement: Straight down the middle creates symmetrical flow but usually produces a weaker whirlpool.
Offset placement: Wand closer to the wall, off-center, encourages tangential circulation and a stronger vortex.
Grip approach: Handle in one hand, other hand flat on the pitcher bottom to monitor heat and stabilize against vibration.
Pour-ready alignment: Angle the spout slightly toward you or away from the machine so you can see the surface clearly and pour immediately once steaming finishes.
Pitcher tilt and offset wand placement work together. A slight tilt lowers one edge, which keeps the tip in the shallow zone without popping out and spraying. Once aeration ends and you drop the wand deeper, keeping the pitcher tilted maintains the circular flow and stops the whirlpool from collapsing into flat, layered milk. Think of the pitcher as the container guiding the whirlpool. The wand supplies energy, but pitcher shape and position channel that energy into the pattern you want.
How to Measure and Adjust Steam-Wand Position

Measuring the Wand Angle
Stand directly in front of the machine and look at the wand from the side. Picture a vertical line running straight down from the pivot point to the drip tray. The shaft should lean slightly away from that imaginary line, forming a small wedge of space between the two. For 15 to 20 degrees, the gap at the pitcher rim will be about one to two centimeters if your pitcher’s around 10 centimeters tall.
You can use the pitcher spout as a reference. Insert the wand so the shaft runs parallel to the spout’s angled edge. Most pitchers have a spout sitting at 15 to 25 degrees, so lining up the wand with that edge gives you a visual cue without needing a protractor. If the machine’s group head or side panel has vertical lines or seams, compare the shaft to those. The small visible tilt confirms you’re off vertical.
Adjusting Wand Depth
Start with the valve closed and the tip resting right at the milk surface. Open the valve fully and listen. Loud sputtering or big bubbles forming fast means the tip’s too shallow or breaking the surface. Lower the pitcher two to three millimeters and listen again. Correct depth makes a steady, gentle hiss that sounds like tearing paper or a quiet exhale. If the sound disappears and the milk goes silent, the tip went too deep and no air’s coming in. Raise the pitcher in one-millimeter steps until the hiss comes back.
Hold that depth for three to five seconds while the milk grows. Once the liquid rises and you see the surface climbing toward halfway, drop the wand deeper, about one to two centimeters below the new level. Hissing should stop and the sound should shift to a low, rolling whoosh as the whirlpool kicks in. If big bubbles keep forming after you drop it, the wand’s still too shallow. Lower it another few millimeters until the surface smooths out and bubbles shrink.
Aligning Wand and Pitcher Together
Rest the handle in your dominant hand and put your other hand flat against the pitcher bottom to track heat. Tilt the pitcher slightly forward so the surface near the spout sits about one centimeter lower than the back rim. Insert the wand at your target angle so the tip enters near the spout, offset toward the right or left wall depending on which way you want the whirlpool to spin.
Lock your wrist and forearm into a stable position once the wand’s in. Small unintentional movements shift depth and break the aeration sound. Anchor the pitcher by pressing the bottom edge lightly against the drip tray or machine base if your setup allows. This creates a fixed pivot so you can make controlled depth adjustments by tilting the handle up or down instead of moving your whole arm. Keep your eyes on the surface and your ears on the sound. Visual and audio cues tell you when wand, pitcher, and steam pressure are all lined up.
Comparison of Angle, Depth, Pitcher Placement, and Vortex Dynamics
Each positioning variable influences texture in a specific way. Change one without adjusting the others and you’ll get unexpected results. Understanding what each one controls helps you troubleshoot faster.
| Variable | Primary Effect | Typical Result |
|---|---|---|
| Wand Angle | Direction and speed of steam entry | Influences whirlpool strength and bubble integration speed |
| Wand Depth | Controls air intake vs pure heating | Shallow = aeration and stretch; deep = heating and texture rolling |
| Pitcher Placement | Guides milk flow geometry and surface access | Offset and tilted = strong vortex; centered and flat = weak circulation |
| Vortex Dynamics | Folds air into milk and equalizes temperature | Tight, stable spin = uniform microfoam; chaotic churn = uneven bubbles |
Angle sets the whirlpool’s rotation axis. Depth determines whether you’re adding air or just heating. Pitcher placement anchors the geometry so the whirlpool can form. Vortex dynamics describe what happens when all three line up: milk spinning in a stable circle that blends heat and air into smooth microfoam. If one variable’s wrong, the vortex weakens or collapses, and texture suffers even if everything else is correct.
How to Use Wand Positioning to Improve Microfoam Quality

Correct wand positioning removes most of the guesswork and replaces random results with repeatable texture. When the wand enters at the right angle and depth, steam moves milk in a predictable pattern, so you can hit the same microfoam quality shot after shot. Consistency matters for latte art, for customer expectations, and for cutting down waste when a pour doesn’t work and you dump the milk.
Tighter bubbles: Shallow aeration at 15 to 20 degrees limits how much surface gets disturbed, so bubbles form small and uniform instead of large and irregular.
Glossy finish: A stable whirlpool integrates bubbles completely, leaving the surface smooth and reflective instead of matte or foamy.
Improved pour control: Microfoam with even texture flows at a predictable rate, making it easier to control contrast and pattern sharpness when you’re pouring latte art.
Reduced scorching: Heating milk in a rolling vortex spreads heat evenly, so you reach 60 to 65 degrees Celsius without hot spots that taste burnt.
Better sweetness: Gentle aeration preserves milk proteins and fats. Even heating brings out natural lactose sweetness without the sulfur notes that show up above 70 degrees.
More consistency: Measuring angle and depth with visual reference points or simple tools means every session starts from the same baseline, which makes it easier to adjust for different milk types or drink sizes.
Microfoam quality depends on controlling four things at once: air intake, heat transfer, bubble size, and texture integration. But wand positioning is the single variable that touches all four. Set angle and depth correctly during the first few seconds and the rest becomes much easier to manage. Miss the initial setup and you’ll spend the rest of the session trying to fix texture problems that started the moment you opened the valve.
Final Words
Set the wand at 15–20 degrees and keep the tip just under the milk surface. Listen for the soft “paper tearing” sound and watch for tight, tiny bubbles.
This post ran through angle and depth basics, pros and cons, angle vs depth definitions, pitcher placement, how to measure and adjust, and using wand positioning to improve microfoam.
Next, try measuring steam wand angle tools and technique — a simple mark on the pitcher, a ruler, and one focused tweak at a time. Do that and your microfoam will get smoother and more consistent. You’ll nail silky microfoam sooner than you think.
FAQ
Q: How to position the steam wand?
A: To position the steam wand, set it about 15–20 degrees from vertical with the tip just below the milk surface; adjust depth until you hear a gentle paper‑tearing sound for steady aeration.
Q: What is the angle for frothing milk?
A: The angle for frothing milk is roughly 15–20 degrees from vertical; this directs airflow into the milk for controlled aeration without splashing and helps form stable microfoam.
Q: What is the difference between 1 hole and 3 hole steam tip?
A: The difference between a 1‑hole and 3‑hole steam tip is force and spread: a 1‑hole delivers focused, stronger steam; a 3‑hole disperses steam for gentler, easier texturing and fewer large bubbles.
Q: What are common steam wand problems?
A: Common steam wand problems include blocked tips, weak or no steam, sputtering or spritzing, leaking valves, and overheating that scorches milk; clean the tip and check steam lines and seals first.