

Think the steam wand angle is just style?
It’s the single tweak that turns big, soapy bubbles into glossy microfoam.
Position the wand 15–20° off vertical and start 0.5–1 cm below the surface; that tilt makes a whirlpool that shears bubbles small.
Do this and you get smoother texture, fewer wasted pitchers, and cleaner latte art.
In this post I’ll show the exact angle, depth, timing, and quick checks so you can hit repeatable microfoam every time.
The Optimal Wand Angle and Positioning for True Microfoam
Position your steam wand about 15–20° off vertical, just off-center in the pitcher. That tilt creates the whirlpool that turns big bubbles into microfoam. Not straight down. “Before I learned the 15–20° rule, my wand sat dead-center and vertical, and I’d end up with hot milk and a thin layer of sad foam on top.”
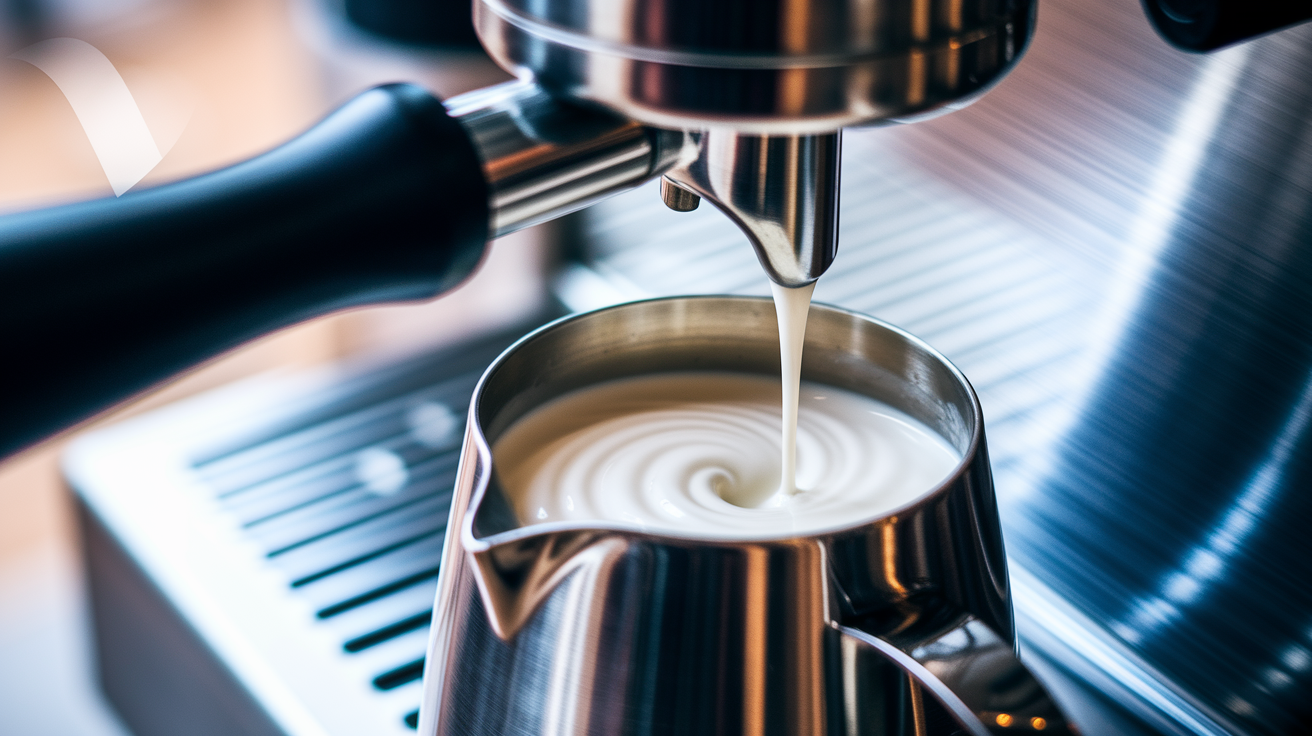
Start with the tip 0.5–1 centimeter below the surface of cold milk. At that depth, you’ll hear a gentle paper-tearing hiss when you crack the valve. Hold it there for about 2–5 seconds while the milk climbs by 20–30 percent. Once you’ve got enough air, plunge deeper to about halfway down or 2–3 centimeters from the bottom and keep that same angle so the whirlpool doesn’t die. Texture at this depth until it hits 60–65°C, then finish with a quick 2–4 second polish before you shut the valve.
The angle matters because it decides whether the milk actually spins. A vertical wand or one that’s way off to the side will just sit there or slosh the milk around instead of creating the rotation that breaks bubbles down. The 15–20° zone balances enough offset to get circulation going with enough stability to keep things steady. Too shallow and you’ll spray milk everywhere and trap huge pockets of air. Too deep and the wand goes quiet, adding nothing.
Five quick checkpoints for wand angle:
- Angle: 15–20° off vertical, aimed slightly toward the pitcher center
- Starting depth: 0.5–1.0 cm below the surface while stretching
- Stretch time: 2–5 seconds, stopping when volume rises around 20–30%
- Texture depth: Halfway down, about 2–3 cm from the bottom, same angle
- Final temp: 60–65°C for smooth microfoam
How Pitcher Tilt and Wand Angle Work Together to Create Microfoam

The wand angle alone won’t do it if the pitcher isn’t tilted right. When you tip the pitcher a bit so the wand rests close to one side instead of floating in the middle, you push the milk into a circular roll that pulls air down and folds it through the liquid. Most people hold the pitcher at about 15–20° tilt, matching the wand’s entry angle. That pairing creates a tight vortex that looks like a smooth wave rolling inside.
If you keep the pitcher flat and the wand straight up and down, the milk just churns without spinning, and bubbles never break into microfoam. The tilt sends the steam along the pitcher wall, turning straight force into rotation. The closer the tip sits to the wall, the faster it spins. But jam it too tight and you’ll choke the flow, hearing a dull hum instead of that clean whirlpool sound. Adjust your tilt so the wand hovers near the wall without touching.
Six tilt adjustments and what they do:
- Pitcher upright (0°): Milk churns straight up. Large bubbles stick around. No microfoam.
- Light tilt (10–15°): Weak vortex. Works okay for small pitchers or tight volumes.
- Standard tilt (15–20°): Strong whirlpool. Best microfoam. Most versatile for 300–600 ml pitchers.
- Aggressive tilt (over 25°): Vortex gets messy. Milk might slosh out. Fine bubbles can trap big air pockets again.
- Wand too centered: Vortex stalls. Uneven heating. Foam separates from the base.
- Wand against the wall: Restricted flow. Loud squeal. Foam clumps on one side.
For small pitchers (12 ounces or 350 ml), dial both the wand angle and pitcher tilt back a bit, closer to 10–15°. The smaller diameter concentrates the whirlpool naturally. Bigger pitchers (20 ounces or 600 ml) need the full 15–20° tilt and sometimes a touch more depth to keep the vortex strong enough to reach all the milk.
Step-by-Step Steaming Technique Using the Ideal Angle

Start with milk straight from the fridge, around 4–6°C, and fill your pitcher to about one-third. Just below the spout. Purge the wand for a second to blow out condensation, then wipe the tip. Position the tip 0.5–1 centimeter below the surface, angled 15–20° off vertical and slightly off-center toward the wall. This is your aeration spot.
Open the valve all the way and listen for that gentle, steady hiss. Sounds like tearing paper. Hold that spot for 2–5 seconds, watching the surface rise. You want volume to jump by about 20–30 percent. If you started with 150 milliliters for a latte, you’ll land around 180–195 milliliters. When you hit that, drop the wand deeper to about halfway down or 2–3 centimeters from the bottom, keeping the same angle. The hiss will quiet down, replaced by a smooth roll. Texture at this depth until the pitcher feels too warm to hold, which happens around 60–65°C. Finish with a final 2–4 second polish. Hold the deep position steady and let the whirlpool fold any remaining bubbles. Close the valve, pull the wand out, wipe it, and purge again.
Full steaming sequence in eight steps:
- Fill pitcher one-third full with cold milk (4–6°C). Purge and wipe wand.
- Insert tip 0.5–1 cm below surface, 15–20° off vertical, slightly off-center.
- Open valve fully. Listen for paper-tearing hiss.
- Hold shallow spot for 2–5 seconds until milk rises about 20–30%.
- Plunge wand halfway down (2–3 cm from bottom), same angle.
- Texture until pitcher reaches 60–65°C. Use your hand or a thermometer.
- Polish with 2–4 seconds of steady deep whirlpool, then close valve.
- Remove wand, wipe, purge, tap pitcher gently, and swirl.
Adjusting Angle and Depth for Different Milk Types
Whole milk (3–4 percent fat) works perfectly with the standard setup. 15–20° angle, 0.5–1 centimeter starting depth. The fat and protein in whole milk lock bubbles in fast, so your stretching phase can stay short, usually 3–5 seconds, and the microfoam holds together all the way to the pour.
Whole Milk
Keep the wand at 15–20° off-center and start 0.5–1 cm below the surface. Stretch for 3–5 seconds until you see about 20–30 percent more volume, then plunge and texture to 60–63°C. Whole milk is forgiving. If you drift a degree or two off or hold the stretch an extra second, you’ll still get smooth, glossy microfoam.
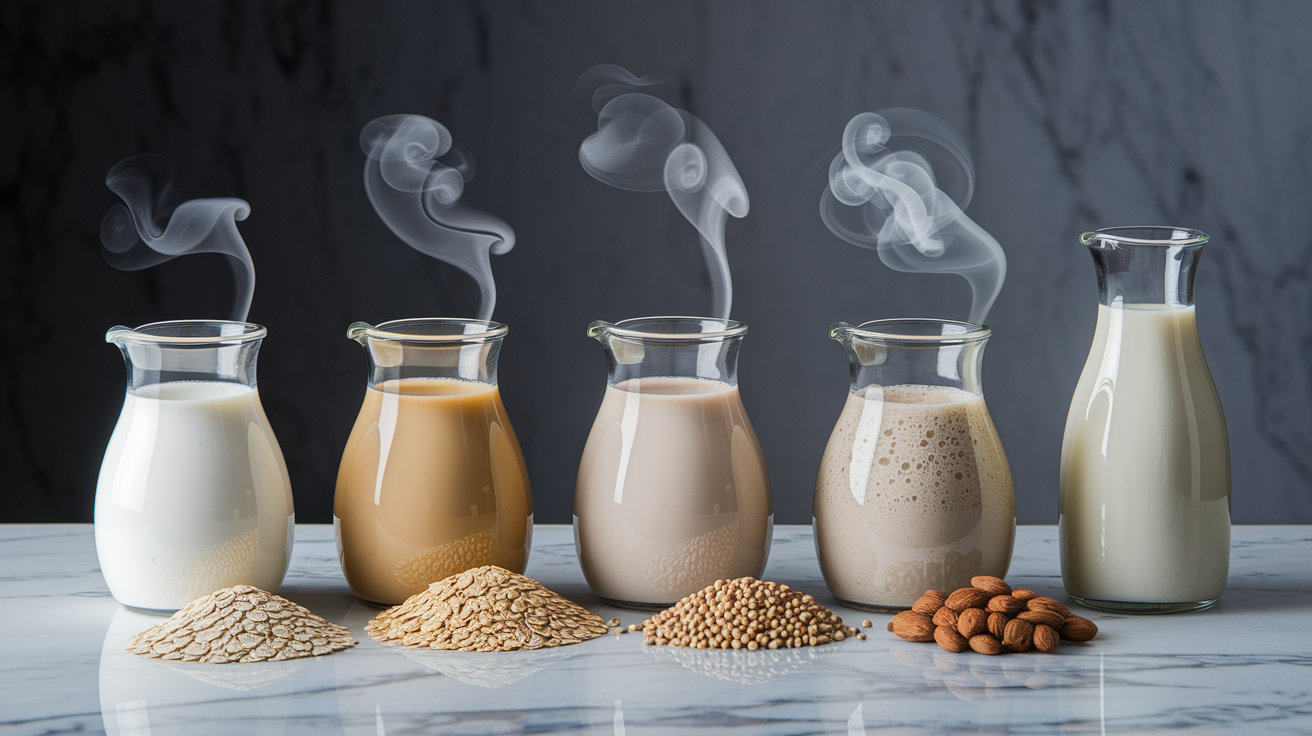
Oat Milk
Oat milk and barista plant blends often need longer stretching, closer to 5–7 seconds, because the protein structure is different and takes more work to aerate. Keep the same 15–20° angle, but start the tip a bit shallower, around 3–4 millimeters below the surface, to get air in faster. Texture to about 55–60°C. Oat milk can scorch and turn gummy above 65°C.
Soy Milk
Soy foams fast but collapses just as fast if you overheat it. Use the standard 15–20° angle and 0.5–1 cm depth, but cut your stretching time to 3–4 seconds and stop heating at 55–58°C. The lower temp keeps the protein from breaking down and gives you a bit more time before the foam separates.
Almond and Skim Milk
Almond milk has almost no fat, so it needs serious aeration, sometimes 6–8 seconds, and a shallower tip, around 3–5 millimeters, to build any foam at all. The 15–20° angle still applies, but tilt the pitcher a touch more to push a stronger whirlpool and shear the bubbles down. Skim cow’s milk foams fast and produces a ton of volume, but the bubbles are big and unstable. Shorten your stretch to 2–3 seconds, keep the angle steady, and stop at 58–60°C to avoid a dry, meringue texture.
Five tweaks for different milk types:
- Whole milk: Standard 15–20° angle, 0.5–1 cm depth, 3–5 s stretch, finish at 60–63°C.
- Oat milk: 15–20° angle, shallower 3–4 mm depth, 5–7 s stretch, finish at 55–60°C.
- Soy milk: 15–20° angle, 0.5–1 cm depth, short 3–4 s stretch, stop early at 55–58°C.
- Almond milk: 15–20° angle, shallow 3–5 mm depth, long 6–8 s stretch, tilt pitcher more.
- Skim milk: 15–20° angle, 0.5–1 cm depth, brief 2–3 s stretch to avoid over-aeration, finish at 58–60°C.
Why the 15–20° Angle Works: Microfoam Physics Explained

Microfoam forms when steam injects air into milk and rotational shear breaks those bubbles into tiny, uniform pockets that stay suspended in the liquid. The 15–20° wand angle creates an off-center flow that spins the milk instead of just shoving it straight up. That spin generates the shear needed to slice large bubbles into micro-bubbles. Milk proteins start to unfold around 40°C, wrapping around the bubbles to hold them in place. By the time the milk hits 60–65°C, those protein-coated bubbles are locked in, giving you the glossy, paint-like texture that pours clean latte art.
Steam pressure between 1.0 and 1.5 bar delivers enough force to both aerate and circulate the milk without blasting bubbles apart. Lower pressure means you need to hold the stretch longer and tilt the pitcher harder to make up for weaker circulation. Higher pressure shortens your margin. If your angle drifts even a few degrees off 15–20°, you can over-aerate in a second and end up with a pitcher full of soapy bubbles. The type of steam tip matters too. A single-hole tip focuses steam into a narrow jet that’s picky about angle changes, while a multi-hole tip spreads the flow and builds a stronger vortex with less fussy positioning.
| Factor | Influence on Angle | Effect on Microfoam |
|---|---|---|
| Wand angle 15–20° off-center | Drives rotational shear and stable whirlpool | Breaks large bubbles into uniform micro-bubbles; spreads foam throughout milk |
| Steam pressure 1.0–1.5 bar | Higher pressure needs tighter angle control; lower pressure needs longer stretch | Best pressure range balances aeration speed and bubble size control |
| Milk protein denaturation (around 40–65°C) | Temperature rise locks bubbles; overheating (over 65°C) causes collapse | Proteins coat bubbles and hold microfoam texture; scalding breaks protein bonds |
| Single-hole vs multi-hole wand tip | Single-hole is angle-sensitive; multi-hole spreads flow and eases whirlpool formation | Multi-hole tips are more forgiving for beginners; single-hole offers finer control |
| Off-center wand placement | Prevents flat, vertical churning; starts circular milk flow | Creates consistent vortex that pulls air down and spreads heat evenly |
Fixing Microfoam Problems Caused by Incorrect Wand Angle
Most foam disasters trace back to the wand sitting in the wrong spot or at the wrong tilt. If your microfoam looks bubbly, flat, or splits into liquid and foam layers, check the angle first. Small tweaks, raising or lowering the tip by just 5 millimeters or tilting the pitcher a few degrees, often fix it mid-steam without dumping the milk and starting over.
When you hear loud hissing or see milk spraying around, the tip is too shallow or the angle is too steep, letting steam break the surface and pull in huge air pockets. Drop the tip deeper by about 5 millimeters and ease back the pitcher tilt to calm things down. If the wand goes silent and the milk barely moves, you’ve plunged too deep or centered the wand too much. Raise the tip back toward the surface and tilt the pitcher to restart the whirlpool. A screaming, high-pitched squeal means the wand is jammed against the wall or angled so hard that steam can’t escape smoothly. Pull the wand a few millimeters away from the wall and ease back to 15–20°.
Seven common problems with angle fixes:
- Large, sticky bubbles on top: Wand too shallow or angled over 25°. Lower tip by 5 mm and reduce pitcher tilt to 15–20°.
- No foam, just hot milk: Wand too deep or perfectly vertical. Raise tip to 0.5–1 cm below surface and tilt pitcher 15–20°.
- Milk spraying or spitting: Tip breaking the surface; angle too extreme. Submerge tip to 3–5 mm and center the angle closer to 15°.
- Screaming or squealing: Wand pressed against wall or tilted over 25°. Pull wand away from wall and reduce tilt.
- Choppy, uneven whirlpool: Wand too centered or vertical. Move wand off-center and set 15–20° angle.
- Foam separates into layers: Not enough vortex during texturing. Maintain 15–20° angle at halfway depth and extend texturing by 2–3 seconds.
- Scalded or burnt taste: Overheating past 65°C regardless of angle. Stop steaming at 60–63°C. Use thermometer if you’re unsure.
If you’ve tried two or three mid-steam fixes and the milk still looks wrong, close the valve, dump it, and restart. Trying to save bad microfoam by over-correcting usually makes it worse and wastes more milk than starting fresh with the right angle from the jump.
Pitcher Size, Wand Type, and Machine Pressure: How They Change the Ideal Angle
A 12-ounce pitcher and a 20-ounce pitcher need different handling even when you’re shooting for the same 15–20° angle. In a small pitcher, the milk depth is shallow, so you don’t need to plunge the wand as far during texturing, about 1.5–2 centimeters from the bottom instead of 2–3. The tighter diameter also packs the whirlpool tighter, which means you can get away with a slightly gentler tilt, closer to 10–15°, and still keep good circulation. Larger pitchers need a deeper starting insertion and a longer texturing phase because there’s more milk to heat and fold, and the wider diameter spreads out the vortex unless you hold a full 15–20° tilt and keep the wand firmly off-center.
Commercial espresso machines usually run higher steam pressure, sometimes above 1.5 bar, so the wand delivers more force and heats milk faster. That speed means you need tighter angle discipline. Drifting even a few degrees off 15–20° will over-aerate or scorch the milk before you can react. Home machines often sit closer to 1.0 bar, which gives you slower, gentler steam and a wider margin for angle mistakes, but you’ll need to stretch for an extra second or two and hold the whirlpool longer to get the same microfoam density. Multi-hole steam tips spread the flow across several jets, making it easier to build a strong vortex without perfect angle precision, while single-hole tips focus all the steam into one narrow stream that rewards exact 15–20° positioning with finer control but punishes sloppy angles with uneven results.
| Equipment Variable | Angle Adjustment | Depth Adjustment |
|---|---|---|
| Small pitcher (12 oz / 350 ml) | Reduce tilt slightly to 10–15° to avoid over-aggressive vortex | Shallower texturing depth, around 1.5–2 cm from bottom; same 0.5–1 cm starting stretch depth |
| Large pitcher (20 oz / 600 ml) | Maintain full 15–20° tilt; move wand farther off-center to push circulation | Deeper texturing spot, around 2.5–3 cm from bottom; extend heating phase by 2–3 seconds |
| High-pressure commercial machine (over 1.5 bar) | Hold strict 15–20° angle; any drift causes rapid over-aeration | Standard 0.5–1 cm stretch depth, but shorten stretch time to 2–3 seconds to avoid excess foam |
| Low-pressure home machine (around 1.0 bar) | Bump tilt closer to 20° and exaggerate off-center placement to make up for weaker flow | Same 0.5–1 cm starting depth, but extend stretch by 1–2 seconds and texturing by 3–5 seconds |
Sensory Cues: How to Know the Angle Is Correct

Listen first. When the wand angle sits right at 15–20° and the tip is 0.5–1 centimeter below the surface, you’ll hear a gentle, rhythmic hiss that sounds like tearing paper or a soft “tss-tss-tss.” That sound tells you air is getting pulled into the milk at a controlled rate. If the hiss turns into a loud roar or spluttering, the wand is too shallow or angled too steeply, and you’re pulling in huge bubbles. If the pitcher goes silent except for a low hum, the wand has dropped too deep or sits too vertical, and no air is getting in.
Watch the milk surface. A correct 15–20° angle creates a smooth, rolling whirlpool that looks like a gentle wave circling the pitcher. The surface should stay mostly level, with just a slight dimple where the wand tip kisses the milk during stretching. If you see the milk jumping around or big bubbles popping on top, your angle is off. When you finish steaming and tap the pitcher, properly textured microfoam will look glossy and uniform, like wet paint, with no visible bubbles or separation between foam and liquid. The final temperature check is touch. The pitcher should feel uncomfortably warm, just past the point where you can hold it for more than a second or two, which lines up with about 60–65°C. If it feels merely warm, you stopped too early. If you can’t touch it at all, you’ve overheated and probably scalded the milk.
Five sensory tests to confirm angle:
- Sound test: Gentle “tss-tss” hiss during stretching (2–5 seconds), then quiet whirlpool hum during texturing.
- Surface motion test: Smooth, circular roll with a slight dimple at the tip; no jumping, splashing, or large bubbles.
- Visual texture test: Glossy, wet-paint look after tapping and swirling; uniform micro-bubbles throughout.
- Temperature test: Pitcher too warm to hold comfortably (60–65°C); thermometer optional but helpful for dialing in.
- Pour test: Microfoam blends seamlessly with espresso; no chunky foam or watery separation when you start pouring.
If any of these feel wrong, choppy surface, loud noise, visible bubbles, or separated layers, the wand angle is the first thing to adjust before you blame the milk, the machine, or your pour.
Practice Drills to Build Angle Consistency
Fill your pitcher with cold, soapy water instead of milk and practice the stretching and texturing motions until you can hit the 15–20° angle and the 0.5–1 centimeter depth without thinking. Soapy water foams easily and costs nothing, so you can run ten or fifteen cycles in a row, focusing purely on wand placement, pitcher tilt, and the sound of the hiss. Record yourself from the side with a smartphone propped on the counter. When you play it back, you’ll see whether your wrist drifts or the wand tip bounces up and down during the stretch.
Once you’re comfortable with water, move to milk but set a rule. Change only one variable per session. Spend one practice round adjusting just the wand angle in 5° jumps (10°, 15°, 20°, 25°) while keeping depth, time, and temperature constant, and note which angle gives you the smoothest whirlpool and finest bubbles. The next session, lock the angle at 15–20° and vary only the starting depth. Try 3 mm, 5 mm, 7 mm, 1 cm, until you can hear and feel the difference. This isolates each part of the technique and builds muscle memory faster than trying to fix everything at once.
Six drills to practice angle consistency:
- Soapy-water cycles: Steam 10–15 pitchers of cold soapy water, focusing only on hitting 15–20° angle and listening for the hiss.
- Smartphone side-view recording: Record your hand and wand position; check angle and depth frame by frame.
- One-variable sessions: Change only angle, or only depth, or only stretch time per practice round; keep all other variables constant.
- Timed stretching drill: Set a timer for exactly 3 seconds; practice stopping the stretch the moment it beeps, regardless of volume.
- Blind temperature drill: Steam without a thermometer; stop when the pitcher feels right, then check actual temp to tune your hand.
- Whirlpool stability test: Once you plunge the wand, hold it perfectly still for 10 seconds and watch whether the vortex stays smooth or breaks up.
Key Points to Remember About the Ideal Wand Angle

Position the steam wand at 15–20° off vertical, slightly off-center in the pitcher, to create the whirlpool that shears large bubbles into microfoam. Start with the tip 0.5–1 centimeter below the surface, stretch for 2–5 seconds until the milk volume rises about 20–30 percent, then plunge the wand to halfway down (2–3 centimeters from the bottom) and texture until the pitcher reaches 60–65°C. Tweak the angle and depth a bit for different milk types and pitcher sizes, but the core 15–20° tilt stays your baseline for consistent results every time.
Six reminders about steam wand angle for microfoam:
- Angle target: 15–20° off vertical, aimed slightly toward the pitcher center, never perfectly upright.
- Starting depth: 0.5–1 cm (3–5 mm) below the surface during stretching.
- Stretching duration: 2–5 seconds, listening for a gentle paper-tearing hiss, stopping at around 20–30% volume increase.
- Texturing depth: Plunge to halfway down the pitcher (around 2–3 cm from bottom) while keeping the 15–20° angle.
- Final temperature: 60–65°C; stop before the milk scalds or the pitcher becomes untouchable.
- Whirlpool maintenance: Keep the wand off-center and the pitcher tilted around 15–20° to hold a smooth, circular roll throughout texturing.
Final Words
Get back to the pitcher: set the wand 15–20° off-center, tip 0.5–1 cm below the surface. Start with a 2–5 second stretch until milk rises 20–30%, then plunge halfway and texture to 60–65°C. Listen for a soft paper‑tearing hiss and a smooth whirlpool.
Adjust tilt, depth, or time for different milks and pitcher sizes. If bubbles are big, raise 5 mm; if no air, lower slightly.
Use the ideal steam wand angle for microfoam as your default and measure by sound, flow, and sheen. Keep practicing—you’ll have consistent microfoam after a few tweaks.
FAQ
Q: What is the best steam tip for microfoam, what is the angle for frothing milk, and where should the steam wand be placed for foamed milk?
A: The best steam tip for microfoam is a single-hole or narrow nozzle that gives focused shear. Place it off-center at a 15–20° angle, about 0.5–1 cm below the surface to form a steady whirlpool.
Q: How to get microfoam with a steam wand?
A: You get microfoam with a steam wand by starting with cold milk, placing the tip 0.5–1 cm below the surface at 15–20° off-center, stretching 2–5 seconds until 20–30% volume rise, then texture to 60–65°C.