

A pricey leveler won’t save a clumpy grind.
If your shots break into thin, fast streams or spray from one side, clumps and density pockets are the usual culprit.
Distribution tools break those clumps and even the puck from top to bottom.
But if your tamper keeps tilting or you need shot-to-shot repeatability, a leveler flattens the top fast.
Which tool works better depends on the fault you see: go leveler for speed and steady tamp contact, go distribution for clump control and dialing precision.
Key Differences Between Distribution Tools and Levelers
Distribution tools move coffee grounds side to side, filling gaps and evening out density across the puck. Levelers scrape or spin across the top, creating a flat surface that stabilizes your tamp. Both cut down on channeling, but they’re solving different pieces of the puzzle.
Distribution matters because clumps and voids let water rush through weak spots. You end up with some coffee under‑extracted and other parts bitter. Leveling matters because an uneven top means your tamper hits at an angle, tilting the puck and pushing water toward one side. When you see fast, thin streams on one edge of your bottomless portafilter, that’s uneven prep happening in real time.
For beginners who can’t get consistency shot to shot, a leveler delivers faster wins. It’s harder to mess up. Set the depth once, spin three times, done. Experienced baristas who dial in by taste often lean toward distribution tools because breaking clumps gives more control over extraction evenness, especially with light roasts and ultra‑fine grinds that clump like crazy.
| Attribute | Distribution Tool | Leveler |
|---|---|---|
| Primary function | Breaks clumps, redistributes grounds laterally | Flattens top surface for consistent tamp contact |
| Impact zone | Entire puck depth, top to basket floor | Top 1–3 mm of the coffee bed |
| Speed | Slower (manual stirring, 10–30 seconds) | Faster (3–8 seconds per shot) |
| Best for | Clump‑prone grinds, precision extraction | Repeatability, high‑volume consistency |
| Cost range | $5–$60 (DIY to machined WDT) | $40–$150 (adjustable depth models) |
How Coffee Distribution Tools Work

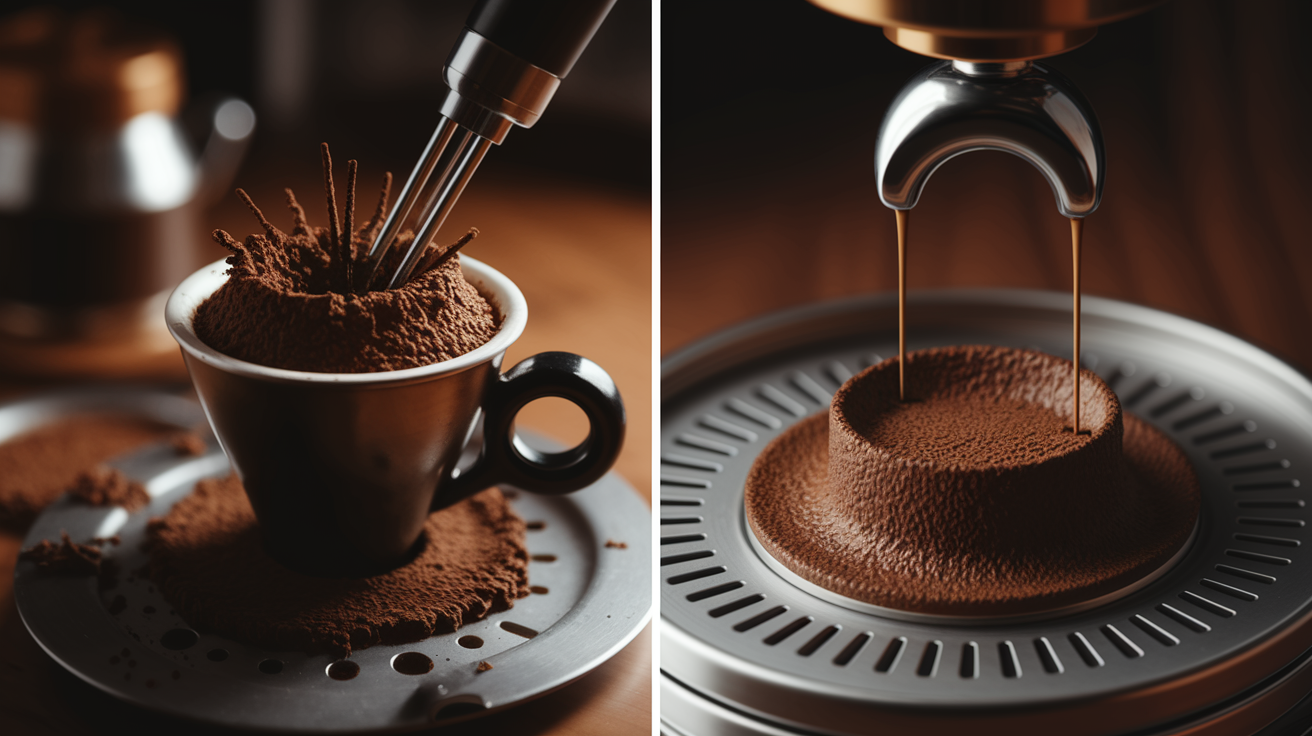
Distribution tools use thin wires or prongs to stir the coffee bed, breaking apart clumps and filling density pockets before you tamp. The most common type is WDT (Weiss Distribution Technique). It runs needles vertically and laterally through every layer, top to basket floor. When you grind fine enough for espresso, static and particle friction turn loose grounds into stuck‑together chunks. WDT pulls them apart.
The goal is uniform density across the entire puck. Not just a pretty top surface. If you skip this step with a light roast ground at 1.2 on a Niche or setting 3 on a Baratza Sette, you’ll see the shot channel within five seconds. Water finds the lightest pocket and blasts through, leaving dry clumps stuck to the basket afterward.
Insert the needles at the basket edge and move inward in overlapping circles, covering every square millimeter. Work through the top layer first, then push deeper until the tips lightly scrape the basket floor without gouging. Lift and reinsert at different angles to catch clumps you missed on the first pass. Stop when the bed looks evenly fluffy with no visible ridges, lumps, or compacted spots.
How Levelers (Puck Tampers) Work
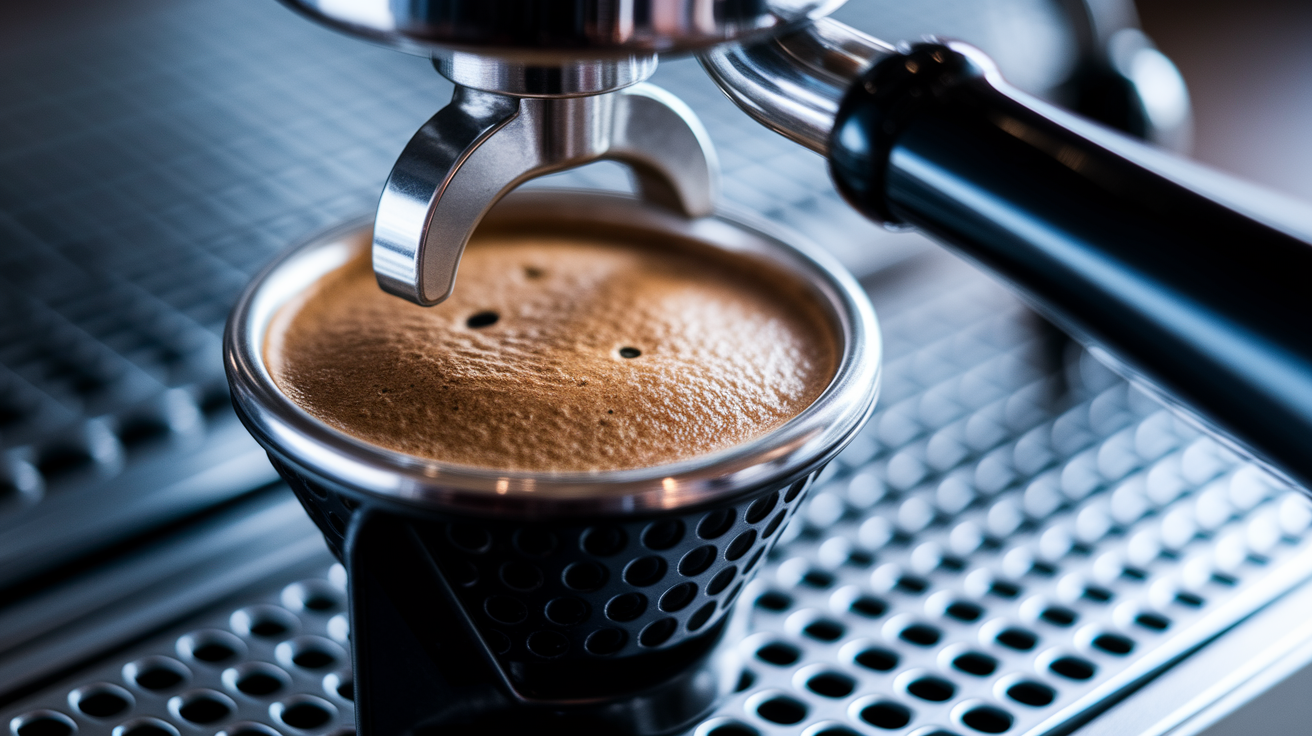
Levelers use rotating fins or blades that sit on top of the portafilter rim and spin across the coffee bed. They scrape high spots and push them into low areas until the surface is perfectly flat. Most models let you adjust depth by turning the top or base. Set it so the blades skim the grounds without digging a trench or compressing the puck before you tamp.
You get a level plane that keeps your tamper from tilting. When the tamper hits evenly, pressure spreads uniformly across the puck instead of concentrating on one side. That stops the angled flow pattern you see when half the portafilter drips while the other half sprays.
Set the leveler depth so the blades just touch the top of a filled basket without pressing down. Place the leveler on the portafilter rim and rotate three to five times in one direction. Lift straight up. If you see a flat, cake‑like surface with no valleys or peaks, the depth is correct.
Pros and Cons of Distribution Tools vs Levelers

Both tools reduce channeling, but distribution works on internal density while leveling fixes the top surface. That difference decides when each one helps and when it wastes time.
| Tool Type | Advantages | Limitations |
|---|---|---|
| Distribution Tools (WDT) | Breaks clumps throughout the puck; works with any basket size; improves extraction yield on clump‑prone grinds; low cost ($5–$60); effective on light roasts and ultra‑fine settings | Slow (adds 10–30 seconds); requires practice and a funnel to contain mess; easy to rush and miss clumps; does not flatten the top surface |
| Levelers | Fast (3–8 seconds); highly repeatable; flattens top for stable tamp; reduces tamp‑angle errors; minimal learning curve | Does not break internal clumps; only affects top 1–3 mm; requires consistent dose weight to work correctly; higher cost ($40–$150); must readjust for different coffees |
Distribution tools perform best when your grinder produces clumpy, static‑heavy output or when you’re chasing high extractions (20–22 percent yield) with light roasts. Levelers shine when you need speed and shot‑to‑shot consistency, especially in high‑volume home setups or when your tamp technique drifts between pulls.
If you grind dark roasts on a coarser setting and tamp cleanly every time, a leveler alone often delivers enough improvement. If you’re fighting channeling even after careful tamping, clumps are the likely cause. Add WDT first.
Impact on Espresso Flavor and Extraction Quality

Even distribution increases uniform flow by getting rid of the light pockets where water rushes through too fast, pulling sour, thin flavors from under‑extracted grounds. Proper leveling reduces side channeling by keeping your tamp perpendicular. That stops water from favoring one edge and over‑extracting bitter compounds there while the opposite side stays dry.
Both changes show up in the cup as better balance and clarity. A well‑prepped puck extracts more evenly across its entire mass, so you get consistent sweetness and body instead of sour brightness mixed with ashy bitterness. Measured yield climbs closer to the 18–22 percent target. Shot‑time variance drops to within one to three seconds between pulls.
Poor puck prep does the opposite. Random flow creates random flavor. One shot tastes sour and thin because water channeled early and the total contact time dropped. The next shot from the same dose tastes harsh and bitter because a clump blocked flow, forcing water to sit too long in one area. You end up chasing your grind setting when the real problem is uneven density or a tilted tamp.
Choosing the Right Puck Prep Tool Based on Budget and Skill Level

Budget and experience both matter, but the coffee you’re brewing and the consistency you’re chasing matter more. Match the tool to the problem you’re actually seeing in the portafilter and the cup.
Beginners benefit most from a leveler because it’s fast, hard to screw up, and immediately cuts down on tamp‑angle mistakes that cause obvious side channeling. A basic adjustable leveler in the $40–$60 range delivers repeatable results within two or three tries. Set the depth, spin, tamp, done.
Intermediate users who’ve dialed in dose weight and grind but still see uneven flow should add a WDT tool next. Start with a $10–$15 option or a DIY set of 0.4 mm needles and a 3D‑printed handle to test whether clump removal helps before spending more.
Beginners on a tight budget should start with a simple leveler ($40–$60) to stabilize your tamp and reduce shot‑time swings. Intermediate home baristas can add WDT ($10–$60) if you’re grinding fine for light roasts and seeing channeling even with careful tamping. Advanced users chasing precision can combine WDT first to break clumps, then leveler to flatten, then tamp. This stacked workflow produces the most consistent extractions but adds 15–40 seconds per shot.
Budget‑conscious buyers who want immediate improvement should note that a $5–$15 WDT tool or DIY needle set often outperforms a $100 leveler if clumping is the main issue. Test WDT first before buying premium accessories.
Final Words
You now have the quick playbook: distribution tools break clumps and spread grounds to fix density pockets, while levelers give a flat surface for a repeatable tamp. We covered how each tool works, the pros and cons, and the flavor and extraction effects to watch.
Start with one change: try a basic WDT or a simple leveler, keep everything else the same, and track time and yield.
Trust your ears and the puck. distribution tool vs leveler: choosing the right puck prep tool — pick what fits your skill and goals, and you’ll see steadier shots.
FAQ
Q: What is the difference between a distribution tool and a leveler?
A: The difference between a distribution tool and a leveler is distribution tools break up clumps and spread grounds to reduce density pockets, while levelers create a flat, repeatable surface for tamping—use levelers for beginners, distribution for control.
Q: How do coffee distribution tools work?
A: Coffee distribution tools work by using prongs or paddles to break clumps and move grounds laterally, reducing micro‑clumps and density pockets; use a WDT for very fine grinds to improve extraction evenness.
Q: How do levelers (puck tampers) work?
A: Levelers (puck tampers) work by rotating depth‑adjustable fins across the coffee bed to create an even surface, improving tamp consistency and reducing side‑flow for more uniform extraction and repeatable shots.
Q: What are the pros and cons of distribution tools versus levelers?
A: The pros and cons of distribution tools versus levelers are: distribution tools improve density uniformity and allow fine control but need technique; levelers give quick, repeatable flat surfaces but may leave micro‑clumps.
Q: How do these tools affect espresso flavor and extraction quality?
A: The effect on espresso flavor and extraction quality is even distribution increases uniform flow and clarity, while proper leveling reduces side‑flow; both cut channeling for steadier pressure profiles, better balance, and fewer sour or bitter shots.
Q: Which puck prep tool should I choose based on budget and skill level?
A: Choosing a puck prep tool based on budget and skill level: beginners and budget buyers should use a leveler or basic WDT for consistency; experienced users should try distribution tools for control—track time, yield, and flow visuals to confirm.