

Think a nice tamper is just cosmetic?
With a bottomless portafilter it isn’t, because the wrong tamper or a tilted tamp shows up as spurting and wasted shots.
This short guide walks you through the three choices that matter, diameter fit, base shape and tamp alignment, and gives the first troubleshooting steps to try when your shot spurts.
You’ll get one clear next move to stop edge leaks, a simple paper test for fit, and what to watch during extraction so you can fix the problem fast.
Essential Guidance for Tamper Choice and Spurting Prevention with Bottomless Portafilters
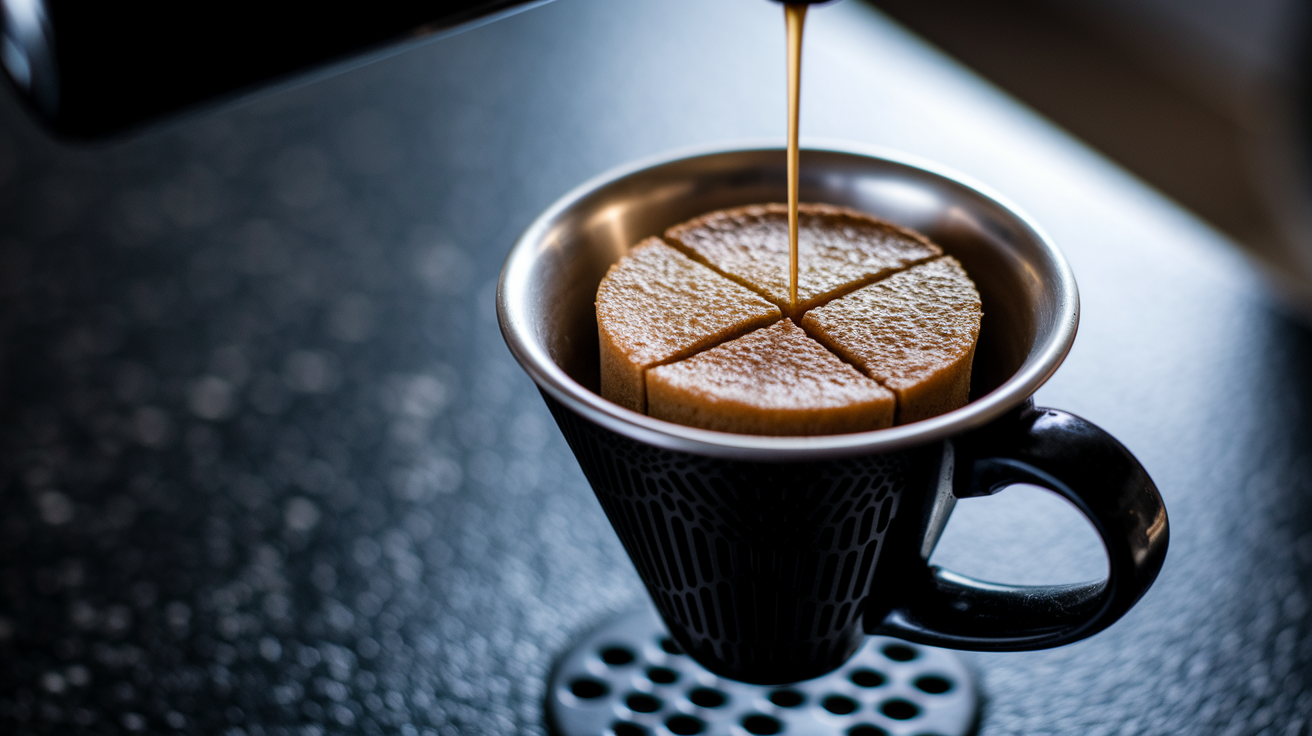
A bottomless portafilter strips away any chance to hide sloppy puck prep. Without the spout and the basket bottom, every channeling mistake shows up as a thin jet, a side spray, or one concentrated dark stream punching through a single spot. Spurting happens when water finds the easiest path through a coffee bed that wasn’t prepped evenly. Your tamper’s job? Create uniform resistance across the whole puck. So when you’re watching extraction happen in real time on a naked portafilter, choosing the right diameter, base shape, and technique actually matters.
Match your tamper to your basket diameter within about 0.1 to 0.2 mm. Most commercial double baskets measure 58 mm inside, but Breville models often use 54 mm, De’Longhi and SMEG machines 51 mm, and the Ninja Luxe Café uses 53 mm. If your tamper’s too small, it leaves a rim gap where water just rushes through the edges. A flat base works best for naked portafilter diagnostics because it compresses the puck evenly and makes it way easier to isolate what’s actually causing channeling. Tamp with steady, level pressure somewhere around 20 to 30 lb, and focus more on alignment than brute force. Typical double basket doses run 18 to 20 g. Spurting usually points back to uneven distribution, a tilted tamp, or grind and dose mismatch, not the tamper itself.
The workflow connection is simple. Clumps, voids, or uneven leveling before you tamp create weak spots that the tamper can’t fix. A perfectly sized, perfectly level tamp will still produce spurts if the coffee bed underneath has gaps or density variations. That’s why distribution tools like WDT (20 to 30 fine needle stirs through the grounds) pair with precision tamping to eliminate channeling. When spurting appears, your first response should address puck prep, tamper fit, and alignment before you start blaming grind or dose.
When spurting appears mid pull, take these four diagnostic actions first:
- Stop and inspect the spent puck for visible craters, cracks, or one sided collapse that confirm channeling location.
- Re distribute using WDT or a distribution tool, then re tamp with verified level alignment at 20 to 30 lb pressure.
- Adjust grind finer by 1 to 2 clicks if the spurt runs fast and light, or increase dose by 0.2 to 0.5 g to raise puck density.
- Test multiple consecutive shots with the same variables to confirm the correction, changing only one factor per iteration.
Precision Tamper Sizing and Fit for Bottomless Portafilters
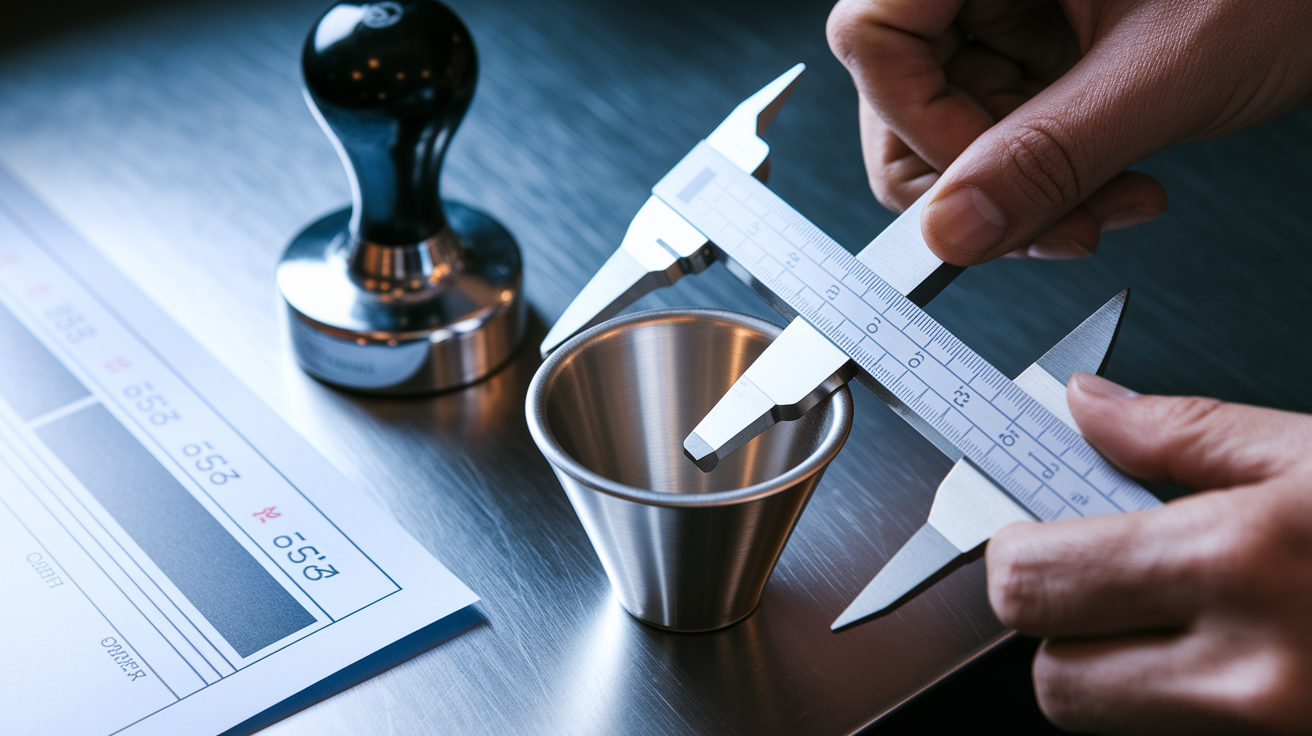
Measure your basket’s inner diameter before buying a tamper. Most baskets have a nominal size stamped on the side or listed in the machine manual, but manufacturing variance and basket wear mean the true diameter can differ by 0.5 mm or more. Use a digital caliper to measure straight across the basket’s inside rim, or place your current tamper in the basket and rotate it while watching for gaps or binding. If you see light between the tamper edge and the basket wall, you’re undersized. If the tamper binds or requires force to seat, you’re oversized. The sweet spot is a tamper that slides smoothly into the basket and makes full width contact without gaps larger than 0.1 to 0.2 mm around the rim.
A simple paper test confirms fit. Place a strip of standard printer paper between the tamper edge and the basket wall. If the paper slides freely all the way around, your clearance is too large. If the paper catches evenly and holds light tension, the fit is correct. If the tamper won’t enter the basket with the paper in place, you’re within tolerance or slightly tight, which is fine. Naked portafilters make rim gaps immediately visible as edge spurting or a ring of fast flow around the puck perimeter, so precision sizing pays off in fewer wasted shots and clearer diagnostics.
| Diameter | Machine Type | Pros | Fit Notes |
|---|---|---|---|
| 58 mm | E61 groups, commercial style machines, most prosumer home units | Widest aftermarket tamper selection, large dose capacity | Verify basket type; some 58 mm baskets are stepped or tapered internally |
| 54 mm | Breville Barista Express, Barista Pro, Barista Touch | Matches Breville stock baskets, good upgrade path from plastic OEM tampers | Stock baskets measure around 53.5 to 54 mm inside; precision tampers improve sealing |
| 53 mm | Ninja Luxe Café, some compact semi automatics | Fits niche machines, reduces edge leaks on smaller baskets | Aftermarket options limited; measure carefully before ordering |
| 51 mm | De’Longhi Dedica, SMEG ECF01, compact pump machines | Lightweight portafilters benefit from lighter tamper materials | Baskets often shallow; dose limits around 14 to 16 g mean less margin for error |
| 49 mm | Older Gaggia Classic, some single group vintage machines | Vintage compatibility, low cost | Confirm group size; some Gaggia models span 49 to 58 mm across production years |
| Custom/Precision | Any machine with measured basket diameter | Perfect fit eliminates all rim channeling caused by tamper clearance | Costs $40 to $150; justify expense if bottomless diagnostics show persistent edge spurting |
Tamper clearance influences channeling in a straightforward way. Water under 9 bar of pressure will exploit any gap wider than a fraction of a millimeter. If your tamper leaves a 0.5 mm rim gap, the outer ring of coffee compresses less than the center, and water accelerates through the looser rim zone. On a spouted portafilter you won’t see this. On a naked portafilter it shows up as a ring of blonde, fast flow or as concentrated spurts where the gap is widest. Tightening the fit to within about 0.1 to 0.2 mm makes the entire puck compress uniformly and removes the rim as a channeling source, letting you focus diagnostics on grind, dose, and distribution instead of fighting tamper fit.
Choosing Tamper Base Shape and Material for Naked Portafilter Extraction

A flat tamper base creates the most even puck density and the clearest diagnostic picture when you’re troubleshooting spurting with a bottomless portafilter. Flat means the tamper compresses the coffee bed uniformly from rim to center, so any channeling you see points to grind, dose, distribution, or alignment problems rather than geometry. Convex bases, which curve slightly downward at the center, were originally designed to help seal minor basket imperfections by pressing the outer ring first. In practice, a convex base can under compress the puck center and leave a weak zone that channels. If your basket is warped or tapered, a convex tamper may reduce edge leaks, but it also makes troubleshooting harder because you can’t be sure whether a spurt is caused by prep or by base shape.
Heavy tamper bases made from stainless steel or brass give stable, repeatable tamping. The weight does some of the work, so you apply less hand force and maintain better vertical alignment. Light bases made from aluminum or plastic require more deliberate pressure, and small variations in your grip or stance translate into tilt or uneven compression. Price ranges reflect material and precision. Basic plastic or aluminum tampers cost $20 to $40. Heavier stainless or brass models with machined flat bases and tight diameter tolerances run $40 to $150. Calibrated tampers, which click or stop at a preset force, typically cost $60 to $150 and enforce consistent pressure across multiple shots.
Tamper base choices affect extraction patterns in these ways:
- Flat base with sharp 90 degree edge gives full width compression but may bind in baskets with internal taper or stepped walls.
- Flat base with chamfered edge (slight bevel at the rim) reduces binding while maintaining even compression across most of the puck.
- Slight convex (1 to 2 mm curve) can seal rim gaps on imperfect baskets but risks leaving the center loose and prone to center channel spurting.
- Deep convex or “competition” curve is designed for specific basket profiles and competition workflows, not general troubleshooting. Avoid unless you have a tested reason.
- Coated bases (powder coat, anodized, ceramic) protect the tamper from corrosion and basket scratching but add no extraction benefit. Prioritize diameter fit and flatness over finish.
Tamping Technique and Alignment for Preventing Spurting

Level tamping matters more than tamp force. One experiment pulled five shots with tamp pressures ranging from 40 lb down to 5 lb and measured only a 3% difference in extraction results. The shots that failed? The ones tamped at an angle or with lateral movement, not the ones tamped lightly. Your goal is to apply steady, vertical pressure in the range of around 20 to 30 lb, keep the tamper base parallel to the basket rim, and avoid twisting or sliding the puck after compression. Calibrated tampers help enforce consistent pressure, but you can also train hand pressure by tamping on a bathroom scale until you feel what 25 lb or 30 lb of steady push feels like.
A slight polish, a small clockwise or counterclockwise rotation of the tamper after compression, is optional. Some baristas use it to smooth the puck surface. The key is that a polish must be gentle and must not shift the puck laterally. If you twist hard or drag the tamper sideways, you shear the coffee bed and create internal cracks that channel. The safer default is to press straight down, hold for a moment, and lift straight up. Thumb and forefinger alignment against the basket rim is a quick levelness check. As you tamp, rest your thumb and forefinger lightly on opposite sides of the portafilter rim. If the tamper base tilts, you’ll feel one finger rise and the tamper will contact one side of the basket first. Adjust your wrist until both fingers rest evenly and the tamper seats flat.
Before you tamp, wipe the basket rim and the portafilter ears clean. Coffee grounds stuck to the rim prevent a full seal at the group head and can cause top side leaks that look like spurting but are actually group gasket bypass. After tamping, inspect the puck surface. It should be flat, smooth, and level with no visible tilt, cracks, or craters. If you see an uneven surface, re distribute and tamp again rather than pulling the shot and hoping for the best.
Correct Body Mechanics for Level Tamping
Hold the tamper handle like you’re shaking someone’s hand. Your palm wraps around the handle, thumb along one side, fingers along the other. Keep your wrist straight and your forearm vertical. Tilt your wrist or bend your elbow and the tamper will tilt with it. Stand square to the counter with the portafilter directly in front of you, not off to one side. If you have to reach or twist your torso, your tamp will favor one edge.
Rest the portafilter on a tamping mat or a stable corner of the counter. A mat prevents sliding and protects the counter, but more important, it gives consistent height so your arm angle stays the same shot after shot. Press down with your shoulder and upper arm, not just your wrist. Let your body weight add steady pressure instead of gripping hard with your hand. When you reach your target force, hold for a moment, then lift the tamper straight up without twisting or dragging. The puck should release cleanly. If the tamper sticks or the puck lifts, your diameter fit may be too tight or you may have compressed unevenly.
Distribution Before Tamping to Reduce Channeling and Spurting

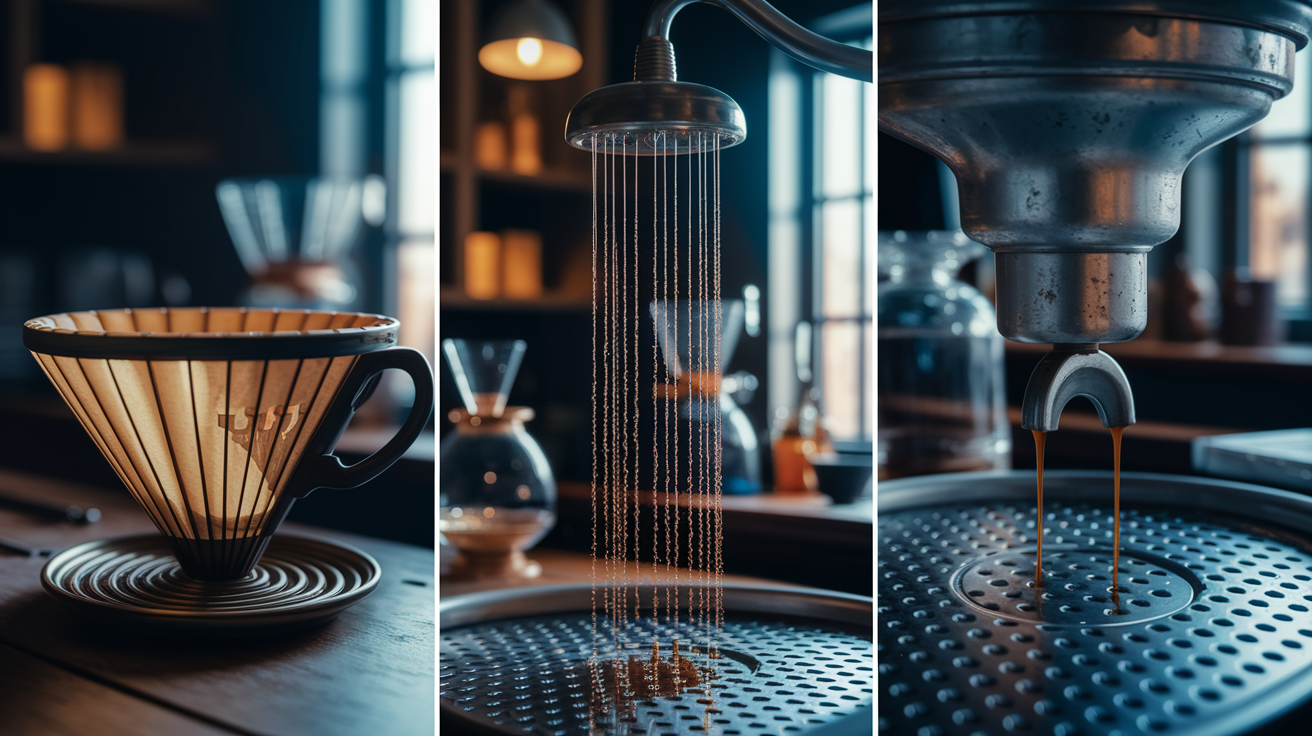
Even the most precise tamp can’t fix a clumpy, unevenly distributed coffee bed. Grinders throw grounds into the basket with random density. Grind retention, static, and the angle of the portafilter all create voids, mounds, and clumps. Those variations translate directly into channeling once water hits the puck, and a bottomless portafilter shows every density error as a spurt, spray, or asymmetric flow. Distribution tools and techniques are your first defense, applied before you ever pick up the tamper.
WDT, the Weiss Distribution Technique, uses fine needles or thin wires to stir through the grounds and break up clumps. Twenty to thirty stirs in a radial or grid pattern redistribute fines, loosen compressed zones, and eliminate large voids. You can buy a purpose built WDT tool with 0.3 to 0.4 mm needles for $15 to $40, or make one from acupuncture needles, printer cleaning wires, or even straightened paper clips inserted into a cork. The goal is to reach all the way to the basket bottom and fluff the grounds without launching them out of the basket. After WDT, the coffee bed should look uniform and lofted, not packed or lumpy. Dose accuracy matters just as much. Weigh your dose to about 0.1 to 0.2 g using a scale. Dose variation of even 0.5 g changes puck density enough to shift extraction time by several seconds and introduce channeling risk.
WDT Fundamentals
Use needles thin enough to slide between coffee particles without compressing them. Stir in overlapping circles or a spoke pattern from rim to center. Go slowly. Aggressive stirring flings grounds and creates new voids. After stirring, gently tap the portafilter on the counter or a tamping mat to settle the bed, then check that the surface is level and the dose is evenly distributed across the basket width. WDT is especially important for single dose grinders, which often produce clumpy output, and for any grinder that builds static.
Distribution methods compared:
- WDT (needles): free to $40 for a tool, most effective at breaking clumps and eliminating deep voids, requires 15 to 20 seconds per dose, works with any basket.
- Tap technique (portafilter side taps plus one mat tap): free, fast (5 seconds), effective for moderate clumping, less reliable with very fluffy or static heavy grinds.
- Mechanical distribution tools (rotor/leveler like OCD or Wedge): $30 to $80, fast (2 to 3 spins), good at leveling the surface but less effective at breaking internal clumps, requires correct depth setting.
- Stockfleths move (finger based redistribution): free, variable effectiveness depending on user skill, risks compressing grounds unevenly if done with too much pressure.
- Combination (WDT plus mechanical leveler): highest consistency, adds 10 to 15 seconds to workflow, recommended when naked portafilter shows persistent edge or random spurting despite good tamping.
Diagnosing Spurting with a Naked Portafilter

A bottomless portafilter turns invisible problems into visible evidence. Start your pull and watch the puck bottom. A good extraction begins with a slow, even darkening across the entire basket surface, then a thick, honey colored stream or twin streams that merge into a steady column of espresso and crema. The flow should be symmetrical, uniform in color, and smooth from first drip to final yield. Spurting, channeling, and other puck defects show up as deviations from that pattern.
Thin, dark, concentrated jets shooting from one spot mean water found a crack, void, or under compressed zone and punched through. Multiple thin jets or a spray pattern indicate severe distribution failure or a fractured puck. Asymmetric flow, where one side runs faster or darker than the other, points to uneven tamping, a tilted puck, or grind inconsistency. Early blonding, when the stream turns pale yellow within the first 10 to 15 seconds, signals under extraction caused by channeling or too coarse grind. A ring of fast flow around the puck perimeter means your tamper diameter is too small or your distribution left the edges loose.
Visual diagnostics are most useful when you change one variable at a time and re test. Pull a baseline shot with your current technique. Note where spurts appear, how many, and at what point in the extraction. Adjust distribution, re tamp, and pull again. If the spurts move or disappear, distribution or tamp alignment was the cause. If they stay in the same location, inspect the basket for damage, check the grind for consistency, or test a different dose. Mock tamping, where you tamp an empty or damp basket and inspect the puck surface under light, reveals tilt or incomplete contact. Blind basket tests, using a backflush blank or a disc to block flow, let you feel puck resistance and detect cracks when you press the brew button.
| Visual Sign | Likely Cause | Fix |
|---|---|---|
| Single thin dark jet from one spot | Localized void, clump, or crack in the puck at that position | Re distribute with WDT focusing on thorough stirring; check for basket damage at spurt location |
| Multiple scattered jets and spray | Severe distribution failure, fractured puck, or grind too coarse | Increase WDT stir count to 30 plus; verify grind setting and go 1 to 2 clicks finer; reduce static |
| Ring of fast blonde flow around rim | Tamper undersized or edges under distributed | Measure basket diameter and use correct tamper size; distribute edges carefully with WDT or finger |
| Asymmetric flow, one side fast/light | Tilted tamp or uneven dose distribution side to side | Check tamp levelness with thumb/forefinger alignment; verify dose is centered in basket before tamping |
| Early blonding (pale yellow within 10 to 15 s) | Channeling causing under extraction or grind too coarse for dose/pressure | Grind finer by 1 to 2 clicks; if blonding persists after grind change, increase dose by 0.5 g |
| Slow, even darkening then sudden spray mid pull | Puck fracture or internal collapse during extraction (often from over tamping or over fine grind) | Reduce tamp pressure slightly; open grind by 1 click; inspect spent puck for large cracks or sinkholes |
Common Root Causes of Spurting and How Each Relates to Tamper Choice
Spurting rarely comes from the tamper alone. It’s the result of a chain. Grinder produces uneven particles or clumps, distribution leaves voids, tamper compresses unevenly or doesn’t seal the rim, and pressurized water exploits the weakest zone. Each link in that chain connects to tamper fit and technique, but fixing spurting usually requires more than buying a better tamper.
Grind uniformity is the foundation. A grinder that produces a wide particle size distribution or excessive fines will clump and create dense spots even with perfect distribution. Adjust grind in 1 to 2 click increments and pull multiple test shots to see if spurting moves, reduces, or disappears. Static charge causes grounds to stick to the grinder chute, basket walls, and each other, forming clumps that WDT can break but that reappear if static isn’t managed. A spritz of water on beans before grinding or an anti static spray in the grinder can reduce clumping. Dose too low for the basket leaves headspace and allows the puck to shift or crack under pressure. Dose too high compresses the puck against the shower screen and can cause blowouts. Typical double basket dose range is 16 to 22 g depending on basket design. Find your basket’s rated capacity and dose within 1 g of that target for the most stable puck.
Root causes tied to tamper and prep:
- Tamper diameter too small leaves rim gaps that water rushes through, visible as edge spurting on naked portafilter. Fix by measuring basket and matching tamper to about 0.1 to 0.2 mm.
- Tilted tamp compresses one side more than the other, creating a density slope and asymmetric flow. Fix by aligning tamper vertically and checking levelness with fingers on basket rim.
- Inconsistent tamp pressure between shots introduces shot to shot variability. Fix by using calibrated tamper or training hand pressure on a scale to repeatable 20 to 30 lb range.
- Distribution skipped or incomplete leaves clumps and voids that tamping compresses but doesn’t eliminate. Fix by adding WDT or distribution tool step before tamping.
- Worn or damaged baskets with bent walls, clogged holes, or uneven rims create unpredictable flow even with perfect prep. Fix by inspecting basket under light and replacing if deformed.
- Static and humidity fluctuations change grind behavior day to day. Fix by monitoring and adjusting distribution effort and grind setting as conditions change.
Corrective Techniques for Eliminating Spurting

When spurting appears, follow a step by step corrective sequence that isolates the problem and tests one fix at a time. Changing grind, dose, distribution, and tamp technique all at once makes it impossible to know what worked. Start with the fastest, zero cost changes and move toward equipment or recipe adjustments only if simple fixes don’t resolve the issue.
Pull your baseline shot and note extraction time, yield, and where spurting occurs. Stop the shot, knock out the puck, and inspect it. Look for craters, cracks, or collapse at the location where spurting appeared. If the puck shows obvious damage at that spot, the problem is prep or basket integrity, not grind or dose. Re dose to the same weight, redistribute thoroughly using WDT with 20 to 30 stirs, and tamp level at your target pressure. Pull a second test shot. If spurting moves to a different location or reduces in severity, distribution or tamp alignment was the primary cause. If spurting stays exactly the same, move to grind and dose adjustments.
Grind adjustments should be small. Go finer by 1 to 2 clicks if the shot runs fast and spurts heavily, or coarser by 1 to 2 clicks if the shot chokes, stalls, or spurts late in the pull from puck fracture. Target extraction time for a double shot is 25 to 30 seconds, and a typical brew ratio is 1:2, for example 18 g dose to 36 g yield. If your shot hits those targets but still spurts, the problem is distribution or basket fit, not recipe. Dose tweaks should also be small, 0.2 to 0.5 g per test. Increase dose if the shot runs too fast and you’ve already hit your grind limit. Decrease dose if the puck is compressing too tightly and fracturing under pressure. Pre infusion, a low pressure water soak before full 9 bar pressure hits the puck, can reduce spurting by giving the puck time to saturate evenly. Set pre infusion to 2 to 6 seconds if your machine allows it.
Step by step corrective sequence for persistent spurting:
- Re distribute using WDT or distribution tool, tamp level at 20 to 30 lb, pull test shot, and observe flow pattern on naked portafilter.
- If spurting persists in same location, grind finer by 1 click, keep dose constant, re distribute and tamp, pull second test shot.
- If spurting reduces but shot runs too slow (over 35 seconds or chokes), return grind to previous setting and increase dose by 0.5 g instead.
- If spurting disappears but shot tastes sour or weak, continue grinding finer in 1 click steps until flavor balances and flow remains even and spurting free across multiple consecutive pulls.
Basket, Grouphead, and Machine Factors Influencing Spurting
A perfect tamp can’t overcome a bent basket, a clogged shower screen, or unstable machine pressure. Baskets wear out. The metal fatigues, holes enlarge or deform, and the rim bends from repeated knocking and cleaning. Hold your basket up to a light and look through it. The holes should be uniform in size and evenly spaced. If you see enlarged holes, cracks, or gaps in the perforation pattern, replace the basket. Check the basket rim for flatness by placing it on a flat surface and pressing down. If it rocks or you see gaps under the rim, the basket is warped and won’t seal evenly against the tamper or the group gasket.
Grouphead cleanliness affects flow distribution before water even reaches the puck. A clogged or dirty shower screen creates uneven pre wetting and can push water preferentially to one side. Backflush your machine weekly if it has a three way solenoid valve, and remove and scrub the shower screen monthly. The group gasket should be pliable, clean, and free of coffee residue. A worn or hardened gasket won’t seal the portafilter properly and can cause top side leaks that mimic spurting. Machine pressure settings also matter. Most espresso machines target 9 bar at the group. If pressure is set too high, it can fracture pucks and create mid pull spurting. If pressure is too low, extraction will be slow and uneven, and spurting may appear as the puck erodes.
Machine and basket maintenance checklist:
- Inspect basket for bent rim, enlarged or clogged holes, and cracks. Replace baskets every 12 to 24 months or sooner if damage is visible.
- Remove and clean shower screen and dispersion plate monthly using espresso machine cleaner or cafiza. Soak, scrub, rinse, and reinstall.
- Backflush with blind basket and cleaning powder weekly (machines with three way valve only) to clear residue from group internals.
- Check group gasket condition every 6 months. Replace if hard, cracked, or if portafilter no longer locks snugly at the 6 o’clock position.
- Verify machine pressure using a portafilter pressure gauge or by observing extraction flow. Adjust pump pressure or OPV (over pressure valve) if needed to maintain around 9 bar during extraction.
Workflow Optimization with Bottomless Portafilters and Precision Tampers

A tamping station keeps your portafilter stable and your tamp angle consistent shot after shot. Simple versions are just a flat mat with a raised edge to catch the portafilter ears. More elaborate stations include a holder that locks the portafilter in place and a scale built into the surface so you can dose and tamp in one position. The value is repeatability. When the portafilter sits at the same height and angle every time, your arm position and tamp pressure stay consistent. That eliminates one source of shot to shot variation and makes it easier to isolate other variables like grind or distribution when troubleshooting spurting.
Dosing scales improve accuracy and speed workflow. Dose directly into the portafilter on a scale, zero the scale, grind to target weight, stop when you hit your number, then move to distribution. This removes guesswork and catches grinder drift, retention changes, or inconsistent dosing cup technique. Record your shot data: dose weight, grind setting, extraction time, yield weight, and tasting notes. After five to ten pulls you’ll see patterns. If spurting appears only on certain grind settings or doses, you’ve narrowed the problem. If it appears randomly, the issue is likely distribution or tamp technique inconsistency.
Training Technique for Repeatable Results
Practice tamping on a scale until you can hit your target pressure, 25 lb or 30 lb, within 2 to 3 lb every time. Use the same grip, stance, and motion each rep. When you can tamp five consecutive reps within that range, move to the portafilter and apply the same mechanics. Train distribution the same way. Dose the same amount, WDT the same number of stirs in the same pattern, settle with the same taps, and tamp with the same alignment. Shoot for five consecutive pulls where the naked portafilter shows the same flow pattern. When you have that baseline, introduce one change, grind setting or dose, and observe how the flow pattern shifts. That controlled iteration is how you learn what each variable does and how to correct spurting quickly when it appears.
Final Words
Pull a shot with intent. Match the tamper to the basket within 0.1-0.2 mm, use a flat base, do a quick WDT, and aim for 20-30 lb tamp. Watch for thin jets or sprays.
If spurting happens, change one thing at a time: re-distribute and level tamp, try grind 1-2 clicks, or tweak dose 0.2-0.5 g.
This short guide on choosing a tamper for bottomless (naked) portafilters and troubleshooting spurting gives fast, repeatable fixes so you can pull better shots.
- WDT 20-30 light stirs, then level tamp
- Confirm tamper fits rim within 0.1-0.2 mm
- Adjust grind 1-2 clicks and test
- Tweak dose 0.2-0.5 g and retry
FAQ
Q: Why is my bottomless portafilter splattering? How to avoid spraying with bottomless portafilter?
A: The bottomless portafilter splattering happens when uneven puck density, tilted tamp, or rim gaps cause channeling and thin jets. Prevent it with WDT 20–30 stirs, a level tamp at 20–30 lb, grind 1–2 clicks finer, and tweak dose 0.2–0.5 g.
Q: Does a bottomless portafilter need a special tamper?
A: A bottomless portafilter needs a tamper matched to the basket within ±0.1–0.2 mm; a flat, well-fitting base is best for diagnostics. Heavier brass or stainless tampers ($20–$150) give more stable, repeatable tamping.
Q: How to tamp a bottomless portafilter?
A: To tamp a bottomless portafilter, use a level “handshake” grip with vertical alignment, press straight to about 20–30 lb, avoid twisting, polish optional, and check the puck for an even surface; start with 18–20 g for a double.