

Think a stuck gasket means you need a repair bill? You probably don’t.
Unplug, shut off the water, crack the steam valve. Safety first.
This guide walks you through safe, repeatable steps to free a jammed espresso gasket without scratching chrome or burning yourself.
You’ll get quick-start moves, the right tools, heat-softening tips, a cut-and-remove backup, and how to clean and fit the new gasket.
Follow one change at a time and you’ll save time, protect the group head, and stop leaks for good.
Immediate Quick-Start Steps for Freeing a Jammed Espresso Gasket

Unplug the machine and shut off the water before you do anything else. Crack the steam valve to dump residual boiler pressure, then wait until the group head feels cool. Metal surfaces should drop below 40°C. Working on hot or pressurized equipment means burns and rubber that won’t cooperate.
Most stuck gaskets come out in 10 to 60 minutes with basic tools you probably already own. You’ll try gentle removal first using wedges, picks, or pliers, then escalate to heat if nothing budges. The full breakdown comes later. For now, follow these five steps in order:
- Pull the portafilter and inspect the gasket edge under a light.
- Find a starting point where the lip is visible or accessible.
- Slip a plastic wedge or pick under the lip and lift gently.
- Pull slowly with needle-nose pliers if you free an edge.
- If the gasket won’t move, move to heat softening or cut and remove.
Essential Tools and Safe Methods for Gasket Removal

Get your tools together before you start. Improvising with random kitchen stuff usually scratches chrome or worse. A typical gasket removal kit includes a small flathead screwdriver ($5 to $15), a plastic or wooden wedge ($5 to $15), a gasket hook or dental pick ($8 to $25), needle-nose pliers ($6 to $25), a utility knife with a fresh blade ($3 to $10), and a hair dryer or small heat gun ($15 to $60). You’ll also need food-grade silicone grease ($8 to $25) for reinstallation and a replacement gasket ($5 to $20). Most people already have half this stuff.
Protect the chrome by wrapping the group head edge with masking tape before using any metal tool. Don’t use petroleum oils or solvents. They destroy rubber, contaminate coffee oils, and can wreck seals deeper in the machine. Food-safe silicone grease won’t leave residue in your espresso. When picking a pry tool, plastic or wood beats metal every time on chrome.
| Tool | Purpose |
|---|---|
| Plastic wedge or wooden stick | Safest initial pry; no chrome scratching |
| Gasket pick or dental hook | Lift gasket edge in tight spaces |
| Needle-nose pliers (rubber-coated tips preferred) | Controlled pulling with minimal slip |
| Utility knife with fresh blade | Radial cuts for cut and remove method |
The tools here prioritize your surfaces and repeatable results. Metal tools can work if you tape up and control your hand pressure, but one slip with a flathead will gouge chrome you can’t fix at home.
Preparing the Espresso Group Head Before Gasket Extraction
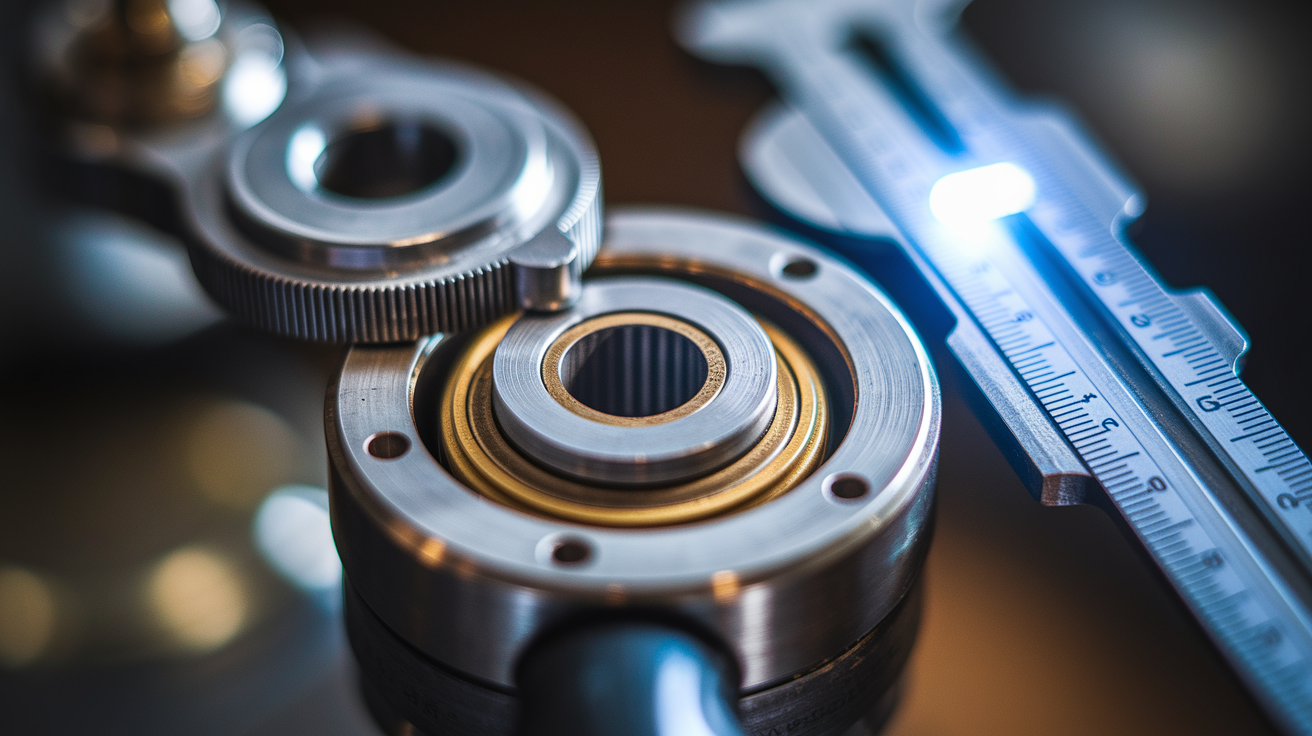
Start by pulling the portafilter and wiping away loose grounds and oils from the group head face. Use a flashlight to inspect the gasket seat. Look for corrosion, dark buildup, or visible cracks in the rubber. If you see heavy scale or tartar around the seat, the gasket’s probably bonded to mineral deposits and you’re in for extra work.
Measure the inner diameter of the group head seat with calipers or a ruler to confirm the replacement gasket size before you order. Common portafilter sizes are 58 mm for most commercial machines and 53 to 54 mm for many home models. Write it down. Guessing means ordering the wrong part and repeating the whole job.
Remove the group diffuser screw and screen if your machine has them. Soak the screen in hot water with one teaspoon of espresso cleaner while you work on the gasket. Removing the diffuser gives you clear access to the gasket edge and makes inspection easier.
Gentle Gasket Extraction Techniques for Espresso Group Heads

Find a point where the gasket lip is visible or slightly raised above the seat. Slip a plastic wedge or wooden coffee stirrer under the lip and apply steady upward pressure for 30 to 60 seconds. If nothing moves, rotate to a new spot 5 to 10 millimeters away and try again. Work around the entire circumference. This even pressure prevents tearing and cuts the chance of scratching the seat.
Once you lift a small section of the gasket edge, use a pick to hold it in place and slide the wedge deeper. You’re creating a gap that lets you grab with needle-nose pliers. Pull slowly and evenly. Jerking will tear the gasket or leave fragments stuck in the groove. For mildly stuck gaskets, expect removal in one piece after two or three minutes of patient prying.
If the gasket resists after working all the way around twice, stop. Move to heat softening. Forcing a cold, hardened gasket risks gouging the chrome or snapping the rubber into dozens of tiny pieces that take much longer to clean out.
Handling Brittle or Fragmenting Gaskets
Old gaskets often turn brittle and snap into fragments as you pull. When that happens, use a pick to trace the entire groove and lift out every piece. Missed fragments prevent the new gasket from seating flush and cause leaks. Shine a light into the seat and run your fingertip around the groove to confirm it’s completely clear.
Heat and Softening Techniques for a Firmly Stuck Espresso Gasket

If gentle prying doesn’t free the gasket, apply controlled heat to soften the rubber without damaging surrounding parts. The safest method is using the machine’s own steam wand: aim it into the group head for two to ten minutes, moving it slowly around the inside. Or flush hot water (60 to 80°C) through the group by running a blank shot with no portafilter attached. Let the water pool in the drip tray for five minutes, then drain and retry the wedge method.
A hair dryer or heat gun on low setting (around 50 to 70°C) works well for machines where internal steam access is difficult. Hold the heat source four to six inches from the gasket and move it in a slow circle for two to five minutes. Touch the group head face with your bare hand between passes. If it feels uncomfortably hot, pull back. High sustained heat can warp plastic parts inside the group or damage electronics mounted nearby.
After heating, immediately try the gentle pry sequence again. Warm rubber is much more pliable and will lift with less force. If the gasket still won’t move after two heat cycles, escalate to the cut and remove method rather than increasing heat intensity. The steps for successful heat softening are:
- Choose your heat source: steam wand, hot water flush, or external heat gun.
- Apply heat evenly around the gasket for two to ten minutes.
- Test the group head temperature with your hand; stop if it becomes uncomfortably hot.
- Immediately retry the wedge and pick method while the rubber is still warm.
- Repeat once if needed, then move to cutting if heat alone doesn’t work.
Cut and Remove Procedures for Severely Stuck Espresso Gaskets

When heat and prying both fail, the cut and remove method is your final option. Wrap the group head face with one layer of masking tape to protect the chrome finish. Use a fresh utility blade to make three to four radial cuts from the outer edge of the gasket toward the center, creating three to six removable segments. Cut only through the rubber. Stop when you feel the blade touch metal underneath.
Slip a pick under one segment and pry it out. Work around the gasket removing one piece at a time. Expect this to take 10 to 30 minutes depending on how firmly the rubber is bonded. Each cut relieves tension and makes the remaining pieces easier to lift.
An alternative technique uses a small nylon punch and light hammer taps to break the bond between gasket and seat. Position the punch at the gasket edge and tap gently. This works well for silicone gaskets that don’t respond to cutting. Rotate the punch around the gasket perimeter, tapping every centimeter until you feel the seal release.
Never use excessive force with the blade. Gouging the seat requires professional repair. Always cut radially (like spokes on a wheel), not around the circumference. Remove tape immediately after finishing to avoid adhesive residue baking onto warm metal. Inspect the seat carefully after removal; deep scratches mean the job needs a technician.
Cleaning and Inspecting the Group Head After Gasket Removal
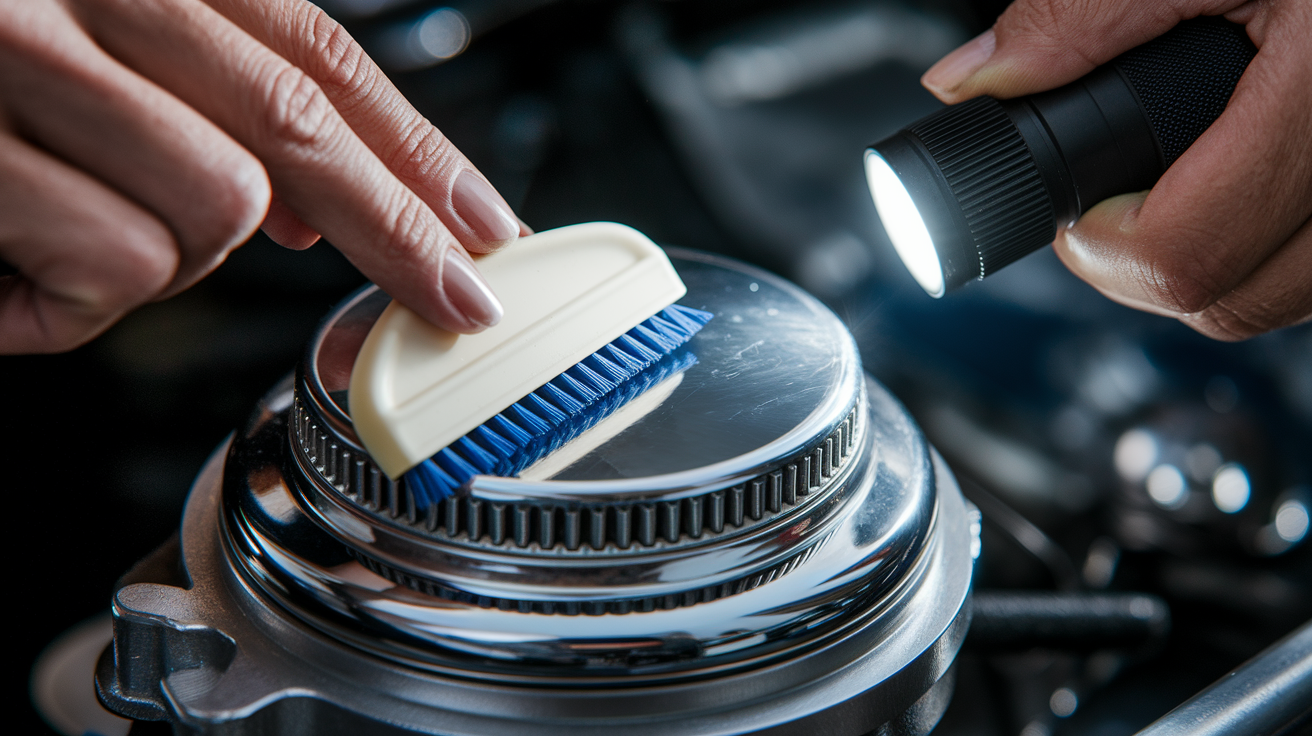
Once the old gasket is out, remove any remaining rubber fragments, coffee oils, and mineral buildup from the seat using a plastic scraper or a soft brass brush. Avoid steel brushes. They leave scratches that become leak paths under pressure. Shine a light into the seat and check for nicks, grooves, or rough spots. Minor surface blemishes can be smoothed with a fine sharpening stone or felt pad, but deeper damage needs professional machining.
If you see heavy scale deposits in the groove, soak a cloth in hot water with a teaspoon of espresso cleaner and press it into the seat for five to ten minutes. Wipe clean and inspect again. Any debris left behind will prevent the new gasket from sealing evenly.
| Issue | Action |
|---|---|
| Rubber fragments in groove | Use pick to trace entire seat; clear all pieces |
| Coffee oil residue or scale buildup | Soak with hot water and cleaner; scrub with plastic brush |
| Visible scratches or grooves in seat | Smooth minor marks with fine stone; deep damage requires service |
Installing and Seating a New Espresso Group Head Gasket
Before installing the replacement gasket, confirm the size matches your measurement from the preparation step. Common mistakes include mixing up 58 mm and 54 mm gaskets. They look similar but won’t seal properly when mismatched. Lay the new gasket next to the old one if you still have it; they should be identical in diameter and thickness.
Apply a thin, even film of food-grade silicone grease to the outer lip of the gasket. Just enough to make the surface slightly shiny. Too much grease attracts coffee grounds and can contaminate the first few shots. Press the gasket into the seat by hand, making sure it sits evenly in the groove with no twists or folds.
Use the portafilter to finish seating the gasket. Insert one ear into the group head and rotate it as far as it’ll go, then remove and repeat with the other ear. This presses the gasket uniformly and prevents high spots. After seating, the gasket should sit flush with the group head face or sit slightly proud by 0 to 1 millimeter. Any more means the gasket is too thick or not fully seated.
Reinstall the diffuser screen and screw if your machine uses them. Tighten the screw fingertip tight. Over-tightening will strip threads or crack the screen. The portafilter should now clock to roughly the 6:00 position on the group head and feel snug when locked in. Expect the gasket to loosen slightly during the first 24 to 48 hours of use as the rubber compresses under heat and pressure.
- Verify gasket size matches the seat measurement.
- Wipe the seat completely dry.
- Apply a thin layer of food-grade silicone grease to the gasket lip.
- Press the gasket into the groove by hand, checking for even placement.
- Seat the gasket by inserting and rotating each portafilter ear fully.
- Reinstall diffuser screen and screw, tightening fingertip tight only.
- Lock in the portafilter and confirm it stops near 6:00 with firm resistance.
Testing Espresso Seal Integrity After Gasket Replacement

Reconnect the machine’s water supply and power, then run a short flush without the portafilter to clear air from the group. Lock in an empty portafilter and run a low pressure test shot. Watch the gasket for any water seeping from the edge. If you see drips, the gasket may not be fully seated or the wrong size was installed.
Pull a full test extraction with coffee and observe the portafilter during the shot. A properly sealed gasket will show no leaks and the portafilter will stay locked at the same position throughout. If the handle shifts or water leaks from the group face, remove the portafilter and reseat the gasket using the ear rotation method again.
Flush the group with no portafilter attached for ten seconds. Lock in an empty portafilter and run a blank shot while watching for leaks. Pull a full espresso shot and check handle position and drips. Inspect the gasket after the first shot. Slight settling is normal. Recheck the seal after 24 hours and again at one week; retighten if the portafilter feels loose.
Preventing Future Stuck Espresso Gaskets

Replace the group head gasket every six to twelve months depending on how many shots you pull daily. Home users running one or two shots per day can stretch to twelve months; busy cafés should replace every six months or sooner. Coffee oils, heat cycling, and pressure gradually harden rubber until it bonds to the seat. Regular replacement prevents that buildup.
Clean the group head face daily by wiping with a damp cloth and backflushing weekly with espresso cleaner. Coffee oils left on the gasket accelerate deterioration and make future removal harder. Temperature cycling between brewing and idle also stresses the seal, so machines that run all day with frequent on and off cycles wear gaskets faster.
Keep one or two spare gaskets on hand so you’re not waiting for shipping when a seal fails mid-service. Store spare gaskets in a cool, dry place away from direct sunlight. Heat and UV exposure degrade rubber even when it’s not installed.
Replace gaskets every 6 to 12 months based on shot volume. Wipe the group face and backflush weekly. Avoid leaving the machine idle at full temperature for extended periods. Store spare gaskets in a cool, dark location.
When to Seek Professional Espresso Repair for Stuck Gaskets
If you discover deep corrosion, pitting, or gouges in the group head seat during inspection, stop and call a technician. These defects prevent any gasket from sealing properly and require machining or part replacement that can’t be done at home. Damaged seat threads or a cracked group head housing also mean the machine needs professional service.
Repeated gasket leaks after proper installation suggest a deeper problem: warped group face, incorrect part specification, or internal pressure issues. Photograph the gasket, seat, and any damage before reassembling; many manufacturers require documentation for warranty claims. DIY gasket replacement usually doesn’t void warranties, but unauthorized modification or damage from improper tools can.
Final Words
Unplug, depressurize, and cool the group head before you do anything else. That safety step was the first thing this guide walked you through, followed by a five-step quick-start sequence to try fast removal without drama.
We covered tool choices, gentle pry methods, heat-softening, cut-and-remove escalation, cleaning, reinstalling a new gasket, and testing. Tackle one variable at a time and document what you change.
Next: follow the quick-start steps and the safe-tool checklist. Removing a stuck espresso gasket from the group head is manageable, and you’ll be back pulling steady shots soon.
FAQ
Q: How to get a stuck head gasket off?
A: Getting a stuck head gasket off starts with safety: unplug the machine, depressurize, and cool metal below 40°C. Then work the gasket edge with a wedge, pick, or pliers; escalate if it won’t budge.
Q: How to remove a hardened gasket?
A: Removing a hardened gasket uses controlled heat to soften it or cutting into segments for removal; protect chrome with masking tape, avoid petroleum oils, and get professional help if the seat is corroded or damaged.
Q: Why does my espresso puck stick to the group head?
A: The espresso puck sticks to the group head because of a worn or gummed gasket, oily coffee buildup, or improper seal. Inspect the gasket, clean oils from the group, and replace the gasket if it’s brittle.
Q: What dissolves gasket glue?
A: Gasket glue is softened by warm water with a coffee-grade cleaner or a chrome-safe adhesive remover; avoid petroleum solvents. Test on a small area, remove residue fully, then install the new gasket.