

Think your grinder is to blame for wild shot times? Think again.
Most home baristas miss the real fix: WDT spacing and stirring.
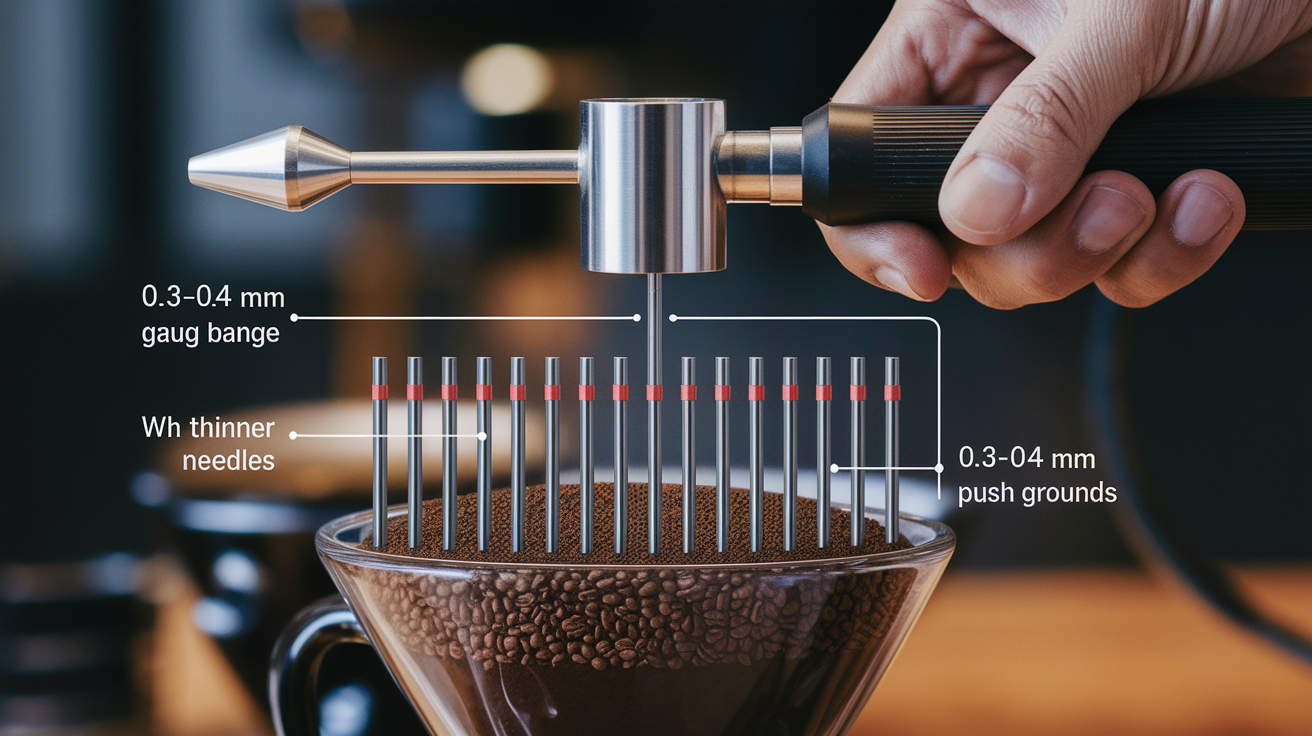
Use 3 to 5 millimeter spacing (4 mm is the practical default), 0.3 to 0.4 mm needles, and slow circular motion for 10 to 15 seconds.
That combination breaks clumps without pushing fines to the bottom and gives a fluffy, even puck you can tamp predictably.
Read on for exact spacing, needle gauge, handle tips, and a simple routine to stop shot drift.
First step: set your needle spacing to about 4 mm.
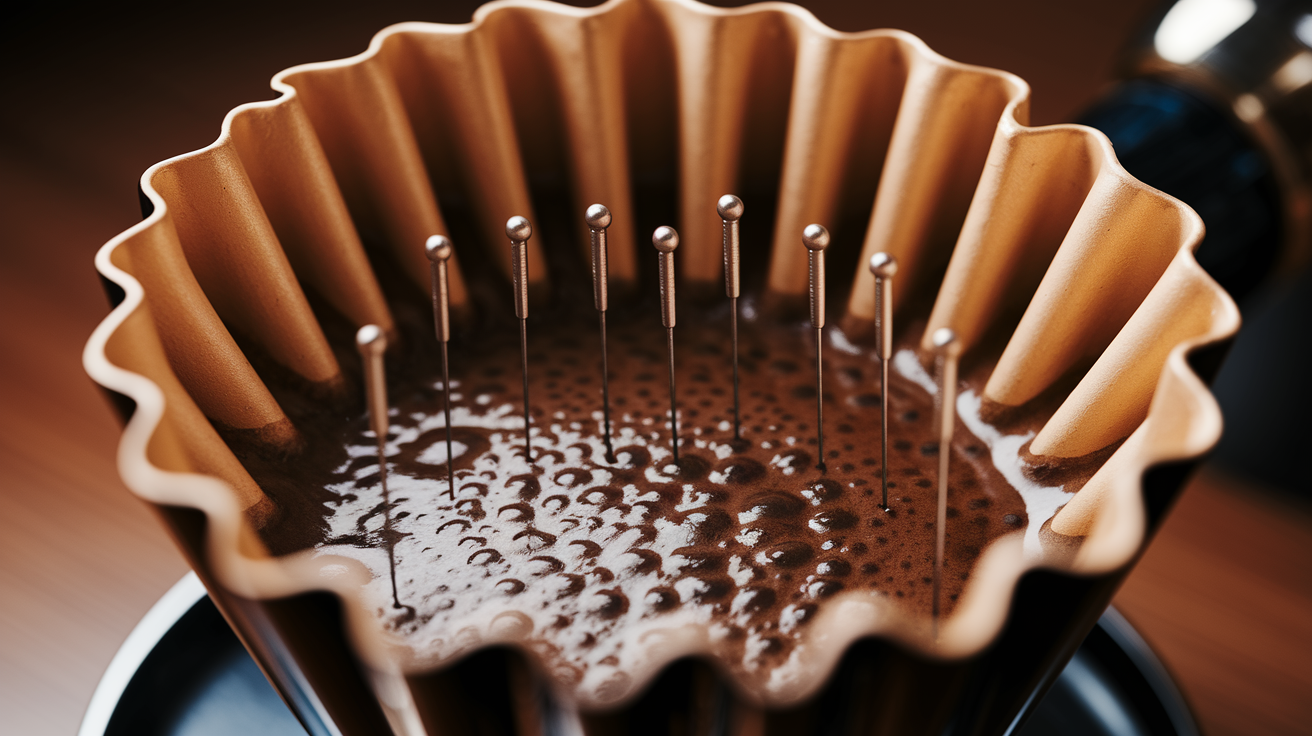
Optimal Needle Spacing and Essential WDT Technique
The sweet spot for WDT needle spacing is 3 to 5 millimeters, measured center to center. Tighter spacing around 3 mm works better when you’re grinding super fine for traditional espresso ratios, because denser coverage catches every tiny clump. Pulling longer shots or working with slightly coarser grinds? 4 to 5 mm spacing covers the basket faster without over-working the puck. Most home baristas land on 4 mm. It’s enough coverage to redistribute grounds thoroughly without stirring for half a minute.
Needle diameter matters just as much. You want needles between 0.3 and 0.4 mm, the same gauge as standard acupuncture needles. Go thicker than 0.5 mm and you’re pushing grounds around instead of slicing through clumps. You’ll feel more drag when you stir. Thinner needles glide through the coffee bed, cutting static-stuck clusters apart without compacting the fine particles toward the bottom. Stainless steel is standard. Rigid enough to reach the basket bottom without flexing, easy to clean, won’t rust or leave residue.
The core stirring motion is gentle, circular, and covers the full radius of the basket. Insert the needles straight down until the tips hover about 2 to 4 mm above the basket floor, then move your hand in slow circles that sweep from center outward to the edge and back. You’re not whipping or beating the coffee. You’re redistributing it so every cubic millimeter of the puck has roughly the same density.
Here’s the sequence for consistent WDT every time:
- Dose your coffee into the portafilter basket or a dosing cup, then tap once or twice to settle large voids. Don’t compact yet.
- Insert the WDT tool straight down until the needle tips reach near the bottom of the basket, stopping just before you feel metal contact.
- Perform 10 to 15 seconds of gentle circular stirring, working the needles from center to edge and covering every zone of the basket.
- Lift the tool slowly while making one final horizontal sweep across the surface to level any peaks or craters.
- Check the bed for a uniform, fluffy texture with no visible clumps, then proceed immediately to tamping.
Stop stirring as soon as the surface looks even and the grounds feel light under the needles. Over-stirring creates new problems. Fine particles migrate downward, forming a dense layer at the bottom that chokes flow and turns your shot sour on top and bitter underneath.
How Needle Thickness and Handle Design Influence Extraction
Needle diameter directly affects how much the tool disturbs the coffee bed. Thin needles (0.3 to 0.4 mm) slice cleanly between particles, separating clumps without shoving large volumes of coffee to one side. Increase diameter past 0.5 mm and each pass displaces more grounds, which compacts some zones and leaves gaps in others. The result is a puck that looks fluffy on top but hides density gradients underneath. Those gradients turn into fast channels the moment 9 bar hits the bed. Thicker needles also generate more friction, so your hand feels resistance and you instinctively press harder. That compounds the compaction problem. If your shots spray from random spots even after careful WDT, check your needle gauge first.
Handle ergonomics and rigidity control how repeatable your motion stays shot after shot. A well-balanced handle (wood, molded plastic, or aluminum) keeps your wrist neutral and lets you stir with your forearm instead of your fingers. That produces smoother, more consistent circles. Handles that are too short or too light wobble, and wobbly motion translates to uneven stirring depth. Commercial tools often use a cylindrical grip about 10 to 12 cm long and 2 to 3 cm in diameter, sized so your whole hand wraps around it and the tool’s weight steadies your movement. If you’re building a DIY version, prioritize a handle that feels stable when you hold it loosely. The moment you grip too hard, precision disappears and you start scraping the basket or missing the edges.
Comparing Common WDT Tools and DIY Options
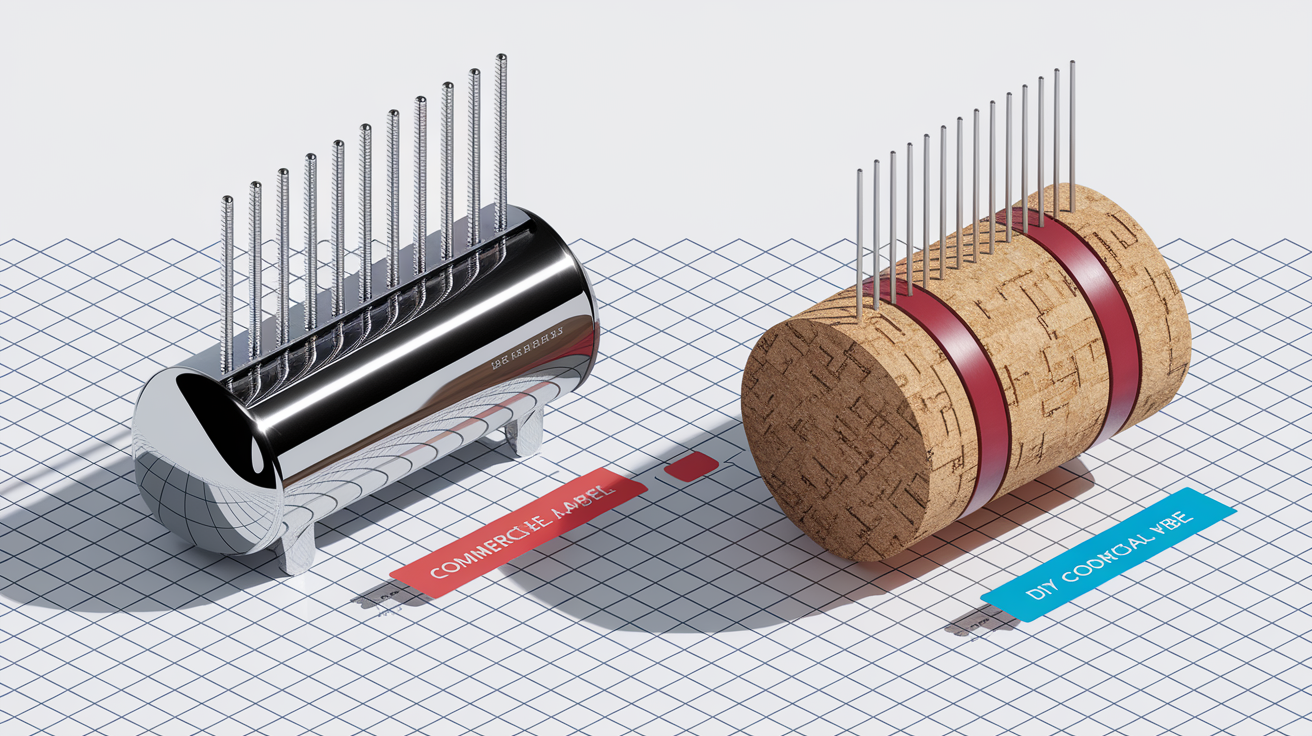
Commercial WDT tools and home-built versions both do the same job, but they differ in consistency, durability, and cost. Knowing which design suits your workflow helps you spend smarter and avoid tools that look good but perform worse than a handful of needles in a cork.
Commercial WDT Tools
Pre-made WDT tools deliver reliable spacing, matched needle lengths, and sturdy handles right out of the box. Most use 4 to 8 stainless steel needles set into a turned wood or machined plastic handle, with spacing locked at 3 to 5 mm and gauge standardized around 0.35 to 0.4 mm. You don’t need to measure, drill, or adjust anything. Cleaning is simple. Pull the needles, wipe them down, rinse the handle. The main limitation is price (commercial tools run $15 to $40) and you can’t customize spacing or replace a single bent needle without buying a new unit. If repeatability and a clean look matter more than experimenting with layouts, a commercial tool saves time and frustration.
DIY WDT Options
Building your own WDT tool costs under $5 and lets you test different needle counts, spacing patterns, and handle shapes until you find what works for your grinder and basket. The simplest version: buy a pack of 0.3 mm acupuncture needles, push 4 to 8 of them through a wine cork in a circular pattern with roughly 4 mm between tips, and trim the cork to fit your hand. You can adjust spacing in 30 seconds, replace bent needles individually, and try asymmetric layouts if you’re chasing specific flow patterns. The trade-off is durability. Corks crack, needles loosen, and uneven insertion depths create wobbly tools that scrape baskets or miss clumps. If you’re methodical about initial setup and occasional re-gluing, a DIY tool performs as well as anything commercial.
| Tool Type | Needle Gauge Range | Typical Spacing |
|---|---|---|
| Commercial multi-needle | 0.35–0.4 mm | 3–5 mm |
| DIY acupuncture-needle | 0.25–0.4 mm | 3–6 mm (adjustable) |
| Single-needle tool | 0.5–1.0 mm | N/A (one needle) |
Troubleshooting Uneven Distribution and Common WDT Errors
Most WDT problems trace back to motion, depth, or duration mistakes that leave some zones under-distributed and others over-worked. Over-aggressive stirring (fast, hard circles or vertical jabbing) breaks clumps but also drives fine particles downward, creating a restrictive layer at the basket bottom that chokes the shot and produces thin, fast flow on top with bitter sludge underneath. Too-wide needle spacing (anything over 6 mm) misses clumps entirely, especially around the basket perimeter where static loves to glue grounds to the wall. Inconsistent insertion depth is another common failure. If you push the needles all the way to the basket floor on one shot and hover halfway down on the next, the first puck gets compacted at the bottom and the second stays fluffy but loose. Your shot times swing by 5 to 10 seconds for no obvious reason.
Tilted or off-center stirring leaves crescent-shaped untouched zones that channel instantly under pressure. If you’re right-handed and always stir clockwise from the same wrist angle, the left edge of your basket probably gets half the passes the center does. Rotating your portafilter 90 degrees halfway through WDT fixes that imbalance. Another subtle mistake: lifting the tool straight up without a final horizontal sweep. When you pull needles out vertically, you leave small peaks and valleys that tamping can’t fully flatten. Those surface irregularities become the starting points for side-wall channels and early blonding.
Watch for these clear symptoms that your WDT technique needs adjustment:
- Spurting or jetting from one side of a naked portafilter during the first 5 seconds, while the opposite side stays dry.
- Shot time jumps around (22 seconds one pull, 16 the next, 28 after that) with no grind or dose changes.
- Spent puck shows a deep crater on one side and a solid disk on the other, or the whole puck is soupy and stuck to the shower screen.
- Early blonding in isolated streaks while other parts of the stream stay dark, signaling fast channels next to slow zones.
- Flavor that’s sour and sharp up front but bitter and hollow at the end, the signature of simultaneous under and over-extraction.
- Visible clumps or dark, wet patches on the puck surface even after tamping, meaning WDT didn’t break them up.
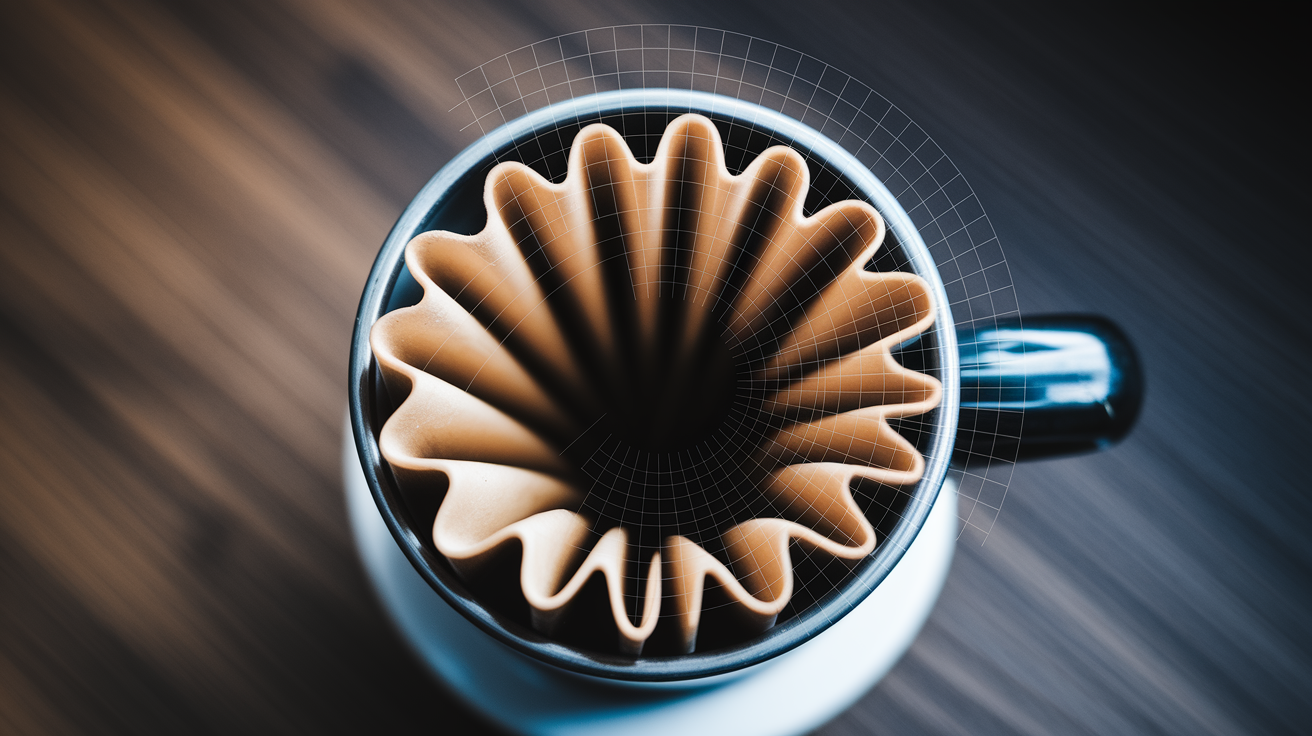
Visual Signs of Properly Distributed Coffee Grounds

A correctly distributed puck looks uniform and feels light before you tamp. The surface should be flat or very slightly domed, with no visible peaks, craters, or color variation. No dark wet spots next to pale dry zones.
Run your finger lightly across the top. Properly stirred grounds feel soft and airy, almost fluffy, not dense or packed. If you tap the side of the portafilter gently, the bed settles evenly without one side collapsing faster than the other. During the first 3 to 5 seconds of extraction with a bottomless portafilter, you’ll see coffee emerging uniformly across the entire basket bottom. No dry spots, no single strong jet, just a slow, even darkening that quickly merges into a solid stream. If one zone stays pale for more than a second while another gushes, distribution failed and you’ll taste it. Sour notes from the fast path, bitter astringency from the slow.
Final Words
In the action we ran through ideal needle spacing, needle gauge, and the stirring motion that breaks clumps and levels the puck.
You got clear steps, tool tradeoffs, common mistakes, and what a good puck looks like.
Try a 3–5mm spacing with 0.25–0.4mm needles, steady circular stirs, and one-variable-at-a-time tweaks. Watch for even color and a steady initial flow.
Keep practicing this WDT needle spacing and technique for consistent puck prep – small, steady changes bring reliably better shots.
FAQ
Q: What is the 15-15-15 rule for coffee?
A: The 15-15-15 rule for coffee is a simple starting guideline: 15 grams of coffee, 15 seconds of pre-wet/bloom, then 15 seconds to check initial flow — use it as a baseline and adjust by taste.
Q: Is the WDT tool important on puck prep?
A: The WDT tool is important on puck prep because it breaks clumps, evens the grounds, and reduces channeling risk; use thin needles and gentle circular stirs for steadier, more consistent flow.
Q: How many needles should a WDT tool have?
A: The number of needles a WDT tool should have depends on basket size; target about 3–5 mm spacing. For a 58 mm basket, 7–15 needles is common; adjust so needles cover the puck evenly.
Q: What is the 80 20 rule for coffee?
A: The 80 20 rule for coffee says 80% of results come from 20% of causes; focus on grind, dose, distribution, tamp, and bean freshness to solve most extraction and taste issues quickly.